Tutorial Three
2026-10-09T23:59
- Learn how to load images
- Learn the details of the
imagefunction
Getting started
- Start a new repository by accepting the assignment.
- Clone the repository to your local computer (in your shell, type
git cloneand the name of the repository)
Task
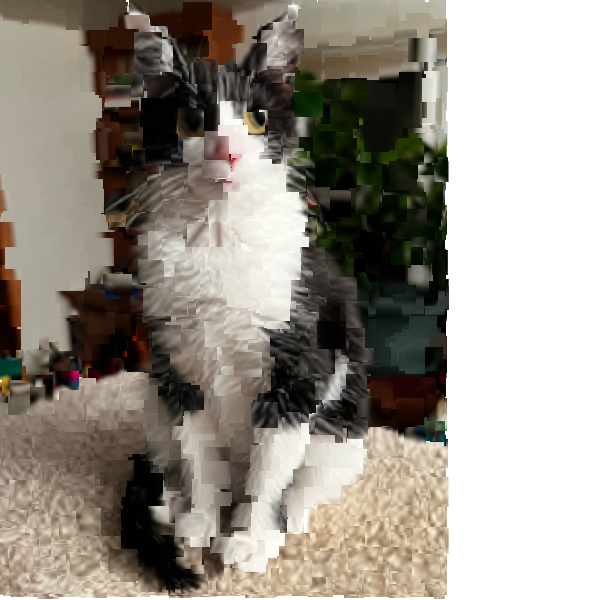
For this tutorial, you are going to make a randomized photo collage piece.
The general idea is that we will take an image, break off small pieces of it, and then paste them back together at somewhat different scales to create collage-like effect.
Links to the references for the included functions can be found at the bottom.
Part 0: Loading an image
On the face of it, loading an image into p5.js is straightforward. We have a function called loadImage and it returns a p5.Image object which we can display with the image function you have already used.
However… there is some subtlety here. The problem is that loading images is asynchronous, which p5.js doesn’t fully come out and acknowledge.
One of the core principles of good UI/UX design is to never let computation cause the application to hang. The user always wants applications to respond to input, even if the application can’t do anything until a computation completes. So, for long-running tasks (like loading an image) the actual work is passed to a different thread of execution. The command itself looks like it finishes instantly – the work just hasn’t been done yet. This releases control back to the main event loop so user input can be handled while the system waits for the long running task to complete.
This is actually one of the big changes in v2 (which aren’t using). If you switch over to v2 outside of class, be aware that this process has changed considerably.
If you read the documentation, you will see that there is an optional successCallback parameter, which is a function to be called if the image loads properly (this is a common pattern for dealing with asynchronous operations).
The second detail has to do with how we specify the image. One approach (which the documentation uses) is to specify the path to the image in the code. Note that the assumption here is that the image has been placed somewhere where the server can access it – this is not a path to a local file on your computer.
Our approach will be to allow the viewer of the site to specify their own image. We are going to use createFileInput() which adds a “Choose file” button to the page. Since this just creates a control, we will need a second callback function to handle the file once the user has added one.
So, the flow will be
- the user clicks the button
- a file dialog comes up and the user picks an image off their drive
- your file handler function is called
- you will check if the file is an image
- if it is, you try to load it
- if the load is successful, your callback is called, and you assign the image data to a variable
Okay, enough background, let’s get into it….
Part 1: Display a user’s image
Create a new variable called img at the top of the file.
Writing the file handler
Write a new function called handleFile(file) (there is nothing special about this name, just be consistent). This will be our callback when the user selects a file.
The file argument has a parameter called type. Check if this is the string “image”.
If this is an image, then call loadImage() and pass file.data as the first argument. For the second argument you need to pass in a callback function. This is a good place for a short anonymous function (check out function expressions in out JavaScript primer). The function will receive a p5.Image object as an argument and you want to save it in your img variable.
(imageData) => {
  img = imageData;
};
Create the file chooser
Now we are ready to create the file chooser with createFileInput (do this in setup). Pass in the new function as the first argument.
const input = createFileInput(handleFile);You can then position it with input.position(). Put it down below the canvas.
Drawing the image
To display images, we have the image() function, which takes in the image data, and the x and y position for the upper left corner.
Initially, img will be undefined since there isn’t an image yet. Add an if statement that checks if you have an image, and if you do, display it at 0,0.
Try it out. You should be able to load an image and display it.
Resizing
There is a good chance that the image you chose wasn’t the same size as your canvas. We want to make sure that the image fits nicely on the canvas. To do that, we will make use of one of the p5.Image object’s, functions :resize(width, height). Note that this is a method, and it permanently alters the stored image rather than returning a new resized one.
We would like to maintain the original aspect ratio of the image when we resize it. Fortunately, the resize() method supports this. If we pass in a 0 for either of the two parameters, then it will use the other value to resize that dimension, while maintaining the aspect ratio. Since we have a square canvas and we want to maximize the size of the image (which keeping it entirely in the canvas), we want to figure out which dimension of the image is larger. We can get that with img.width and img.height. We then set that dimension to match the size of the canvas and let the other one get size accordingly. So, for example, if we have an image with a landscape aspect ratio (longer width), we would use img.resize(width, 0).
In the anonymous function you passed to loadImage, add a conditional statement that properly resizes the image to just fit in the canvas.
Part 2: The cutup
The image function
Now it is time to explore the full capabilities of the image() function.
The function takes up to twelve arguments. We will actually stick to the first nine.
The key to understanding these is this picture from the documentation:
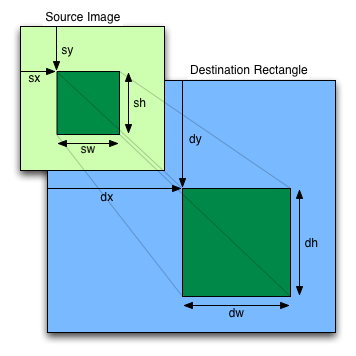
There are two important takeaways here:
- the size of the image and the space it takes up when displayed can be different
- we don’t have to display the entire image
So, the dx, dy, dWidth, and dHeight arguments control what you place on the canvas. The location is set by (dx, dy), while dWidth and dHeight control how big the piece of the image you are displaying is.
The next four arguments control how we sample from the image data. If we leave them off, we get the whole image. otherwise we get a patch at (sx, sy) that is sWidth by sHeight.
Making patches
Instead of showing the entire image, we are going to build it up in randomly selected patches.
At the top of the file, create two variables:
const MIN_SIZE = 10;
const MAX_SIZE = 50;
These will determine the bounds on the size of our image patches.
Before you display the image, create four variables: sx, sy, sWidth, and sHeight.
We want to set all four of these to random values. For sx and sy, you want to pick a position within the bounds of the image (use img.width and img.height). We are specifying the upper left corner of the patch we are extracting from the image, so to make sure we have enough pixels, don’t pick a point that is within 10 pixels of the border.
Use sWidth and sHeight to create a random patch using MIN_SIZE and MAX_SIZE. However, you don’t want to grab pixels you don’t have, so use the randomly selected position to limit the upper end of that range to make sure you stop at the edge of the image.
Add these four values to your image call, replacing the (0,0). As this runs, you should get little distorted versions of your image scattered around on the canvas. (try it)
This isn’t what we want. This is happening because those four arguments control position and size of the region we are painting on the canvas. We want our variables to be controlling the patch we are extracting from the source image.
Copy those four arguments and paste them in a second time. (try it)
Now we are specifying a patch on the original image and copying it to the canvas. As time passes, your original image should fill in.
More random!
While this sketch starts well, it very boringly returns to original the image in fairly short order. To make it more interesting, we are going to change the size, but not the position of the patches when we paint them on the canvas.
Add two more random variables dWidth and dHeight. Set them the same way you set sWidth and sHeight (but not to sWidth and sHeight)
Now, when the image fills in, it will be recognizable, but distorted in interesting ways.
Once everything is working, feel free to experiment with the patch sizes. Small patches and a big differences between the patch sizes will create more abstract forms.
There are two interesting extensions you could add to this tutorial.
- Add sliders to allow the user to control the range of the patch sizes
- Rather than making the patch sizes totally random, you could make the destination patch size dependant on the source patch size, either forcing them to be close or by forcing them to be very different.
Because the image patches will be all sorts of odd sizes, I think it makes sense to change the image mode to CENTER so that the displayed patches are as close as possible to the original location. Now the positions will refer to the center of the patches. You will need to adjust the bounds on the random calls to compensate.
Part 3: Refinement
Speed up
This is not a particular fast process. We can speed this up a little bit (and learn a little bit more about the render loop at the same time).
Each time the draw() function is called it takes time to set it up behind the scenes and display the result. Doing more during the function will speed things up.
Add a for loop around your code in the draw function (inside of the conditional). Have it repeat your random placement 50 times. You should see a big jump in speed. Experiment a little. What happens as yuo turn that up and down. Is there a point where the speed tops out?
Finishing up
- Add and commit your changes and push those commit(s) to GitHub.
- Submit your repository to Gradescope
References
Links to the reference pages for the functions you will be using:
background
createCanvas
createFileInput
image
imageMode
isLooping
key
keyTyped
loadImage loop
noLoop
random
resize