Tutorial Two
| Deliverable | Due Date |
|---|---|
| Tutorial 02 | 2026-10-02T23:59 |
| Tutorial 02 (revision) | 2026-10-11T23:59 |
- Experiment with noise
- Introduce object oriented “agents” to your toolbox
- Explore your aesthetic sense through play
Getting started
- Start a new repository by accepting the assignment.
- Clone the repository to your local computer (in your shell, type
git cloneand the name of the repository)
Task
This tutorial is going to be closely related to Tutorial 04 and the complexity example from class. This is another variation of a random walk. For this walk, rather than determining the direction for the next step at random, you are going to consult the noise() function based on where you are to determine where to go. In other words, we can image that the “floor” is covered in angles, and when a walker steps on an angle, that is the direction it will go next.
You will see that the behavior is quite different. The movement looks more purposeful, and two walkers who pass through the same location will head in the same direction. We start to get patterns that look like river systems, with small feeders joining up with central trunks.
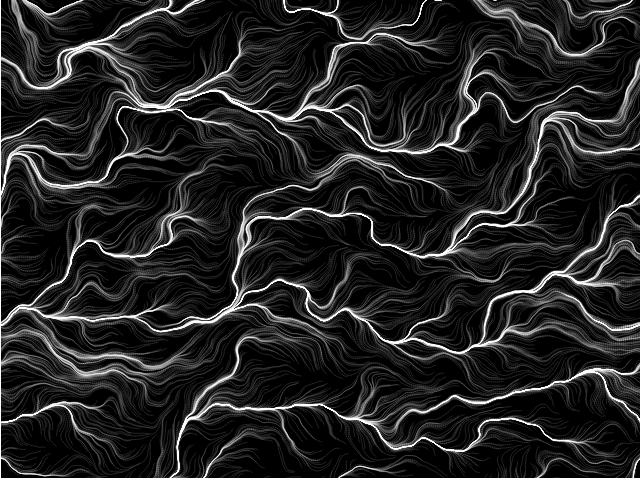
Links to the references for the included functions can be found at the bottom.
Part 1: Make an Ant
For this tutorial, we are going to introduce a major piece of JavaScript syntax: the class. This will allow us to create walkers that have both data (position) and agency (functions). We will call our walker an “ant” because it is following somewhat ant-like behavior. It appears it be wandering randomly, but when it finds the scent trail of other ants, it will follow along in the same direction.
To get you started if classes in JavaScript are new to you, here is an example duplicated from the reference linked above:
class Rectangle {
  constructor(height, width) {
    this.height = height;
    this.width = width;
  }

  // Method
  calcArea() {
    return this.height * this.width;
  }
}

const square = new Rectangle(10, 10);

console.log(square.area); // 100
There are a couple of things to note here:
- The constructor is called
constructor - Like Java, we can use
thisto refer to methods and properties of the object. Unlike Java, these don’t have to be declared. - Unlike normal JavaScript functions, we don’t need the
functionkeyword
This is not a comprehensive introduction to OO with JavaScript, but it is enough for this tutorial.
Create the class
Create an Ant class. It should have two methods: the constructor and update.
In the constructor, add a new property called position and initialize it to a new vector (createVector()). The x and y coordinates should be initialized to some random location on the canvas.
The update method
The update method will be responsible for handling the movement of the ant and drawing a trace of its movement.
The general theory is as follows: The ant will consult the 2D noise field at its current location. This will be a value from \([0,1)\). This value will be used to set the heading of the ant by mapping it to a value between 0 and 2π. You will use this to create a direction vector, which you will add to the ant’s current position, while drawing the line from the old position to the new.
Now for the details.
Recall that the smaller the step we make in noise space, the more coherent the values are. We typically add a scaling factor to the values we pass to noise to provide control over this. To make it easier to tune the behavior, add a global const called noiseScale and set it to 0.03.
The first step of update is to read the noise value for the current location. Pass in the x and y components of the position, scaling them both with noiseScale.
Then, use the map function to convert it from the range \([0,1)\) to \([0 - 2π]\). This will be the new heading for the ant.
One of the nice methods in p5.Vector is fromAngle, which allows you to create a new unit vector from an angle. Note that it takes a second optional argument that will set the length. You can use this to increase the distance the ant travels in a particular time step (try 2 to start with).
To get the ant’s new location, we can add this direction vector to it’s current location.
To give you practice with beginShape(), we are going to draw the line with beginShape(LINES), vertex() and endShape(). The sequence is:
beginShape(LINES)- use
vertexto set the start point with the position - update the position by adding the direction vector to it
- use
vertexagain with the new position endShape()
One of the big advantages of this approach is that we don’t need to hang on to two different vectors, which we would if we used line().
Keeping the ant on screen
There are a number of ways to handle the problem of the ant leaving the screen, but we will use a wrap around this time. If the positions x component exceeds width, set it to 0, and if it drops below 0, set it to width. Write this on the bottom of the update function and do the same for the y component.
Part 2: Set the ant loose
Start with a single ant to make sure it is working first. Create a new global variable to hold your ant. In setup, initialize the variable with new Ant(). Note that we can’t initialize the ant when we declare the variable because the constructor relies on createVector, which isn’t available until setup is called.
In the draw function, call the ant’s update function. We want to see the trail left by the ant, so we won’t call background in the draw function. If you want to set the background color, you need to do it in the setup function.
Your ant should now meander across the screen. If you adjust the noise scale, you will be able to control how direct the path is.
Part 3: More ants!
The single ant is not that exciting. Things only really pick up when we add more ants and start to get interesting patterns through emergence.
Replace the single global variable with an array, and load it up with ants in the setup function. In the draw function, iterate through the ants and update each in turn. The above picture has a couple of thousand ants in it.
Aesthetically, I like to have the ants draw in white with a very low alpha value on black. This makes the points where the ants converge stand out more and makes a nice background where the individual ants started. You should play with this a little and find a combination you respond positively to.
Part 4: “Killing” the ants
One of the things you will notice is that after a few moments, the picture stops changing very much. What happens is that the ants all eventually cross into one of the major thoroughfares and once on it, there is no way off, since they are subject to the directions in the noise space.
One way to keep the image evolving a little bit is to give the ants “life-spans”. Add a new property to the Ant class called life. On every call to update, you will subtract from this variable. If the value hits zero, the ant “dies”. Of course, we want to keep drawing, so we will resurrect the ant in a new random location and with a restored life-span.
Make the ant’s life a random value. If they all have the same life-span, there will be obvious moments when all of the ants suddenly jump to a new location.
Part 5: Play
I would like you to play around with this a little bit and change it a little bit from the description above.
You should certainly play around a bit with color, noise scale, and the distance the ant’s move per update cycle.
You could color by age, or you could keep track of how many times the ant as been resurrected and use that to control color.
You could add a little bit more chaos by using the third noise argument so that not all ants are following exactly the same directions. For example, I made an example where every time an ant was resurrected, it would advance to the next “layer” of 3D noise space (technically, the space is continuous, but if we keep a fixed step size, we can think of it as layers).
Experiment and see if you can make something that you find aesthetically pleasing.
Finishing up
- Add and commit your changes and push those commit(s) to GitHub.
- Submit your repository to Gradescope
References
Links to the reference pages for the functions you will be using:
background
beginShape
createCanvas
createVector
endShape
fromAngle
map
noise
random
stroke
p5.Vector
vertex