Practical Seven
| Deliverable | Due Date |
|---|---|
| Practical 7 | April 21, 2026 at 11:59 PM |
| Practical 7 (revision) | May 07, 2026 at 11:59 PM |
Goals
- Learn how to add password authentication to an application with Supabase
- Learn how to protect your database with Row Level Security
- Learn about React Context providers and
useContext
Background
In this practical we are going to create a simple message board application. All users will be able to read the board, but only authenticated users will be able to post new content.
Prerequisites
Create the git repository for your practical by accepting the assignment from GitHub Classroom. This will create a new repository for you with the Next/React infrastructure in place.
Clone the repository to you computer with
git clone(get the name of the repository from GitHub).Open up the
package.jsonfile and add your name as the author of the package.Install the module dependencies by typing
pnpm installin the shell in the terminal in the root directory of your package (the directory that contains the package.json file).Get some practice with our new workflow and start by making a feature branch in your repository.
Make sure that you have completed the Getting Started steps and have Docker Desktop installed.
Setting up Authentication
We are going to be using Supabase’s authentication manager (Auth) along with Google’s OAuth API. The setup is a little involved, so work through this carefully.
Configuring Google OAuth
These instructions are based on the Supabase instructions. I attempted to distill them down for you, but feel free to refer to them for more details.
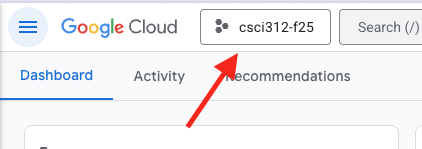
The first thing we need to do is set up the project on the Google side. Start by visiting the Google Cloud Platform dashboard. At the top, you will find a button that opens the project picker. If you have created other projects, it will have a name like mine.
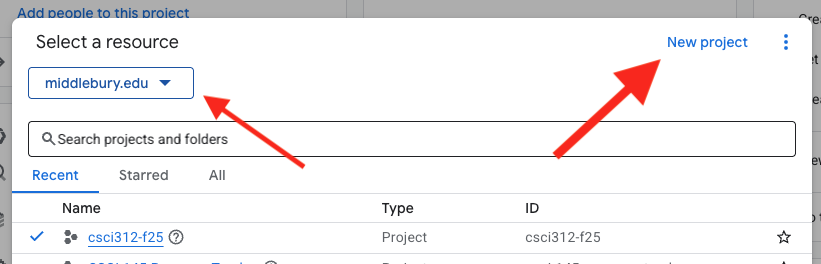
In the picker, Make sure you are in the middlebury.edu organization and then create a new project. You can name it whatever you like. I recommend something like “csci312” (you should be able to use the same project for your group projects).
Next, we want to visit the Google Auth console (conceptually there is a way to get there from the platform dashboard, but honestly I can never reliably find it, so just follow this link). It should say that authorization isn’t configured yet, so click the “Get Started” button. If you don’t have the button, go to the Branding pane from the menu on the left.
- Give the app a name. Set this to “Practical 07” (this is the name of the application that is requesting authentication)
- Set the user support email to you Middlebury email address
- Set the audience to “internal” which will restrict your users to middlebury.edu addresses
- Add your email address for the contact information
- Agree to the Google API services
- Click Create at the bottom
Now select the Data Access pane from the left menu and then click “Add or remove scopes”. This is where we are setting what user information we want our application to request from the user. This will bring up a long list of options. We want ../auth/userinfo.email. This will ask for the user’s email address. We don’t really need anything more for this practical. Click “Update” (or “Save”) at the bottom of the panel, and then click “Save” at the bottom of the Data Access page.

Now you should go to the Clients pane from the left side menu. Click the “Create client”.

The settings should be:
- Application type - Web application
- Name - whatever you like, this is just for internal naming – I called mine Practical 07
- Authorized JavaScript origins - http://127.0.0.1:5173
- Authorized redirect URIs - http://127.0.0.1:54321/auth/v1/callback
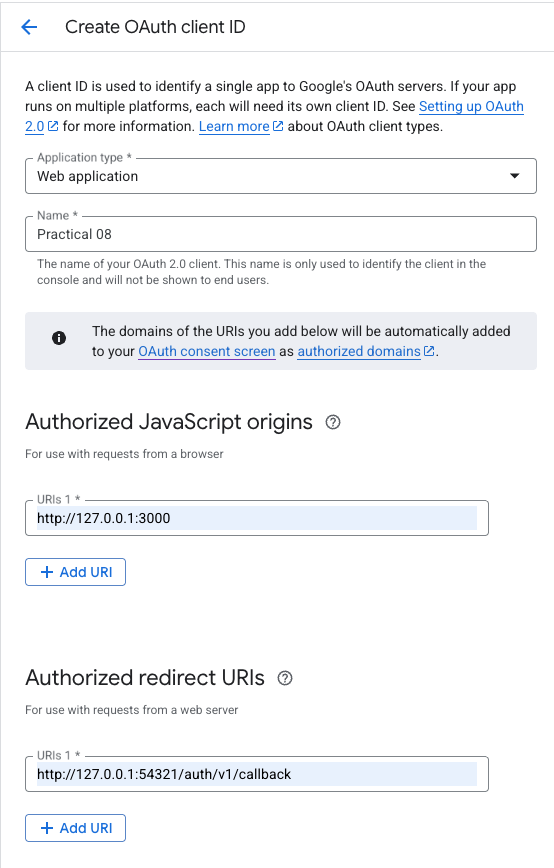
Click “Create”. This should give you two values, the client ID and client secret. Copy those somewhere safe for a moment.
The “Authorized JavaScript origins” address is the address of the server that served the page making the request. For the practical we are setting this to our local development server. Notice that this includes the port so if you have multiple servers running and you pop over to a different port number, this won’t work. For your project, you will want to include the address of the server running the deployed version as an additional authorized origin. For full production use, we would remove the local development origin.
When your application makes a request of Google for log in information, it is going to redirect the user to a Google page for the log in (or account selection). When they are done, Google needs to know where to redirect the user to next (and send the user data). This is where the “Authorized redirect URIs” come in.
Look carefully at the port number there – that is the port of the Supabase API server running on your local machine. it has a route for /auth/v1/callback that will collect the user data, store it in the database and then redirect back to our application. Again, you will want to add a different URI for your deployed projects. It will be the same as the URI of your production Supabase project.
The address 127.0.0.1 is a special one called the “loopback address”. It routes back to the same machine that requested it. Practically, this is the same effect we get when we use “localhost” in the address, though there are some differences. There was a time when we could use them interchangeably, but that day has come and gone. For the purposes of security, we need to be consistent which one we use. Vite uses localhost by default and Supabase uses 127.0.0.1. The easiest one to change is Vite, so if you look in vite.config.ts you will see that I have set it up to use 127.0.0.1 as the host. For your projects, I already made that change for the deployed code, but you may need to add the server portion to your configurations to do local development with auth enabled.
Configure Supabase to use Google
Now we can finally move to our local code.
Add the client secret to your .env file as `SUPABASE_AUTH_EXTERNAL_GOOGLE_CLIENT_SECRET.
Open supabase/config.toml. Search in the file for [auth.external.apple]. Immediately before that add the following:
[auth.external.google]
enabled = true
client_id = "<client id>"
secret = "env(SUPABASE_AUTH_EXTERNAL_GOOGLE_CLIENT_SECRET)"
skip_nonce_check = false
Replace <client id> with the client id you got from Google (make sure to retain the quotes). Save the file and then start the local Supabase instance (or restart it if you already fired it up).
Take a breath – you made it through the configuration.
Getting to know the Messages App
The application we are working on is a very simplistic message board.
index.tsx
I would like you to take a moment to read through the code to understand what is going on. The bulk of the application can be found in app/routes/home.tsx. There is a collection of things going on in there, but in very broad strokes there are only a couple of things to note
- we have a loader that is fetching a collection of messages from the database
- the messages are mapped into
MapViewcomponents and displayed - there is a
useEffectthat is polling the database for changes
The piece that you have not seen before is the useEffect (and the associated useRevalidator). The useEffect is a lifecycle hook that comes with React. It takes a function and a watch list. We can think of it as a way to add some functionality outside of the rendering pass. A frequent use for it is to fetch resources from some slow service (like a remote database). We have not needed it because we have the clientLoader function.
The key to the useEffect is the watch list. If the array is empty, the effect will run once when the page loads, but it won’t run again, no matter how often the component is changed and re-rendered. If we put values in the list, then a change of those values will trigger a run of the function. Typically, these will be state variables or props.
We are going to use it to be able to see new messages appear when they are posted, rather than having to reload the page over and over. just to see if anyone has posted anything. Supabase does have some real time facilities to support this behavior. However, in the interest of simplicity for this example, I thought I would show you an old school approach based on polling. The idea is that the client just goes out and re-fetches the message list from time to time.
This is set up in the useEffect. In the useEffect, I have a line that looks like this:
 const timeout = setTimeout(() => {
      revalidator.revalidate(); // Re-runs the clientLoader
    }, 5000); // Poll every 5 seconds
This schedules the revalidator to run five seconds in the future. The revalidator causes RRv7 to “revalidate” the component, which means calling its loader again and then re-rendering. In truth, we could set this to a pretty long wait since we don’t really have other people posting messages for us…
The other important piece of this is the return value of the useEffect which we have never talked about. If we return a function from a useEffect, the function is run when the component is closed. If we have any kinds of subscriptions then this is the place to shut them down.
return () => clearTimeout(timeout);Since this is just a setTimeout and we only have the one page, we don’t need to be too worried about this. However, with a more complex page it would be messy for the component to try to revalidate after it had already been removed from the page.
The database schema
I have set the database schema up for you already. Reset the database with pnpm db:reset to apply the migration.
We have three tables we will care about: messages, profiles, and users.
The users table is a special one that is set up and maintained by Supabase to handle our users. When someone logs into our application this table will be updated with their information. This table hides in the auth schema. Open up your Supabase dashboard. Go to the Table Editor. On the left, you will see that you can change the schema. If you change the schema to auth you will see a collection of tables, with users at the bottom. There isn’t much to see here since we don’t have a user yet.
The other two tables are in the public schema. Switch to the Database view and make sure you are in the public schema. This will show you the structure of our tables.
The profiles table looks like it is just duplicating the auth.users table. Why are we bothering? For security purposes Supabase won’t allow us to expose the tables in auth to our clients. So, if we want to use any of the data in it (like the email addresses), we need to make our own copy. The profiles table is a pretty common solution and it provides a place for us to put other profile data like name, photos, etc…
The messages table is where we have our application specific data and is pretty straightforward, with fields for the id, timestamp, and body. Things get interesting with the user_id field. First, I set the default to auth.uid(). This is a function that returns the id of the currently logged in user. So, if we insert a message into the table without specifying the user, it will set the user automatically. Second, it has a foreign key to the profiles table, which itself has a foreign key to auth.users.
Open up the migration file. You will find the schemas for the two tables including the syntax for establishing the foreign keys. At the bottom of the file, however, you will find the magic that populates the profile page. While we could handle this from the client code we can take a shortcut since we already have all of the information we need.
The first thing you will see is the function handle_new_user.
create or replace function public.handle_new_user()
returns trigger
set search_path = ''
as $$
begin
  insert into public.profiles (id, email)
  values (new.id, new.email);
  return new;
end;
$$ language plpgsql security definer;
This is what is performing the insertion into the profiles table. The next thing you will see is the trigger:
create or replace trigger on_auth_user_created
  after insert on auth.users
  for each row execute procedure public.handle_new_user();
This detects when a new user has been added to auth.users and then calls handle_new_user. Both of these live in the database itself, which gives them full power to access everything.
Row Level Security (RLS)
While we are in the migration file, let’s set up the RLS setup. RLS allows us to lock down our database tables so the general public can’t use our public API access and do whatever they want with our database. The first thing we want to do is enable it on our tables. Under the block creating the public.messages table, add
alter table "public"."messages" enable row level security;With no policies in place, the table is now inaccessible.
For our message board we would like everyone to be able to read the messages, so we can add a policy that provides SELECT access. Add the following below the line enabling RLS for the table.
CREATE POLICY "Enable read access for all users" ON "public"."messages" FOR SELECT USING (true);On the other hand, we only want logged in users to be able to write messages. more critically, they should only be able to write messages that are associated with their user_id.
CREATE POLICY "Enable insert for users based on user_id" ON "public"."messages" FOR INSERT WITH CHECK ((select auth.uid()) = user_id);The auth.uid() function is available in our policies to query the user data associated with the request. The user_id would be data that was part of the insertion.
Let’s do the same for the public.profiles table. This should follow the same pattern:
- Enable RLS
- Allow all users to read all rows
- Allow authorized users to add profiles for their own id
The Supabase dashboard has a good collection of templates for creating policies. One approach is to go to the Authentication page in the dashboard and select “Policies”. From that page you can create new policies using their templates as starting places. Once you have worked out the policy, then you can transcribe them into a migration.
This would also be another valid use of AI assistants. They seem to be pretty good at identifying where you have forgotten things with your RLS policies. That said, I trust them when they say “this is missing”, but they are not validators and should not be your sole way to make sure all possibilities are covered.
Database functions
The last stop of the tour is app/data/dbFunctions.ts. I am not going to dwell here, but I just want you to point out a few things about how we are getting the data out of the database. We have two functions fetchMessages and insertMessage. These do what you would expect. You can look at fetchMessages as another example of fetching joined data.
What I wanted you to notice in here is the typing. One of the things we can do is get Supabase to generate the types for our data stored in database tables.
To generate the types, we can run something like:
supabase gen types typescript --local --schema "public" > app/types/database.types.tsYou can take a look in app/types/database.types.ts to see what it output (though it is not the most readable document).
In app/data/supabaseClient.ts I added
import type { Database } from "@/types/databaseTypes";and changed the call to createClient to createClient<Database>(SupabaseUrl, SupabaseAnonKey). This tells Typescript the return type of our basic selection queries.
We can also get types that correspond to particular tables like this:
import type { Tables } from "@/types/databaseTypes";

type MessageRow = Tables<"messages">;
Unfortunately, this is less helpful for queries that involve multiple tables, so I had to do some type manipulation to get working types.
Okay – the tour is over.
Managing the user
We will start with the basic functionality of logging in and out.
Go to app/components/LoginStatus.tsx. We will start by putting all of the user logic in here.
Add two state variables in here: user and error.
Create a helper function called signIn.
  const signIn = useCallback(async () => {
    setError(null);
    const { error } = await supabase.auth.signInWithOAuth({
      provider: "google",
    });
    if (error) setError(error.message);
  }, []);
You will need to import supabase
import { supabase } from "~/data/supabaseClient";The important part of this function is await supabase.auth.signInWithOAuth({ provider: "google"}).
The useCallback hook is another on of React’s built in hooks. It basically remembers the function definition so it doesn’t keep getting redefined every time the component reloads.
Now replace the return statement with this:
let item: React.ReactNode;
  if (user) {
    item = (
      <div>
        <p>Hello {user?.user_metadata?.name}</p>
      </div>
    );
  } else {
    item = <input type="button" value="Sign in with Google" onClick={signIn} />;
  }

  return (
    <div>
      {item}
      {error && <p>{error}</p>}
    </div>
  );
You should now have a button on the page. When you click it, Google should try to log you in. However, we are not quite there yet.
We have logged in, but we don’t yet have the user data. We get the user data from the supabase client with supabase.auth.getUser(). The nice thing about this is that once we are logged in, everything can access the user using the supabase client. However, it is an asynchronous process, which is why we created the user state variable.
So, we are going to add a useEffect.
useEffect(() => {
  const getUser = async () => {
    const {data: { user: newUser },error,} = await supabase.auth.getUser();

    if (error) {
      // 400 just means no session exists (user not logged in)
      // we won't treat this as a real error
      if (error.status !== 400) {
        setError(error.message);
      }
    } else {
      setUser(newUser);
    }
    };

  getUser();
  // Subscribe to auth state changes
  const { data: sub } = supabase.auth.onAuthStateChange((_event, session) => {
    setUser(session?.user ?? null);
  });

  return () => {
    sub.subscription.unsubscribe();
  };
}, []);
The getUser should be pretty easy to follow, we are just doing another async data access. The only extra parts there are so we can store and display the error instead of just dumping it to the console.
There is a new part, however. The supabase.auth.onAuthStateChange subscribes to changes in authentication, so if we lose our log in for any reason, this will drop the user object. As before, we are using the return statement to unsubscribe from this subscription.
Okay, now we should be able to log in and see the user name.
We should let the user log out as well.
Add another helper function:
  const signOut = useCallback(async () => {
    setError(null);
    const { error } = await supabase.auth.signOut();
    if (error) setError(error.message);
  }, []);
Note that we don’t need to handle the user state variable because our subscription will detect the change for us.
Then add a log out button under the user name
<div>
  <p>Hello {user?.user_metadata?.name}</p>
  <input type="button" value="Sign out" onClick={signOut} />
</div>
Now you should be able to log in and out.
Now that we have this working, let’s wrap this in a little bit of abstraction so this component can concentrate on rendering.
Creating a hook
What we are going to do is to wrap the functionality in a custom hook called useUser.
Create a new file app/hooks/useUser.ts. Add a new function to the file:
export default function useUser() {

}
Move the two state variables, the useEffect, signOn and signOff into the hook. Then return all of the relevant pieces with
return { user, error, signIn, signOut };Replace all of the things you have removed with
const { user, error, signIn, signOut } = useUser();Make sure that everything still works.
The hook provides us some abstraction, making sure that LoginStatus really is a display component and all of the code required for managing the user is nicely tucked away in a different location. However, we are going to want to use the user object in other places in the code…
Contexts
This is a small app, but we need access to the user almost everywhere. As we have seen earlier, the solution is to lift the state up to the highest point in the hierarchy where everything that needs it is under the node holding the state. In our case, that would be the Home component in app/routes/home.tsx, but App in app/root.tsx would probably be appropriate if we ever wanted to add more pages. That is simple enough. Remove the const { user, error, signIn, signOut } = useUser(); from LoginStatus and put it in App. Now, to get these four things back to LoginStatus we need to add them to the props, passing them down the chain to LoginStatus. This approach leads to something called “props drilling”, where we are just passing these values along through the props of components that don’t even care about them. This is annoying and it adds to our technical debt as we now need to “touch” a number of unrelated components every time we want to make a change.
The alternative is something called a Context. We wrap the top level component with a context, which contains a value. Now, any component under that node, no matter how deep, can access that value without having it pass through the props of all of the intervening components (the truth is it actually does still pass down, it is just handled behind the scenes for us now).
We will create our context in useUser.ts1.
The first thing we need is a type for the hook.
export type UserHookType = {
  user: User | null;
  error: string | null;
  signIn: () => void;
  signOut: () => void;
};
Now, we can create a typed hook with createContext
export const UserContext = createContext<UserHookType | undefined>(undefined);This says that the context can hold the data our useUser hook returns, or it could be undefined. We have also initialized it to undefined.
Import this into app/root.tsx. We are now going to wrap the Outlet in the new context.
 const userData = useUser();

  return (
    <UserContext.Provider value={userData}>
      <Outlet />
    </UserContext.Provider>
  );
Notice how we are setting the value of the context to the structure returned by the useUser hook. Anything that falls in the hierarchy of any node within <UserContext.Provider value={userData}></UserContext.Provider> will be able to access the context using useContext(UserContext).
Another convention is to write another custom hook that wraps useContext to simplify the code that uses it. So, return to useUser.tsx and add this:
export function useUserContext() {
  const context = useContext(UserContext);
  if (!context) {
    throw new Error(
      "useUserContext must be used within a UserContext.Provider",
    );
  }
  return context;
}
The advantage to this pattern is that users of the context don’t need to know that they are using a context (though our name gives the game away here), they are just using a hook. Return to the LoginStatus component and replace useUser with useUserContext. Everything should still work.
Posting new notes
Now that we have our user, we are ready to add the functionality to our message board that allows logged in users to post messages.
newMessage component
We are going to start by looking at the NewMessage component in app/components/NewMessages.tsx. You will see that this looks like a simplified version of the editor we wrote for Code Cache. This time we just have the one field. The missing functionality is in the postMessage function.
Here is what that function will look like:
  const postMessage = async () => {
    if (!user) {
      setError("there is no logged in user");
    } else {
      const insertError = await insertMessage(message);
      if (insertError) {
        setError(insertError.message);
      } else {
        setMessage("");
        setError("");
      }
    }
  };
The missing piece is the user. Now that we have the user information in the context, we can just break out useUserContext and add it to the component (make sure it is added to the top of the component, and not within postMessage). Note that since we only need user this time, you can use destructuring to just extract that value and ignore the other three.
Incorporating NewMessage
Now that we have the NewMessage, let’s add it to the interface in app/routes/home.tsx. We want it to only be an option if the user is logged in. So, under the message list, add this:
{user?.email && (
  <div>
    <hr style={{ border: "1px solid lightgray", width: "80%" }} />
    <NewMessage />
  </div>
)}
Once again, we need that user object, so add it in with useUserContext.
You should now have a simple message board. Make a few posts and make sure it is working. Remember that there is a timer on how often the board updates so messages won’t appear instantly.
Finishing Up
- Make sure the tests are passing (with
pnpm test:unit), there are no linting errors (withpnpm run check), and no type errors (withpnpm run typecheck) - Add and commit your changes and push those commit(s) to GitHub.
- Submit your repository to Gradescope
Requirements
- The RLS policies are in place
- There is a
useUserhook that manages theuserobject and logging on and off - There is a
UserContextthat has been applied to the top of the hierarchy - There is a
useUserContexthook that can be used to fetch any of the data returned by theuseUserhook LoginStatussupports logging in and out and displays the user’s nameNewMessageactually posts messages to the serverHomeconditionally shows thenewMessagecomponent- Pass all tests
- Pass all Biome checks
Recall that the Practical exercises are evaluated as “Satisfactory/Not yet satisfactory”. Your submission will need to implement all of the required functionality (i.e., pass all the tests) to be Satisfactory (2 points).
Footnotes
Convention is to put contexts in their own file in a contexts folder. For simplicity we are going to keep it in the same file as the hook.↩︎