Assignment Three
| Deliverable | Due Date |
|---|---|
| Assignment 3 | March 12, 2026 at 11:59 PM |
| Assignment 3 (revision) | April 13, 2026 at 11:59 PM |
Goals
- Get more practice implementing React components
- Learn about static typing by converting your code to TypeScript
- Learn more about web site architecture by converting your code to React Router
- Advance your understanding of the division of responsibilities and state between components
Prerequisites
This assignment builds on the work of assignment 2. As such, you should not start it until you have passed most, if not all of the tests for assignment 2.
- Click the GitHub Classroom link and then clone the repository GitHub classroom creates to your local computer (in your shell, execute
git clonefollowed by the address of the repository). - Update the
package.jsonfile with your name and e-mail - Install the package dependencies with
pnpm install
Once you have the dependencies installed you can start the development server with pnpm run dev.
Background
This assignment, the next part of creating Code Cache, starts where Assignment 2 left off. As with previous assignments an initial set of (failing) tests are provided as part of the skeleton. These tests are intended to help you as you develop your application and to ensure that the grading scripts can successfully test your assignment. Code that passes all of the provided tests is not guaranteed to be correct. However, code that fails one or more these tests does not meet the specification. You are not expected to write any additional tests for this assignment.
As a general bit of advice, worrying too much about the flow of interactions through your application can lead you astray. While information flow is important, focusing on it will have you tied in knots trying pass information between components. Practice compartmentalization and trusting that other components will work. Recall the philosophy of React. Focus on “given the current state and props, what should I render?” and “how do I update that state in response to user actions”. React will take care of triggering the necessary re-rendering.
This assignment is all about refactoring and retooling to make our lives easier later.
Data access
In Assignment 2, we just imported the JSON file of snippets. This was quick and easy, but very much not the way we would typically work with data in a real web site. We aren’t quite ready for a full database backend, so I have provided a compromise, which you will find in app/data/utils.ts. In that file you will find a fake database. The only piece that you need to worry about is the five accessor functions (and you won’t even need to use all of them). Here are the functions:
getSnippet(id)– returns the snippet associated with the provided idgetSnippets()– returns all snippets (this is what importing the JSON file was approximating)addSnippet(values)– creates a new snippet based on the values invalues(not used for this assignment)updateSnippet(id, values)– update the contents of the snippet with idid(not used for this assignment)deleteSnippet(id)– delete the snippet with ididfrom the database (not used for this assignment)
You should use these functions for all data access. The advantage of establishing an interface like this is that it is (a) more testable (we are creating a seam and we can mock out its behavior), and (b) when we introduce a database, we can just change the implementation of these functions without changing any of the code that relies on them.
If you look at the provided functions, you will see that they all call accessLag. This mimics the real lag we will have when interacting with a database. This will force you to use async functions, which will help make sure that the code you write that uses these functions won’t need to be changed again later.
Testing
I’ve added a new testing tool to our arsenal called Playwright which we will be using alongside Vitest. We will continue to use Vitest for our unit testing and you can run those tests with pnpm test:unit.
Playwright is designed specifically for testing web applications and actually loads your site into a browser and interacts with it more like a user would. Because we are switching to using React Router and the routing is part of the system, using Playwright allows us to write more realistic tests without having to essentially mock out the entire routing system. You can run these tests with pnpm test:e2e (“e2e” here stands for “end to end”). As these are end to end tests, you probably want to hold off on running them until you have most of the structure built.
At a later date we will talk more about how to test React applications and we’ll look closer at these two tools.
Routing
I’ve switched you over to using React Router v7 for this assignment. That means that the structure has changed a little bit. We now have an app directory instead of a src directory and you will need to manage the routing.
TypeScript
We are also switching over to all TypeScript now as well. So, when you copy in your files, make sure to rename them to have a .tsx suffix. You can run the typechecker with pnpm typecheck. VSCode will also probably complain at you if you have type issues as you work.
Assignment
Part 0: Port over Assignment 2
The first thing that you need to do is to update the Assignment 3 skelton with the code you wrote for assignment 2.
Start by copying over the components from your assignment 2 src/components directory to your assignment 3 app/components directory. Just copy the components, not the tests – some of the tests may be different. This should be the files
- Listing.jsx
- ListingItem.jsx
- SnippetView.jsx
/src/App.jsx can be copied over into the new app directory. There is a placeholder there that you can overwrite.
Fire up the dev server and see if everything is working. Most of the tests will probably still fail.
Part 1: Switch to TypeScript
TypeScript checking is now enabled for this assignment. To get your file checked, rename it from .jsx to .tsx. VSCode should then issue warnings and you can also check all TS files by running pnpm run typecheck.
I have provided an interface that describes the Snippet type in src/types/Snippets.tsx. You should use this wherever you need an snippet.
Work slowly, one file at a time. Your primary concern should be creating type descriptions for the props. Most other things will be handled by the TS type inference. However, if the type checker complains you should add type annotations to make it work.
Make sure that by the end you have converted all .jsx files to .tsx files and that pnpm run typecheck tells you everything is properly checked.
Sometimes, especially when you are making a lot of radical type changes, VSCode’a type checking gets a little lost and will insist that something is not typed properly when you know that it is. If that happens, you can restart the TypeScript engine.
Open up the Command Palette1 and type “restart ts”. You should get an option that says something like “TypeScript: Restart TS Server”. Select that and it will recheck everything and will probably clear up the problem.
Part 2: Switch to routing (requirements change!)
Code Cache is another of those applications where it would be nice to have URLS that were meaningful so we could share or bookmark particular snippets. So we are going to add some routing2.
Big Picture After the change, every snippet will now have a unique URL. For example, the snippet called ‘React Router 7 Loader Function’ will now be located at http://localhost:5713/snippets/2. Rather than storing the current snippet as state, we will the use the URL to keep track of which snippet we are looking at (if any).
We will use a “RESTful” API with the following initial URLs:
| URL | View |
|---|---|
/ |
Home page showing the usage message |
/snippets/:snippetId |
Show snippet with snippetId |
The second of those is a dynamic route, which as we discussed, allows us to introduce variables into the route that are available in our code.
One of the nice features of RRv7’s routing is that we can think about only part of the page being affected by the routing. In our case, we want to keep the header, the footer and the sidebar no matter what we are looking at, so the yellow region is the portion that will be controlled by the route.
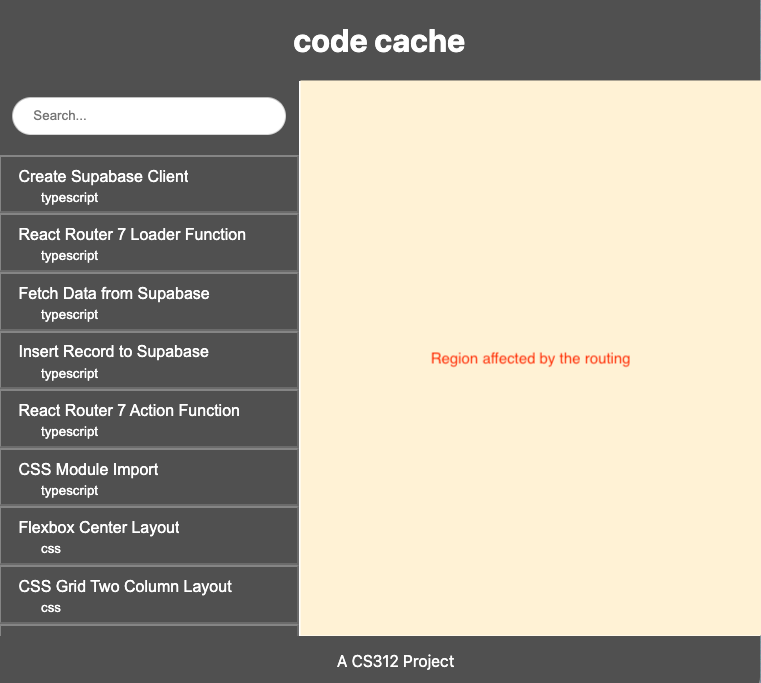
We are going to do that by using a layout route that contains the page structure that has an <Outlet> where the yellow region above would be.
Then we will need two other components: one that uses an index route to provide the usage message and one that is configured to have a dynamic segment which will display a snippet.
To implement this, create three files: - app/layouts/interface.tsx - this will provide the page structure (layout route) - app/routes/default.tsx - this provides the welcome message (index route) - app/routes/snippet.tsx - this shows the current snippet (dynamic route)
Then edit routes.ts to provide the routing configuration. You can remove the index("routes/home.tsx") that RRv7 put in there by default. Use the documentation and the example from class to guide you.
interface.tsx
To implement this, start by copying over the contents of App.tsx into this file.
In root.tsx, find the AppRoot component and have it return <Outlet /> instead of <App />. You should now see exactly the same thing on your page, but now you are getting the layout instead of the App component. You can delete App.tsx and remove the import statement from root.tsx.
data loading While we are here, we will rid of the direct import of our JSON file and use getSnippets() from the new data/utils.ts file. This is not as straightforward as just importing the function and writing const data = getSnippets() in the App component in App.tsx because the getSnippets function is asynchronous.
We are going to make use of one of the features of RRv7: data loading (specifically client loading). The idea is that we write a second function in App.tsx that will handle the loading and then pass it along to the App component when it is ready. If we call that function clientLoader, then RRv7 will know to call it.
Create a function called clientLoader (the name is important – that is how RRv7 wil know to call it).
The function should be exported and async.
Call getSnippets() using await.
Return an object that includes the snippets.
If you have stored the snippets in a variable called snippets, you can create an object like this: {snippets}. JavaScript will use the name of the variable as the name of the property. In other words, this is the equivalent of {snippets: snippets}.
App will now receive a prop called loaderData containing the snippets as a property.
Extract it and use it as your list of snippets.
If you look at the clientLoader example in the documentation, you will see that the type of the props is Route.ComponentProps where the Route comes from this import: import type { Route } from "./+types/product";.
There is some RRv7 voodoo going on here. The “product” on the end of that import is because this file is product.tsx. The “+types” is telling RRv7 to auto-generate the types for this component. RRv7 is looking at the output of the clientLoader function and figuring out from that the type of the props.
For our component, you would add import type { Route } from "./+types/interface";. Then you can use the same Route.ComponentProps for the types of the props of App.
These generated types are another of the places where VSCode’s type checker can get hung up until you rerun the TS server and sometimes even if you do restart TS. Don’t worry about the “Can’t find the module” errors for these generated imports. They will sort themselves out.
adding an Outlet
In this component, you should have a little bit of conditional rendering that either shows the SnippetView or some default message based on whether or not you have a current snippet. That is the part that is being replaced by our routes, so replace that code with an <Outlet />.
The current snippet should now be handled by the route, so we can remove the state variable from the code as well.
default.tsx
This route shows whatever the user sees when there is no selection. Create a component that just returns the default message (probably in a <p>) you had before (that you just removed from App).
snippet.tsx
This snippet is going to show the current snippet. Create a component that returns a SnippetView. The problem is that we don’t know what snippet to hand it any more. We need to read it out of the URL.
We are going to do this by once again adding a clientLoader function. This time we are going to add a parameter to the function so RRv7 will hand us the page parameters. That will look like this:
export async function clientLoader({ params }: Route.ClientLoaderArgs) {

}
Again, we are relying on RRv7 to figure out the typing for us, so you will need to add the appropriate import for Route.
Whatever you used as the variable name (frequently called a slug) in your dynamic path segment is now available as a property of params. So, for example, if you specified the path as “snippets/:snippetId”, params.snippetId will hold the value that is found in the path for “:snippetId.
Convert the number to a number and then use the getSnippet function to get the corresponding snippet. Return an object containing the snippet you located. Just as we did previously, use loaderData to get this data and then pass it along to the SnippetView.
Test this by directly adding “/snippets/2” on to the end of the URL. You should see the snippet on the RRv7 loader function.
The buttons are still setting the current snippet state variable, which we no longer have access to.
The last thing to consider is that the URL might not refer to a valid snippet (not something we had to worry about previously). So, in the clientLoader, before you return it, check to see if you actually got a snippet back from getSnippet. If you didn’t, run
throw new Response("Not Found", { status: 404 });This is throwing an exception. Try it out – try going to a snippet that doesn’t exist like 2560.
If you look in root.tsx you will find a function called ErrorBoundary. This is what is actually handling the exception and making sure the page doesn’t crash. It sees the 404 status and returns a simplified page that reports the problem. We could absolutely make the output look nicer. We also can add ErrorBoundary functions to any of our routes to catch errors at different levels within our app (for example, we could catch errors right in routes/snippet.tsx and return a message about not finding snippets that would be returned in place of the output of your component).
Fixing snippet selection
Now that the routes are set up, we need to fix the side bar so we can select snippets again.
We will start with the ListingItem component. This currently should have a button element in it. When the button is clicked, we call the onClick function that was passed in as a prop. We want to replace this behavior with navigation.
RRv7 comes with a component called NavLink. Change the component to be a NavLink instead of a button.
The NavLink need a “to” attribute that says where it is navigating to. Provide the attribute and give it a strong of the form “/snippets/snippetId”, where “snippetId” is the id of the snippet that is being displayed by the ListingItem.
Remove the onClick – we no longer need it. You can remove this as a prop as well.
Clicking on the sidebar items should now work again.
One thing that we have lost, however, is that we no longer have selection highlighting. NavLink has another trick up its sleeve, however. The “className” attribute can take a function, which is passed an argument with three booleans: { isActive, isPending, isTransitioning }. RRv7 is watching the current state of the routing and knows the “to” value of the NavLink. So, if we are at the location pointed to by this NavLink, isActive will be set to true. The other two are for the moments while we are transitioning to this location.
So, change the “className” attribute to take in a function with {isActive} as the argument. Use isActive instead of selected to add the styles.selected style to the component.
A supercool aspect of this is that it doesn’t matter how we get to the particular path – NavLink will just detect that it is a match and rerender for us.
Now you can remove selected as a prop from ListingItem.
Now there is some cleaning to do. We removed two props from ListingItem, so now you should walk backwards up the tree and remove them from Listing where they are set. Work your way up the hierarchy. Remove any props that no longer need to be passed down. This will lead to more variables and props that are no longer needed, so remove those as well. Keeping working your way up removing things until you get to the top of the hierarchy.
So, it was a process to get there, but the result is something that is actually simpler and easier to reason about.
Reflection
In the README.md file, I would like you to write a brief reflection about your assignment.
If it meets the requirements (passes all of the automated checks), write how comfortable with your solution. Did you use good development practices, or is it a hacky, last minute solution. Do you understand your own solution? How much effort did you put into it? Do you feel like you could do a similar assignment with more ease?
If it doesn’t yet meet the requirements, what are you struggling with? What does it not do correctly? What have you done to try to correct it? How hard have you tried to correct it? How much effort have you put into the entire assignment?
Put a date on the reflection and if you do any revisions, add another dated reflection below it.
Finishing up
Your submission should not have lint warnings or errors when run with npm run check. Remember that you can fix many errors automatically with npm run check --write. You should also make sure that your code passed all type checks by running pnpm run typecheck.
Submit your assignment by pushing your changes to the GitHub repository. Once the repository is fully pushed, submit your repository to Gradescope as described here. You can submit (push to GitHub and submit to Gradescope) multiple times.
Portions of your assignment will undergo automated grading. Make sure to follow the specifications exactly, otherwise the tests will fail (even if your code generally works as intended). Use the provided test suite (run with pnpm test) to get immediate feedback on whether your code follows the specification. Because of the increased complexity of a React application, Gradescope can take minutes to run all of the tests. Thus you will be more efficient testing locally and only submitting to Gradescope when you are confident your application meets the specification.
Labeling
For this assignment, I will label submissions with one of the following
| Assessment | Requirements |
|---|---|
| Revision needed | Some but not all tests as passing. |
| Meets Expectations | All tests pass, including linter analysis (without excessive deactivations). |
| Exemplary | All requirements for Meets Expectations and your implementation is clear, concise, readily understood, and maintainable. |
Advice
You will go astray if you worry too much about the flow of interactions through your application. While information flow is important, focusing on it will have you attempting to code everything linearly. Practice compartmentalization and trusting that other components will work. You should also remember that as you write React components, the primary question should be “given the current state and props, what should I render?”
FAQ
Do I need to implement testing?
We will learn later in the semester how to unit test React components and do end to end testing. For this assignment you are not expected to implement any of your own tests. The skeleton includes some tests to assist you in your development and to ensure that the grading scripts can automatically test your submission.
What if the tests and assignment specification appear to be in conflict?
Please post to Campuswire so that we can resolve any conflict or confusion ASAP.
I am getting an error about “No route matches URL”/.well-known/appspecific/com.chrome.devtools.json”. What is going on?
This is just caused by your browser asking the dev server for some development tooling. You can ignore this.
VSCode keeps showing red lines in my TypeScript files
The VSCode process that is running a typechecker as you work can get stuck, especially with some of the RRv7 pieces like the automatically generated types. Open the command palette3 and type “restart ts”. Look for “TypeScript: Restart TS Server”. Select that and it will recheck everything and will probably clear up the problem.
Footnotes
The Command Palette can be opened from the View menu. The keyboard shortcut is either CMD+Shift+P on the Mac or CTRL+Shift+P on a PC.↩︎
For additional documentation, I suggest RRv7’s docs on routing and route modules.↩︎
The Command Palette can be opened from the View menu. The keyboard shortcut is either CMD+Shift+P on the Mac or CTRL+Shift+P on a PC.↩︎