Assignment Two
| Deliverable | Due Date |
|---|---|
| Assignment 2 | March 05, 2026 at 11:59 PM |
| Assignment 2 (revision) | March 30, 2026 at 11:59 PM |
Goals
- Implement basic React components with state and callbacks
- Use a linter and code formatter to write more consistent, more maintainable, higher quality, code
The goal of this assignment is to learn the basics of creating a single page web application (SPA) with React. In this and the next few assignments, you will be developing a tool for collecting code snippets called “Code Cache”. Implementing Code Cache will provide hands-on experience developing a full single page web application in preparation for completing your large project.
As with the previous assignment, you may need to do additional research (online) to successfully complete the assignment.
Prerequisites
- Click the GitHub Classroom link and then clone the repository GitHub classroom creates to your local computer (in your shell, execute
git clonefollowed by the address of the repository). - Update the
package.jsonfile with your name and e-mail - Install the package dependencies with
pnpm install
Once you have the dependencies installed you can start the development server with pnpm run dev.
I recommend reviewing Writing Markup with JSX before starting your assignment.
Design
Before we get to the implementation, we need to understand what the site does and what it should look like.
Functionality
As developers, you have probably found that there are a number of little tasks that come up again and again, but not so often that you have the associated code memorized. Code Cache is designed to be a tool to help you collect and manage all of these little code snippets that you think you might need again. Over the next three assignments we will build out most of the functionality of this tool, but for now we are going to focus on the viewing and browsing functionality. To that end I have provided a JSON file (src/data/snippets.json) that is already loaded with some (AI generated) snippets covering many of the tools you will be using this semester.
Here is the interface:
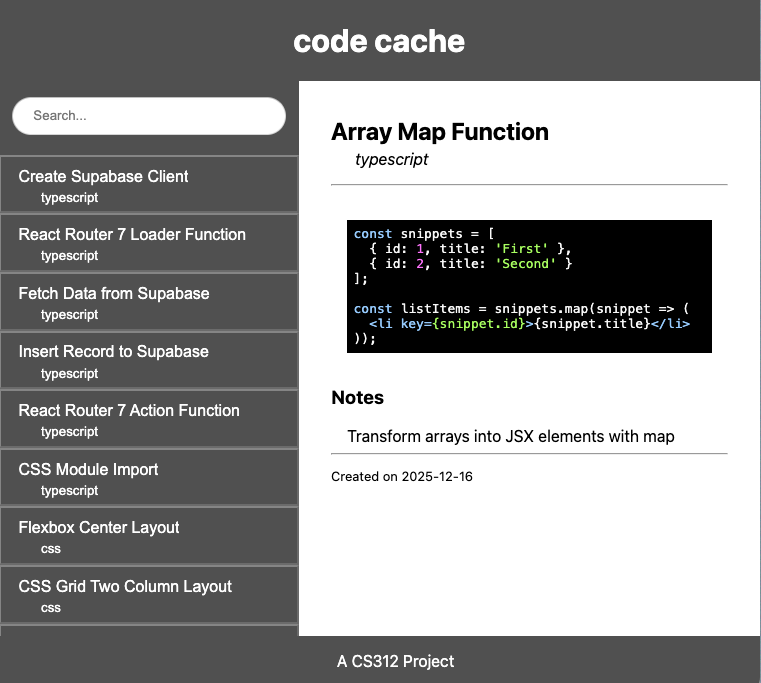
There is a list of all of the snippets down the left-hand side, with a search box. When a snippet is selected, we can view it in the main viewer.
Component design
For this assignment, you are focusing primarily on implementation, so I have taken our first step of breaking down the interface into its components for you.
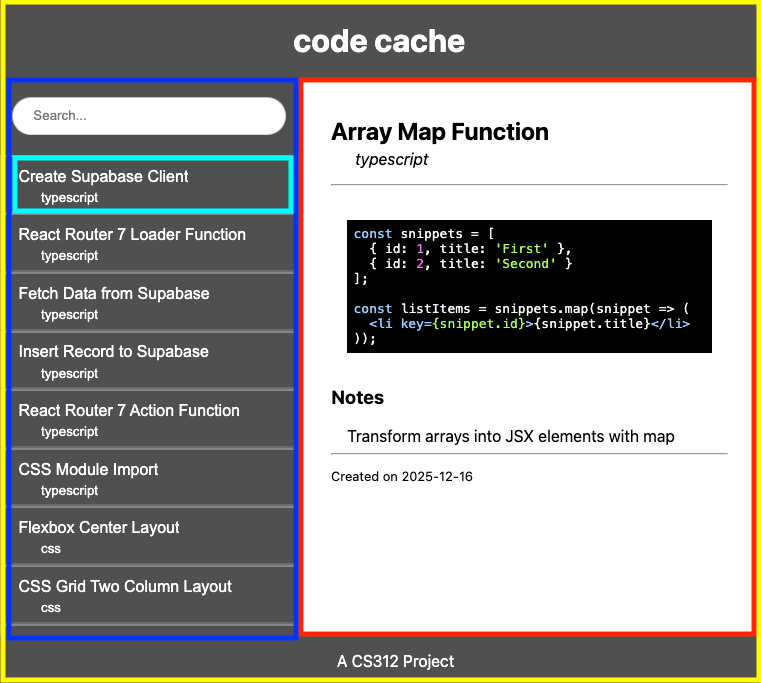
App(yellow) is the root elementSnippetView(red) shows a single snippetListing(blue) contains the list of snippets and the search barListingItem(cyan) provides the representation of a single snippet inListing
More abstractly, here is the component hierarchy.
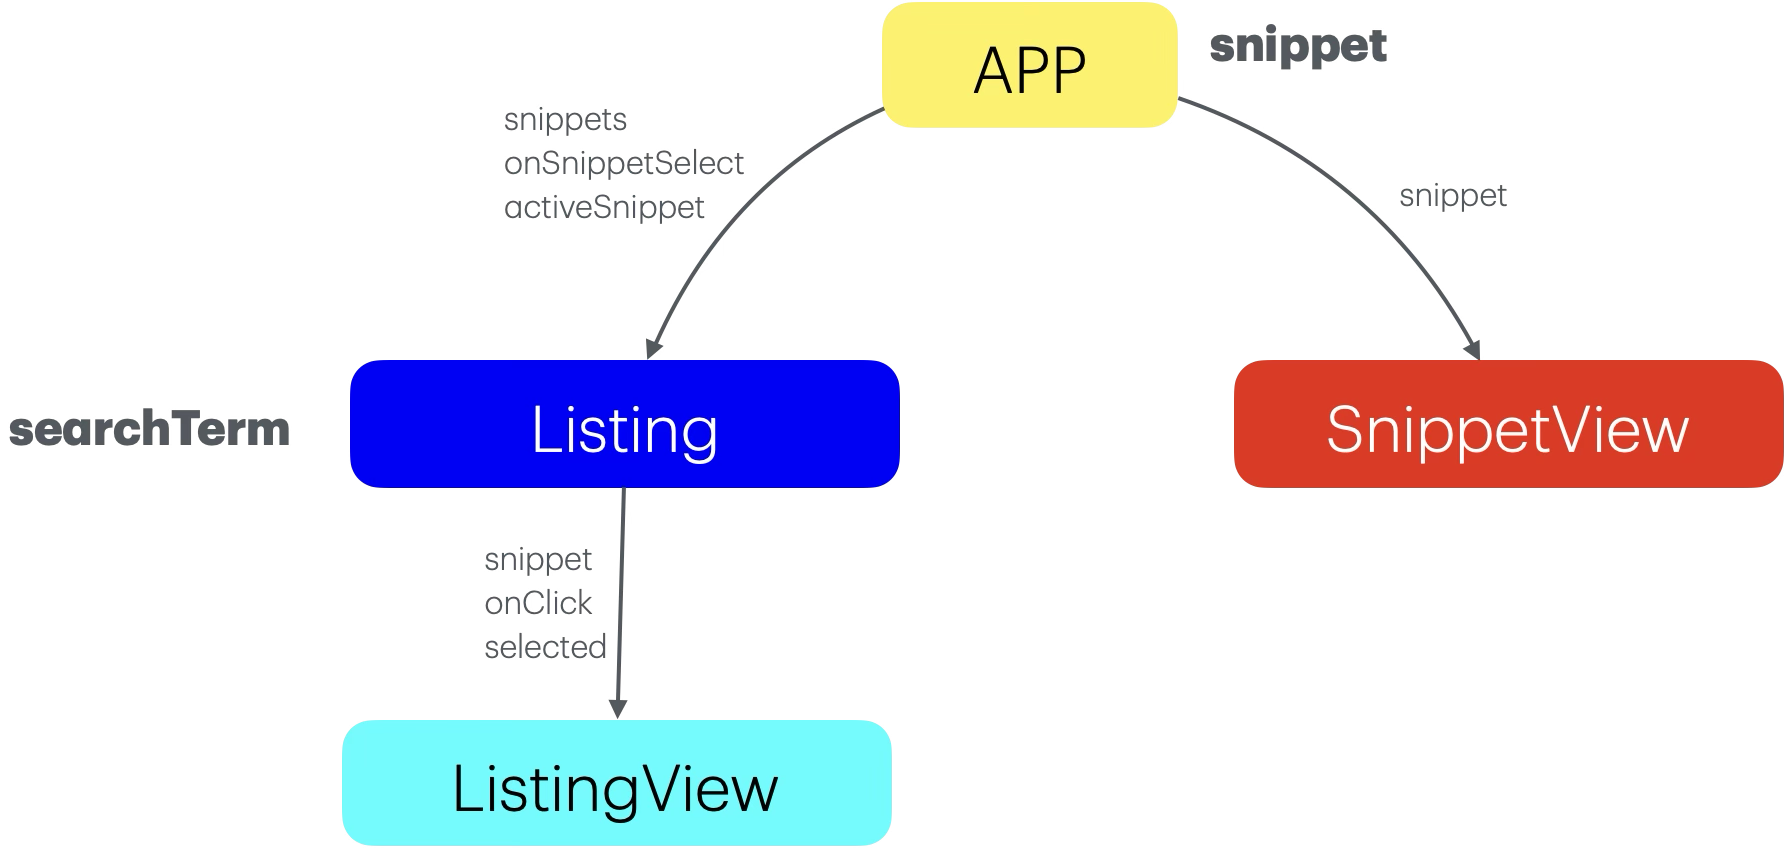
In this diagram, I have also included the state and the props. Note that the props expected in a child component don’t have to match the name of the state in the parent. We chose to do that here for simplicity and clarity. What must match is the name of the prop expected by a component, and the name provided when that component is rendered (i.e., on the left-hand side of the = in JSX).
Data flow
The collection of snippets is imported into the App as data. App also should keep track of the current snippet (snippet).
The Listing component is responsible for selecting the current snippet, so it gets all of the snippets (snippets), as well as a callback function to call when a snippet is chosen (onSnippetSelect). We also tell Listing about the current snippet so it can highlight to currently selected one (activeSnippet).
The ListingView component shows a single snippet listing, so it needs to know about the snippet (snippet) and whether or not is it selected (selected). This also gets a callback to call when it is clicked (onClick).
Finally, the SnippetView shows the current snippet (snippet).
Starter code
As with previous assignments an initial set of (failing) tests are provided as part of the skeleton (run with pnpm test). These tests are intended to help you as you develop your application and to ensure that the grading scripts can successfully test your assignment. Code that passes all of the provided tests is not guaranteed to be correct. However, code that fails one or more these tests does not meet the specification. Testing React applications is a future topic and so you are not expected to write any additional tests for this assignment.
You will notice that there is already some code present in App.jsx and in components. I have provided starter code for all of the required components, which includes importing the snippet data into App as data.
Components
You are welcome to tackle the components in any order (though you probably want to start with App so you can see what you are doing). I suggest getting your dev server running and actually looking at the site as you work rather than purely trying to get the tests to pass.
Remember our process. I have already specified the component hierarchy for you, so the first thing you should so is make a static site. You can do this without props or callbacks. Once you have the structure, add the props in. Then, once you have everything in place add in the callback props that allow for interaction.
I have provided a collection of CSS files for styling the site. Some of these are essential to make the site work correctly, others are purely aesthetic. In the discussion of each component I have tried to differentiate these for you.
In all cases I have already imported the CSS module into the code like I did for practical 3.
To apply a style you will set the className of the element. These will always be styles (the name I imported the style under) dot the name of the CSS class. So, if I say to give an element the class name styles.sidebar, you should add an attribute to the element that looks like className={styles.sidebar}.
In a couple of places I have asked you to apply aria labels to your components. We will talk more about them at a later point, but the short version is that these are labels that we use to make our web site more accessible. They add more information to our components which make it easier for people who can’t see to use the site.
In this instance, however, I would like you to add them because it is a convenient way for the tests to find elements on your page (it is essentially the same problem – our tests can’t perceive the page visually either).
Applying an aria label just means adding an aria-label attribute to the component. So, for example, if I asked you to add the aria label “Search field” to a component (something I will ask you to do), you would add the attribute aria-label="Search field".
App
- File src/App.jsx
- Props none
- State
snippet(object with id, title, language, creationDate, and notes)
I have provided the start of this component to give you the header and the footer of the page. You will want to add two <div> elements between these. One should have the class name of styles.sidebar. This should hold a Listing component. The second should have a class name of styles.viewer and it will display the current snippet (if there is one). The class names will make sure that the correct styles are applied so the components will fill the space correctly.
The state variable snippet should hold the snippet that is currently being viewed.
If there is no snippet to view, the viewer div should show a usage message, otherwise there should be a SnippetView component that shows the current snippet.
“Fake it till you make it” is a critical approach to building a complex system. In lecture we talked about this with respect to seams and how we could use them to mock in behavior for functions we haven’t written yet when testing.
This is part of the reason I gave you components that just return their name. Another way to “fake it” is to just pick a snippet from the collection and use that as the “active” one before you add state or a process for picking one.
Listing
- File src/components/Listing.jsx
- Props
snippets(array of snippets)onSnippetSelect(function to call when a snippet is selected)activeSnippet(object with id, title, language, creationDate, and notes)
- State
searchTerm(string)
This should return a <div> with the class name styles.contents. Inside there should be a text input and the list of ListItems.
The text input should use the class name styles.searchBox. It should also have an aria-label of “Search field”. The grey text you see in the pictures is a placeholder. I suggest spending a little bit of time with the input documentation.
This component should display all snippets. If the user types in the search box, the list should be filtered to just those snippets that include the search term. Your search functionality should look at the snippet’s title, language and notes and should be case insensitive.
I would suggest leaving the search functionality until the very end.
ListingItem
- File src/components/ListingItem.jsx
- Props
snippet(object with id, title, language, creationDate, and notes)
onClick(function to call when this item is clicked)selected(boolean, is this the current snippet)
- State none
This component should return a <button> element. The class name for the button should be styles.itemBody. If the snippet is selected, the class name should also include styles.selected.
The button should have an aria-label that is of the form “View title” where title is the title of the snippet.
Inside of the button you should display the title and the language of the snippet. There are two class names, snippet.title nd snippet.language that you can use for styling.
When the button is clicked, onClick should be called with the component’s snippet.
Component Styling
If you look in src/styles/ListingItem.module.css, you will see that I have defined some additional styles. These can be applied to the individual elements in your component to make them look closer to the pictures. It should be obvious what is the intended target of each class.
This styling is not required to reach Meets Expectations, but an Exceptional submission will be styled.
SnippetView
- File src/components/SnippetView.jsx
- Props
snippet(object with id, title, language, creationDate, and notes)
- State none
This needs to show the title, language, code, notes and creation date. Consult the image for the arrangement. Think about which HTML elements make the most sense for each one of these.
In order to display the code, I have included a package called react-syntax-highlighter. You will see imports for SyntaxHighlighter (the actual component) and dark (the style). Here is an example of its usage:
<SyntaxHighlighter language="javascript" style={dark}>
    if (stress > 42){
    console.log("Don't Panic");
  } else{
    console.log("Good job not panicking");
  }
</SyntaxHighlighter>
You will obviously want to control the code and the language programmatically. If you get inspired you can do a little research and try out some other styles.
Component Styling
If you look in src/styles/SnippetView.module.css, you will see that I have defined a collection of styles. These can be applied to the individual elements in your component to make them look closer to the pictures. It should be obvious what is the intended target of each class.
This styling is not required to reach Meets Expectations, but an Exceptional submission will be styled.
Linting and code formatting
Your submission should not have biome warnings or errors when run with pnpm check. Remember than you can fix many errors automatically with pnpm check --write (although since Biome can sometimes introduce errors during this process make sure to test afterwards). The assignment skeleton is also configured with a git hook to automatically reformat your code to a consistent standard when you commit. Thus do not be surprised if your code looks slightly different after a commit.
Reflection
In the reflection.md file, I would like you to write a brief reflection about your assignment.
If it meets the requirements (passes all of the automated checks), write how comfortable with your solution. Did you use good development practices, or is it a hacky, last minute solution. Do you understand your own solution? How much effort did you put into it? Do you feel like you could do a similar assignment with more ease?
If it doesn’t yet meet the requirements, what are you struggling with? What does it not do correctly? What have you done to try to correct it? How hard have you tried to correct it? How much effort have you put into the entire assignment?
Put a date on the reflection and if you do any revisions, add another dated reflection below it.
Finishing up
Submit your assignment by pushing your changes to the GitHub repository. Once the repository is fully pushed, submit your repository to Gradescope as described here. You can submit (push to GitHub and submit to Gradescope) multiple times.
Portions of your assignment will undergo automated grading. Make sure to follow the specifications exactly, otherwise the tests will fail (even if your code generally works as intended). Use the provided test suite (run with pnpm test) to get immediate feedback on whether your code follows the specification. Because of the increased complexity of a React application, Gradescope can take minutes to run all of the tests. Thus you will be more efficient testing locally and only submitting to Gradescope when you are confident your application meets the specification.
Labeling
For this assignment, I will label submissions with one of the following
| Assessment | Requirements |
|---|---|
| Revision needed | Some but not all tests as passing. |
| Meets Expectations | All tests pass, including linter analysis (without excessive deactivations). |
| Exemplary | All requirements for Meets Expectations, includes all styling, and your implementation is clear, concise, readily understood, and maintainable. |
FAQ
Do I need to implement unit testing?
We will learn later in the semester how to unit test React components. For this assignment you are not expected to implement any of your own unit tests. The skeleton includes some unit tests to assist you in your development and to ensure that the grading scripts can automatically test your submission.
What if the tests and assignment specification appear to be in conflict?
Please post to Campuswire so that we can resolve any conflict or confusion ASAP.