Practical Six
| Deliverable | Due Date |
|---|---|
| Practical 6 | April 07, 2026 at 11:59 PM |
| Practical 6 (revision) | April 30, 2026 at 11:59 PM |
Goals
- Learn some basic techniques for testing React apps
- Get some experience using Vitest and the Testing Library
- Get some experience with Playwright
Prerequisites
Create the git repository for your practical by accepting the assignment from GitHub Classroom. This will create a new repository for you with the Next/React infrastructure in place.
Clone the repository to you computer with
git clone(get the name of the repository from GitHub).Open up the
package.jsonfile and add your name as the author of the package.Install the module dependencies by typing
pnpm installin the shell in the terminal in the root directory of your package (the directory that contains the package.json file).Get some practice with our new workflow and start by making a feature branch in your repository.
Make sure that you have completed the Getting Started steps and have Docker Desktop installed.
You previously used Vitest for unit testing JS code. Today we are going to use Vitest in combination with the Testing Library library to test a React application. There are a number of items that need to be installed, but the project skeleton includes everything you need.
Regression Tests
Smoke test
The easiest form of testing we can perform is called a smoke test1. Unlike the testing we saw earlier, we aren’t going to assert anything, nor will we test anything explicitly. All we will do is try to render a component. If the process throws any errors, the test will fail, otherwise it succeeds. This kind of test is great for quick and dirty regression testing, where we are trying to make sure that adding new features or fixing bugs hasn’t inadvertently added any errors in unexpected places. Note that it doesn’t actually tell you that the functionality hasn’t been broken, just that it didn’t catch fire, as it were (the name comes from the hardware side of the world, where a smoke test means “plug it in and see if smoke comes out”).
For our smoke test, we will test the HikeView component. You will find the file HikeView.test.tsx in the app/components directory. I have already provided the imports for you.
All we need to do is render the component, so the smoke test simply looks like this:
test("Smoke test", async () => {
    render(<HikeView hike={sampleHike} />);
});
Add this into the Regression test suite.
There are a number of different philosophies about where to put test files. One approach is to have a dedicated tests directory for everything. Our test runner will look for several variants of this name or can eb configured to look specifically in a selected directory.
Another approach is to put the tests right with the components that they test. Most frameworks know to exclude this when building the production build of the app.
I tend to use a hybrid approach and put unit and some integration tests in place and then use a dedicated directory for end to end tests and integration tests where there isn’t a clear root component.
Snapshots
Vitest provides another quick regression testing tool called snapshots. The idea with a snapshot is to make sure that the output of a function doesn’t change when we aren’t expecting it. When the test runs for the first time, Vitest serializes the value and saves it in a file (a file that should be committed to our repo for future tests). The next time the test is run, the output is compared with the saved value.
We can use this for anything, but we will find it most useful for monitoring the UI. We can render a component and then snapshot it If the component changes, the test will fail, which is a cue to either fix the offending code, or to take a new snapshot because the change was intentional. Note that the snapshot is not a literal picture, it is a DOM fragment that can be compared to later.
Here is the snapshot test:
 test("Snapshot test", async () => {
        const { asFragment } = render(<HikeView hike={sampleHike} />);
        expect(asFragment()).toMatchSnapshot();
    });
Add this to the Regression test suite.
Here we are getting the asFragment function from the render function. The asFragment function returns a DocumentFragment with the rendered component. We then snapshot that fragment.
Note that we didn’t write anything to generate the snapshot. Vitest will do that automatically the first time the test is run.
You will find that Vitest has created a new directory called __snapshots__ in the same directory as your test file. Open this up and look at the snapshot that is stored in there. This should be committed with your code so that subsequent tests can use it.
So that you can see how the snapshot test works, go into app/components/HikeView and find where the place where we wrote “Difficulty”. Change this to “Challenge level”. The snapshot test should now fail. Notice that you are provided with a diff showing what has changed. Of course, sometimes you will be making a change and you want the page to be different. If you are running the test with the file watcher (our default mode), you can type u to update the snapshot. If you were using pnpm test -run to disengage watcher mode, you can add a -u flag to update the snapshot.
No. Recall in TDD we write the tests first. But snapshots require a working implementation. Snapshots are most useful for regression testing.
Testing React Router Applications
For this test, we are going to test the /town route to make sure all hikes are visible for the town. This is an integration test as we are going to be testing loader that fetches the hike data from the route and the component together.
I’ve given you a start in app/routes/town.test.tsx
Create a routing “stub”
Our technique for doing this will be to create a routing stub using createRoutesStub. Unfortunately, the documentation for this is quite poor…
Before the test suite, add this code:
const Stub = createRoutesStub([
  {
    path: "towns/:town",
    Component: Town as any,
    loader: townLoader as any,
  },
]);
As you can see, this is partially duplicating one of our routes from routes.ts, though we have a totally different configuration format. The path looks the same. This time, however, we are not providing the file, we are providing the component itself. Since we didn’t provide the file, we are also going to provide the loader function explicitly.
Yep – we are using the as any I told you not to use. This is because RRv7 autogenerates the types for our components, and it is very strict. createRoutesStub expects something a little more generic. We could try to untangle this, but it isn’t worth the trouble.
You will need to add some Biome ignore comments to pass the linting step.
Rendering the component
Create a new test in the test suite (making sure to mark its function as async). In the test, add this line:
render(<Stub initialEntries={["/towns/stowe"]} />);This uses the stub we created and tries looking at the “stowe” route.
Waiting for the render to finish
We know that the process of loading the data and then rendering the component with the data is an asynchronous process, so we need to wait a moment before we look to see that everything is in place. However, we don’t know how long to wait and render isn’t going to block until everything is in place. So, we will wait for something we know needs to be present.
Fire up the dev server if you haven’t already. The navigate to the “/towns/stowe” and look at the page. There are a couple of candidates on the page. We are going to go for the “Hikes” text. So, we need a query to locate it.
Right click to open the developer tools. In the Elements panel you will see a text representation of the DOM. As you mouse over the elements, it should highlight the corresponding element on the page. Find the <div> that contains all of the town specific data.
With your mouse on the <div>, right click to bring up the context menu. Select Copy > Copy element. This will copy the entire contents of the element.
In a new tab, got to the Testing Playground. Select everything in the upper left panel and then paste. This should replace their placeholder with your component and you should see it rendered on the right.
Click around on different elements on the right. You will see that the bottom panes will update with a query for locating the thing you clicked.
Click on “Hikes” to get the query. It should give you a query that looks like screen.getByRole("heading", { name: /hikes/i }).
In JavaScript, we write regular expressions like /pattern/options. So, if you see /dalek/i it will be looking for the string “dalek”. The option “i” means case insensitive, so this will also match “Dalek”, “DALEK”, “DaLeK”. being a regular expression it will also match “Daleks are evil pepperpots”. We will prefer using regular expressions generally so we don’t have to worry about weird extra space characters or extra text in the component. However, this isn’t a universal – sometimes we want to make sure it is an exact match, in which case we would put a string in for the name property.
We want to wait for this heading to show up, so put
await screen.findByRole("heading", { name: /hikes/i });into your test. The findBy will return a Promise and it will resolve when the heading is found (or timeout after 1000ms). We won’t bother using expect and a matcher since we just wanted to wait until it appeared and if the test didn’t fail, it must have appears.
Looking for the hikes
Okay, now we are confident that the component has loaded, so we can check to see if the hikes are present.
First we need to know what to expect, so called getTownData("stowe") to get the town data for Stowe.
You can take a look at the JSON file to see the structure, but the important thing to know is that town data has a “hikes” property and that is an array of the available hikes.
Use the Testing Playground to figure out how to query for the hike names.
Use forEach to iterate over the hikes and test that the name of each one is present in the document.
Testing the sad path
A common oversight is to just test good behavior and not test what happens when things go wrong (the “sad path”).
We are going to add a second test that makes sure we get a 404 error when the route goes to a bad town.
Add the second test to the same test suite and call it “Town: Invalid towns generate 404s”. Start the same way, but replace “stowe” with a word that doesn’t match any of the town ids in our collection.
Use the same pattern with findBy, but this time look for the 404. We don’t even need any assertions this time. If it never appears the test will fail, otherwise it will pass.
Because our components get all of their data from props, we can actually test the loader and the component separately. However, this falls apart if we using one of the special RRv7 components like Form or NavLink. We could still mock them, but this approach seems like a reasonable compromise.
End to end testing with Playwright
For the last test, we will do some end to end testing with Playwright. Recall that for end to end testing, we are primarily concerned with the user’s experience with the site and we want to avoid be tied to the technical details that underlay things.
Writing tests with Playwright is very similar to writing them with Vitest. The structure of the tests look the same and we have queries like getByRole() that work exactly the same ay as they do with the Testing Library. You can read up on the basic in the documentation.
The big differences are that we start with
await page.goto(url);at the start of each test, and we will have a slightly richer collection of actions.
However, we are going to make use of one of Playwright’s party tricks today: test generation. Test generation allows us to interact with the website like a user, and Playwright will generate the code needed to emulate it. As we go, we can even ask for assertions about what should be found in certain fields and the code will be generated for that as well.
Generating a test
We will create a test that contains the user flow down to finding information about a hike. So we will start at the root and navigate down through the town and onto the hike.
Start the process by typing the following into the terminal:
pnpm playwright codegenThis will bring up a browser window (Chrome, regardless of what you usually use because of how I set the configuration), and an editor.
When it opens, it is already in record mode, so anything you do to the browser will be recorded into the test. You can always click the Record button in either window to pause/restart recording.
Type the address of the dev server (e.g., http://localhost:5174) into the URL bar of Playwright’s browser window. The page should load and you should see the page.goto() call show up in the test.
Along the top of the browser, you will see a little toolbar:

From left to right, these functions are
- Record - start / stop recording
- Generate Locator - If you click this an hover over elements on the page it will provide locators like the Testing Playground
- Assert visibility - If you click this and then click an element on the page, it will provide an assertion that tests if the element is visible
- Assert text - If you click this and then click an element, a box will come up asking your to provide text that the element should contain (defaulting to the current text found there)
- Assert value - This is the same as assert text, but it meant for input elements that would have a value
- Assert snapshot - Add a snapshot test
Start by adding a test asking if “Burlington/Shelburne” is visible.
Then click the “Burlington/Shelburne” link. notice that it has added the interaction to the test.
Add a check if “Mount Philo” is visible.
Then click the “Mount Philo” link.
Now add visibility tests for the Top heading, the smaller heading, the difficulty and the description.
Finally, click the Record button to stop recording.
Create a new file called app/tests-e2e/flow.spec.ts. (The Playwright configuration file is set to look in app/tests-e2e for tests)
In Playwright’s editor window, find the Copy button and copy the contents of the test.
Paste the test into the new file and give it a more descriptive name.
Quit the Playwright Test Generator.
Running the test on the command line
To run the new test, run
pnpm test:e2eThis is just a script for
pnpm playwright testRunning the test in the UI
For a more interesting experience, run
pnpm test:e2e --ui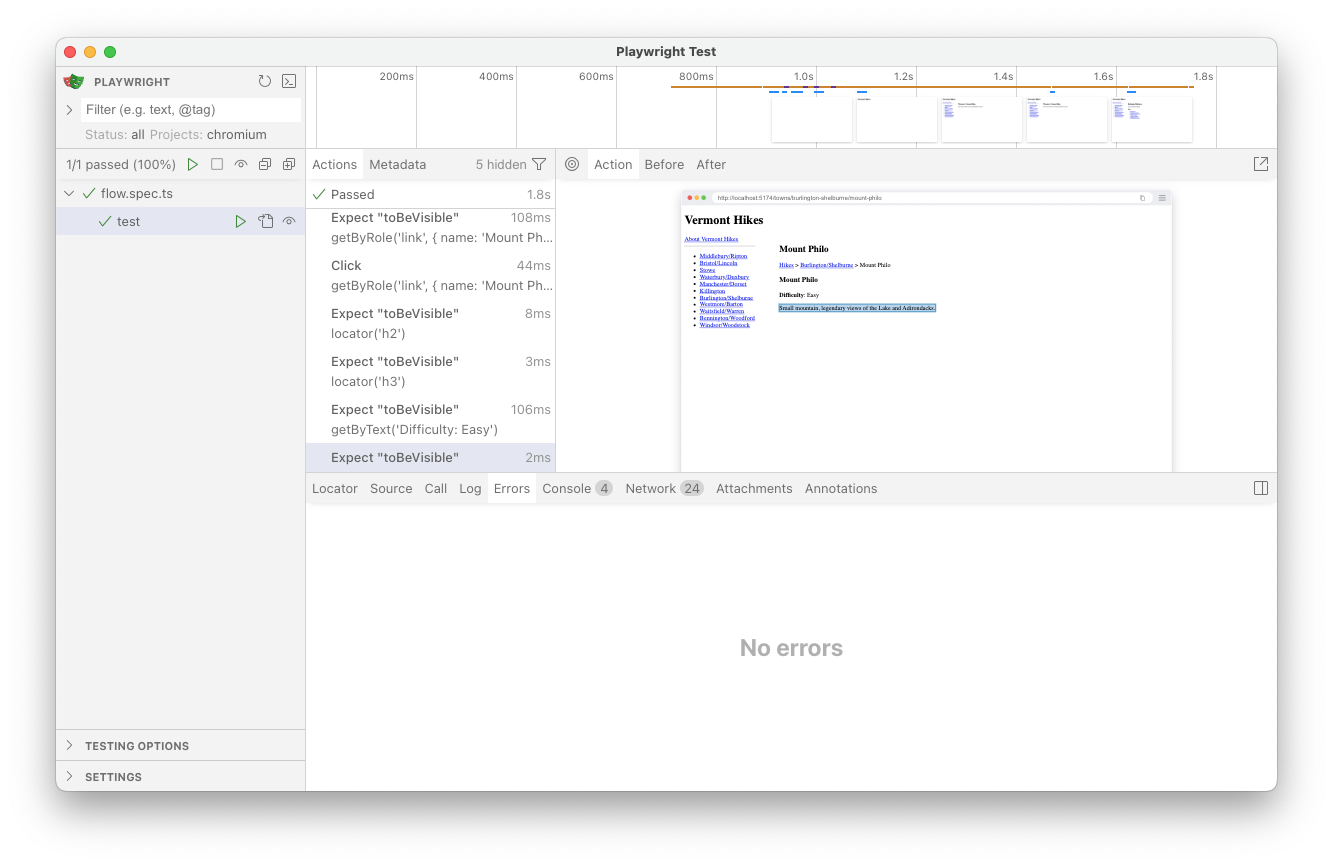
This will list all of the available tests you can run. Using the Play buttons, you can run all tests, all tests in a file or even individual tests. As you only have one test any of the three buttons will work, so click one now.
One of the cool things about this is that you can see the list of every action and assertion in your test. If you mouse over them, you can replay the test. This is particularly useful for tests that have errors. You can also see how long different commands take to execute to help you find inefficiencies in your tests (or code).
This interface also has a Pick Locator tool (the bullseye) that will allow you to query the interface to get element selection queries.
Copilot and other LLMs are indeed quite good at writing tests, and this is another reasonable use of them.
However, you should be more intentional than just “Write tests for this component”. It certainly will do it, and it might do a good job, including thinking of some things that you wouldn’t have though to test. But, it will also miss things because it might make assumptions about what you were intending to do (this is especially the case if what you are doing is close to, but not entirely, similar to a pattern that it knows well). It can also use old approaches or come up with fairly byzantine mocking structures because it can and hasn’t considered other options.
I suggest being very explicit about what you want tested and how if you are going to try to generate tests. Vet what it produces and if it looks over complicated, ask it if this is the most idiomatic or most modern approach. Sometimes this is enough to bump it to new approaches that are more trimmed down. Or, you can just be blunt and ask for simpler approaches.
Another way you can use AI is to vet your tests. Once you have the tests in place, just ask Copliot if the tests appear to be comprehensive and if not to tell you what else it would test (this a supplement to, not a replacement for, coverage tests). Read through its suggests and see which ones seem reasonable and ignore the rest.
Finishing Up
- Make sure the tests are passing (with
pnpm test:unitandpnpm test:e2e) and there are no linting errors (withpnpm run lint) or typescript errors (withpnpm typecheck). - Add and commit your changes and push those commit(s) to GitHub.
- Submit your repository to Gradescope
Requirements
- Smoke test is present
- Snapshot test is present
- Both tests of the town route are present and correct
- the Playwright test is present and correct
- Pass all tests
- Pass all Biome checks
- Pass the TypeScript check
Recall that the Practical exercises are evaluated as “Satisfactory/Not yet satisfactory”. Your submission will need to implement all of the required functionality (i.e., pass all the tests) to be Satisfactory (2 points).
Footnotes
https://en.wikipedia.org/wiki/Smoke_testing_(software)↩︎