Assignment Four
| Deliverable | Due Date |
|---|---|
| Assignment 4 | April 07, 2026 at 11:59 PM |
| Assignment 4 (revision) | May 01, 2026 at 11:59 PM |
Goals
- Work on integrating Supabase into a more complex application
- Demonstrate your knowledge of React Router v7
- Experience refactoring to fit changing requirements
Prerequisites
This assignment builds on the work of assignment 3. As such, you should not start it until you have passed all of the Gradescope tests for assignment 3. While this doesn’t assure you that you will have “met expectations”, it is enough to proceed.
Click the GitHub Classroom link and then clone the repository GitHub classroom creates to your local computer (in your shell, execute
git clonefollowed by the address of the repository).Update the
package.jsonfile with your name, e-mail, and the URL of your repositoryInstall the package dependencies with
pnpm install.Copy over your assignment 3 code into the starter project.
Practice good software development habits and create a new feature branch for your work.
Once you have the dependencies installed you can start the development server with
pnpm run dev.
Background
This assignment mirrors the Supabase practical in which you converted the Vermont Hikes site to use a database for data persistence. You will be transitioning Code Cache over to server-maintained data management and adding the facility to add data to the application. Specifically, you will be adding the ability to add new snippets and to edit existing ones. As such, you should complete the practical before starting this assignment.
I recommend that you keep the Supabase documentation and Supabase JavaScript API reference handy.
Part 0:
We are going to make a small change to your code to improve testability and accessibility.
In Listing, you will have a list of ListingItems. These are (hopefully) contained with a <div> or an <ul>. I would like you to change that to the more semantic <nav> which says “here are a bunch of navigation links”. You should also add an aria-label of “Snippet list”.
Part 1: New functionality: Add, update and delete
The first part of the assignment will be to add new functionality to the site to allow users to add, update and delete snippets.
New snippets
For new snippets, we want to add a new route: http://host/create. This should take us to a page that looks like this:
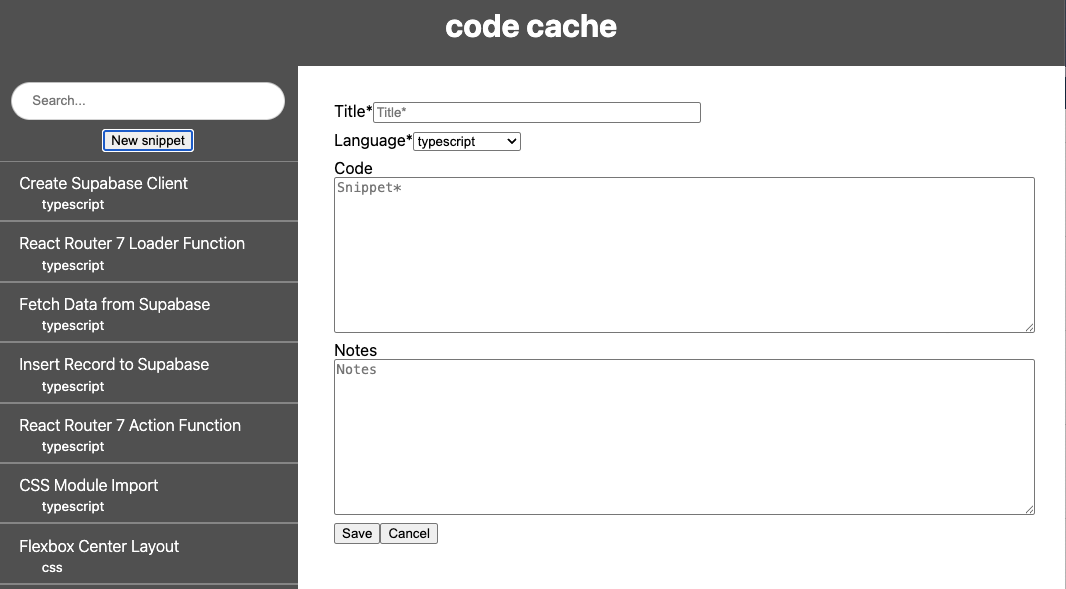
Note that the sidebar is still visible, so the new route should be under the layout you built previously.
Once the route is in place, add a <Link> containing a <button> to Listing and have it link to your new create route. The button should have the text “New snippet”.
The Editor
You will find that I have added a new component called Editor in app/components/Editor.tsx. Your route component can just return an Editor to provide all of the visual interface you see in the image.
Your goal is to make the editor look as close to the picture as you can, using what you learned from Practical 5. I’ve provided a CSS module for the styling and given you the containing <div>. You should not need to worry about the styling beyond that – just using the correct elements.
The only tricky piece is the drop-down options for setting the language. That is using a select tag. To populate the <option> tags that provide the values for the drop-down, we are going to ask the SyntaxHighlighter which languages it supports (I’ve already imported it for you). You can get the languages with
SyntaxHighlighter.supportedLanguagesFor each input, add an aria-label that matches the name of the input (i.e., “title”, “language”, “code”, “notes”, “save”, or “cancel”).
Handling Save
When the user saves, the snippet should be saved in the database and the app should load the newly created snippet.
To save the new snippet, you will want to call addSnippet in your clientAction function (like we did in the practical). The addSnippet function will return the new snippet with its auto-assigned id number. We want to use this to change the view to the new snippet.
We have not talked about automatically redirecting the user yet. We can do that with the redirect function, which can be imported from the react-router library (see the example in the linked documentation). You want to return the redirect(route) call, where route is the path to the new snippet.
Handling Cancel
When the user clicks the Cancel button, we would like to go back to whatever they were looking at when they clicked the button.
This one will require a slightly different approach. I would like you to add prop to the Editor called onCancel. onCancel will be a function to call when the cancel button is clicked (you can do this by setting the onClick property of the button).
You will write this function in your new route component and pass in ito the Editor.
You can think of your browsing history like a big stack. Every time you visit a new page you are adding to the end of the stack. The back button in your browser moves you backwards in the stack.
RRv7 provides a custom hook called useNavigate which returns a navigate function ( const navigate = useNavigate();). We can pass in any route to navigate to go to that route. We can also pass in -1, and it will take us to the previous route.
The guidance is to use redirect when we can. The redirect function taps directly into the functionality your browser already has for redirecting to new pages.
The navigate function is more tied up in the implementation of RRv7 and has deeper access. We need this for the easy access to the history stack. However, since useNavigate is a hook, it must be called inside of a React component (and near the top of the function).
Write your custom doCancel function and have it called navigate(-1). This should be done inside of your new snippet route component. Use the useNavigate hook to get the navigate function. Note that you can’t call this inside of doCancel – it needs to be in the component itself.
The “return to the last page” behavior is usually what we want. However, what happens if someone types in the URL of the create page (or has it bookmarked) so that the last page they were viewing wasn’t within the application? You will find that the navigate(-1) trick doesn’t work if the previous page wasn’t in the app (or the user typed in the URL, so there is no previous page). Part of being an app designer is thinking about these cases and coming up with reasonable solutions.
I think one of the best things we could do is to go to the root of the site (/) if there isn’t a valid page to back to. If you want a challenge, see if you can figure out how to detect that there isn’t a valid page to return to and navigate to / instead. This will probably require you to look into the document variable.
Updating snippets
Updating snippets will work very similarly to creating them. To edit a snippet, we will introduce a new route: snippets/:snippetId/edit. This makes it very clear what the route’s function is and provides us with the id of the snippet being edited in the URL.
Once you have the new route established, add a button to the snippet route under the SnippetView. Wrap it in a Link that takes the user to your new route.
The contents of the new route will basically look the same as the route for creating new snippets. You will achieve this by reusing the Editor component. The difference is that we would like the Editor to be loaded with the existing values of the snippet. This will require you to add an optional prop to the Editor and set the default values for the various form elements.
Handling Save
This can be done just like you did for creating snippets. The difference is that you will use updateSnippet, which has a slightly different behavior.
Handling Cancel
This will also be very similar to the last case, but this time canceling should return you back to the original snippet.
Deleting snippets
Deleting will work a little bit differently from add and update. This is an immediate action so we don’t need a route or new components. Instead, we will add an action directly to the snippet route.
Add a second button to the snippet route with the text “Delete”. Instead of wrapping it in a Link, wrap it in a Form.
You can then add a clientAction directly to the snippet route. In there, call deleteSnippet and then return a redirect to /.
This is admittedly poor UX. We should not have an instant death button the erases snippets with no warning. However, this assignment has enough other things going on that I decided to spare you that one extra piece of complexity for now.
Part 2: Add Supabase
You should follow the process of practical 05 fairly closely through this process.
- Run
supabase initto initialize the system. This will create a supabase directory in your project root. You will be asked if you want to setup settings for Deno for different environments. You can reply “n”. - Start the supabase server with
supabase start - Save the key values you need in a .env.local file
I have provided the app/lib/supabase_client.tsx source file again as there are no changes that need to be made to it from the practical.
Between this assignment, the practical and the project, you will have a collection of different supabase instances to manage. They will not want to run simultaneously unless you edit the port number in supabase/config.toml. A better plan is to just run one at a time. Pay attention to the error message – it will provide the command to stop the currently running instance.
A good practice to get into is running supabase stop when you are done.
Data modeling
Our data model for this application is pretty much as simplistic as it gets. Our only “noun” is a Snippet. There are no relations that we need, so we just need the database for persistence. The attributes that our table will need are:
id: biginttitle: textcode: textlanguage: textnotes: textcreationDate: date
All of the fields are required, so you can specify that they are NOT NULL.
The id should be an auto-incrementing primary key like we saw in the practical for the reviews.
For the creationDate, we could store it as text, but we have more flexibility if we store it as a Date type. If you set the default on the column to current_date and then don’t try to set it, then it will be set to the date that the record is created (which is just what we want). A second consideration is that Postgres is case insensitive by default, so if you specify a column as currentDate, it will be stored as currentdate, which will mess up our code. If we put quotes around the name it will preserve the case. So, you would specify the column as "creationDate" date default current_date NOT NULL.
Loading the data
Follow the process from the practical to create a migration.
We have not talked a lot about the SQL syntax you need. Use the schema we wrote in practical 5 to get you as far as you can. Once you think you have it, asking Copilot to check it for you is a good use of the AI.
Once your migration is in place, you can follow the same technique we used in practical 5 and get Copilot make a seed.sql file for you. Make sure that it knows not to include the id so it can be autogenerated. You can make your own choice about the dates. The original dates are all autogenerated so you could leave them off and get the current date as their creation date, or you could pass them through as is, or you could get really creative and ask Copilot to randomize them a little when it creates the seed file. I leave that choice with you.
Run supabase db reset to update the database and load all of the data.
A note about testing
In order to test the code that uses a database, my tests need to actually interact with the development Supabase instance. The downside of this is that when you run those tests, it will replace the database contents with the test data. You certainly don’t need all of the seed data to do some simple checks of your code. However, when you want the seed data back, run supabase db reset again.
For the last assignment, I introduced Playwright for doing the end-to-end tests (pnpm test:e2e). Playwright has a nifty mode that allows you to run your tests with a user interface. Start Playwright with pnpm test:e2e --ui. It will open a window and show you all of the tests. You can run them all or pick individual tests to run in the interface. You can also see what the test is doing and when it is complete, if you click on the individual steps, you can see the state of the UI at that point in the test. We will talk about it in class, but I would encourage you to spend a little time playing around with it on this assignment.
Database functions
To convert Code Cache over to using the database, you just need to replace the functionality of the five accessor functions in app/data/utils.ts.
getSnippet(id)- takes in the id of a snippet and returns the associates snippet objectgetSnippets()- returns an array of all snippetsaddSnippet(values)- takes in a partial snippet and adds it to the database; returns the new snippetupdateSnippet(id, values)- takes in the id of an existing snippet and the values to updatedeleteSnippet(id)- deletes the snippet with the matching id
I advise converting these one at a time and then when they are all working, delete the rest of the contents of this file.
Reflection
In the README.md file, I would like you to write a brief reflection about your assignment.
If it meets the requirements (passes all of the automated checks), write how comfortable with your solution. Did you use good development practices, or is it a hacky, last minute solution. Do you understand your own solution? How much effort did you put into it? Do you feel like you could do a similar assignment with more ease?
If it doesn’t yet meet the requirements, what are you struggling with? What does it not do correctly? What have you done to try to correct it? How hard have you tried to correct it? How much effort have you put into the entire assignment?
Put a date on the reflection and if you do any revisions, add another dated reflection below it.
Finishing up
Your submission should not have lint warnings or errors when run with npm run check. Remember that you can fix many errors automatically with npm run check --write. You should also make sure that your code passed all type checks by running pnpm run typecheck.
If you followed the advice to work in a feature branch, merge your changes back into main.
Push your changes to the GitHub repository. Once the repository is fully pushed, submit your repository to Gradescope as described here. You can submit (push to GitHub and submit to Gradescope) multiple times.
Portions of your assignment will undergo automated grading. Make sure to follow the specifications exactly, otherwise the tests will fail (even if your code generally works as intended). Use the provided test suite (run with pnpm test) to get immediate feedback on whether your code follows the specification. Because of the increased complexity of a React application, Gradescope can take minutes to run all of the tests. Thus you will be more efficient testing locally and only submitting to Gradescope when you are confident your application meets the specification.
Labeling
For this assignment, I will label submissions with one of the following
| Assessment | Requirements |
|---|---|
| Revision needed | Some but not all tests as passing. |
| Meets Expectations | All tests pass, including linter analysis (without excessive deactivations). |
| Exemplary | All requirements for Meets Expectations and your implementation is clear, concise, readily understood, and maintainable. |
FAQ
Do I need to implement unit testing?
No. As with previous assignments, the skeleton includes some unit tests to assist you in your development and to ensure that the grading scripts can automatically test your submission.
What if the tests and assignment specification appear to be in conflict?
Please post to Slack so that we can resolve any conflict or confusion ASAP.