CS 105 - Exercise Thirteen
Goals
- Learn how to manipulate images with Snap!
- Learn a little bit about color
- Get more practice with lists and higher-order blocks
Prerequisite
There is no starter code for this exercise, so go ahead and visit https://snap.berkeley.edu/snap/snap.html and make sure you are logged in.
Objective
Our goal with this exercise is to show you a collection of ways that you can manipulate images at the pixel level (and hopefully learn a little bit about how filters you may have used in the past might work).
I have some tasks for you, but I hope that you take the opportunity to play around a little bit.
Getting an image
As I showed you during the lecture, we can get images into Snap! very easily by just dragging them into the working area.
There, is, however, a second way -- you can use the camera that you have become somewhat accustomed to staring into at the top of your computer.
Go to the Sensing palette. Pull out  . Click on the predicate input until it shows a green check box. Then click on the block. Your browser should ask for permission to use your camera, and then you should show up on stage.
You will notice that the image is pale -- it is set to be semi-transparent. You can control it with  .
.
You can turn the video off again by clicking the predicate again so it shows a red check and then clicking the block again.
However, that doesn't get you a picture.
Pull out the  . Set the first input to 'snap' and the second to 'stage'.
If you click on it, you will see a little picture pop up in the report bubble.
We want to work with it, so... hopefully you can hear this coming already... we want to save it in a variable. Create a new variable called pic and set it to a picture:

Run your block to get a good picture of yourself (or at least one you can stand looking at for the next hour or so).
To see what the picture looks like, use  to see the image on the sprite.
When you are happy, turn off the video capture.
Check out the pixels
The picture data in pic is considered to be a "costume". This is essentially a wrapper around the pixel data with some extra information about the dimensions. To get the actual pixels so we can look at them (and manipulate them), we need to use the  . Change the first input to 'pixels' and load
 pic into the second input.
If you click on this reporter, you will see the long list of pixel data. Remember that while this looks like a table when you display it, it is a list of lists, where the sub-lists are representing single pixels in the image.
Adjust the brightness
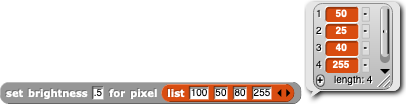
You first task will be to create a new block:  .
.
This block takes two arguments, a brightness and a pixel. We will consider the brightness to be a percentage, so numbers less than 1 will make the image darker, and numbers greater than 1 will make it brighter. We will multiply this value by the values stored in each pixel to create a new image.
Now, we could just apply this multiplication to the entire image at once (which I did in the lecture). Unfortunately, this only kind of works. The problem is that it changes the alpha channel as well. We could trim off the alpha value (which has the effect of making it always 255), but we are going to want to work at the pixel level for our next operations, so we will do that for this one as well (despite it being slower).
The idea behind making a block that just operates on a single pixel is that the logic is easier (we only have to worry about a single pixel), and we can easily apply it to the entire image with teh  .
.
Making the block
Recall that each pixel is just a list of four elements. The first three are the red, green, and blue channels of the color, and the fourth is the alpha value.
You want to report a new list of four values. For the three color channels, multiple each one by the brightness. For the alpha channel, just report the original value from the pixel.
Here is what the block should output given a pixel:
Apply it to the image
Once the block is working (and not before), use to apply the new reporter to the pixels of your image. Wrap the whole thing in a so you can check out your handiwork.
It will take a couple of seconds for the image to be processed.
Make the image grayscale
As I told you in the lecture, a grayscale image is one in which the pixel value is really just the intensity of the light. We could represent each pixel with a single value. However, when our images have RGB channels, we can achieve the same thing by setting all three channels to the same value. I showed you how we could look at the amount of light was stored in the red channel, by duplicating its value across all three channels.
The resulting image is grayscale, but diverges from our perception of how much light was actually shining on the subjects of our pictures. We would like to get closer to the "luminance" of the pixels. While there is a formula for the luminance, we are going to keep things simple and just average the values in the three channels together. This at least gets all three channels involved in the output (the reason that this isn't quite the correct solution is because our eyes have different sensitivities to red, green and blue).
Make a block
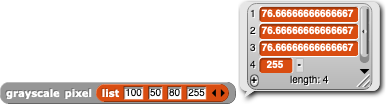
Create a new block:  .
.
This will work like the . We will work at the pixel level first, and then apply it to the pixels later.
Inside of the new block, create a new script variable called avg. Set it equal to the average of the three color channels.
Report a list of four elements. The first three channels should all be the computed average. The fourth should be the original alpha value.
Apply it to the image
Use the same process as you used for the to map the new reporter over the entire image.
Posterize
I showed you a simple example of posterizing in the lecture. In essence, the process of posterizing is to reduce the number of colors in an image (historically, printing in color was expensive and each color required a separate print run, so the fewer colors the better).
In the example I showed you, I divided all of the pixel values by 100, rounded to throw away the fractional part, and then multiplied by 100 again. This meant each color channel could be 0, 100, or 200. This gives us 9 possible colors.
While this process works, and gives us an interesting stylized look, we can make the output much more interesting looking.
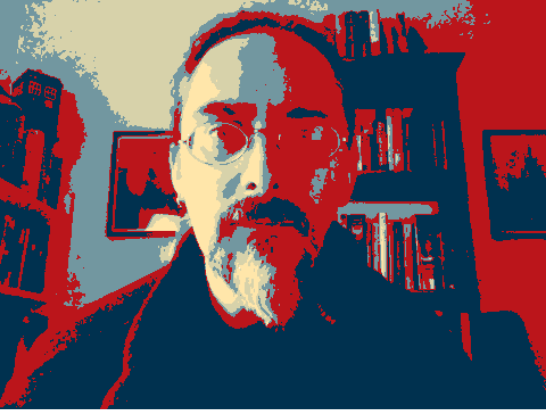
Another approach to posterizing is to convert the image to grayscale, simplify that image, and then assign whatever colors we like to the different levels.
With a looming election, I was reminded of the Obama "Hope" poster by Shepard Fairley. So I borrowed the color scheme.
Make a block
Create a new block: 
You can actually duplicate the to give you your starting place.
You will start the same way -- compute the average of the three color channels.
However, you won't assemble a new pixel based on that value.
We also don't need to simplify the average value either. Instead, I would like you to think about numeric ranges. For example:
if avg < 64
  report color 1
else
  if avg < 128
    report color 2
  else
    ... and so one
Notice that these ranges will simplify the color palette by using a single color to represent a collection of values found in the original image.
Colors
When you report the color, you just need to report a pixel (list) with your desired color.
To get the "Hope" colors, I used (0,49,79), (187,21,27), (114,151,160), (215,210,170), (255,230,170), and (255,255,255) (in that order). You can use this color scheme, or you can make your own. There are a number of different sites that will help you create color palettes that work together, like Adobe Color and coolors (click the hex string at the bottom of the stripes to get the 0-255 values for the color channels). The requirement is that you should use between four and ten different colors.
Tuning the ranges
I would start by evenly dividing the 0-255 range into roughly equal sized bands (e.g., if you want six colors, you could break at 42, 84, 126, etc...). This may look fine, or it may not. You are welcome (encouraged) to tinker with the ranges to achieve a look you like. (Note that while we can match the colors of the "Hope" poster, we won't quite gt the same look because there is a lot of image simplification that also happened, which we aren't able to perform).
What I will be looking for
- You should have a picture stored in the variable
pic - You should produce three new blocks: , , and
- You should have a script incorporating which shows the image with the brightness adjusted when run
- You should have a script incorporating which shows a grayscale version of the image when run
- You should have a script incorporating which shows a posterized version of the image with at least four colors, but no more than ten different colors when run
Submitting
Share the project using the instructions from exercise 1.
Visit the exercise page on Canvas to submit the URL.
Note: If you were playing around and dragged some extra images in (which would be great!), you may not be able to save your work because there is a cap on the size of projects that are saved on the Snap! servers. You can either delete the extra images back out, or save the project to your computer and upload the file to Canvas.