CS 105 - Exercise Five
Goals
- Learn to use script and sprite variables
- Get more practice thinking spatially
- Get more practice using abstraction to reduce complexity
Prerequisite
There is no starter code for this exercise, so go ahead and visit https://snap.berkeley.edu/snap/snap.html and make sure you are logged in.
Objective
In this exercise we are going to continue the theme of the last exercise and make some more generative art. Again, we will have the sprite bounce around the screen drawing colored lines. However, this time, we will add a little more randomness, and more importantly, some symmetry to make the result more aesthetically appealing.
Random bouncing
We are going to start by having the sprite randomly bounce around the screen. This time, however, we will do it a little differently.
Start with the  .
.
Add a  to clean up the stage at the start.
Now, let's make the sprite bounce around.
Put a  in a
in a  . You can leave the default 10, or you can change it if you feel like it.
If you just run that, the sprite will run off the stage and disappear. We solved this before with our special predicate. However, Snap! comes with a block for handling this precise thing. If you look in the Motion palette, you will find the  . This handles both the edge detection AND the change in direction. Unlike our solution, which headed off in random directions, the will give us perfect reflections.
Put a  before the move and a
  after the bounce (at the moment, this will seem pointless since we are just putting the pen down again almost immediately, but trust me, it will be important later...).
Go ahead and run it.
It probably look pretty boring. The perfect reflections mean that a direction of (0, 90, 180, or 270 degrees) just causes the sprite to turn around and go back the way it came. If you click  to change the direction a little, you will get a somewhat more interesting cross-hatch effect. After a short period, however, the sprite starts tracing over old lines.
Add some interest
We can add some more interest by adding some more randomness.
Add after the pen up block. If you leave it at the default 15 degrees, the sprite will draw a circle, which isn't quite what we want.
Replace the 15 with a  from the Operators palette. If you keep the default 1 to 10, you will get random curves. You can change the look by adjusting the numbers. Higher numbers will make more "scribbly" lines, while small ones lead to long swooping lines.
Adding symmetry
To make this exercise a little more interesting, we are going to add some symmetry to the drawing. We are going to start by mirroring across the Y axis. The basic idea is if we draw a line on one side of the stage (black), we will draw a mirrored version of it on the other side of the stage (red).
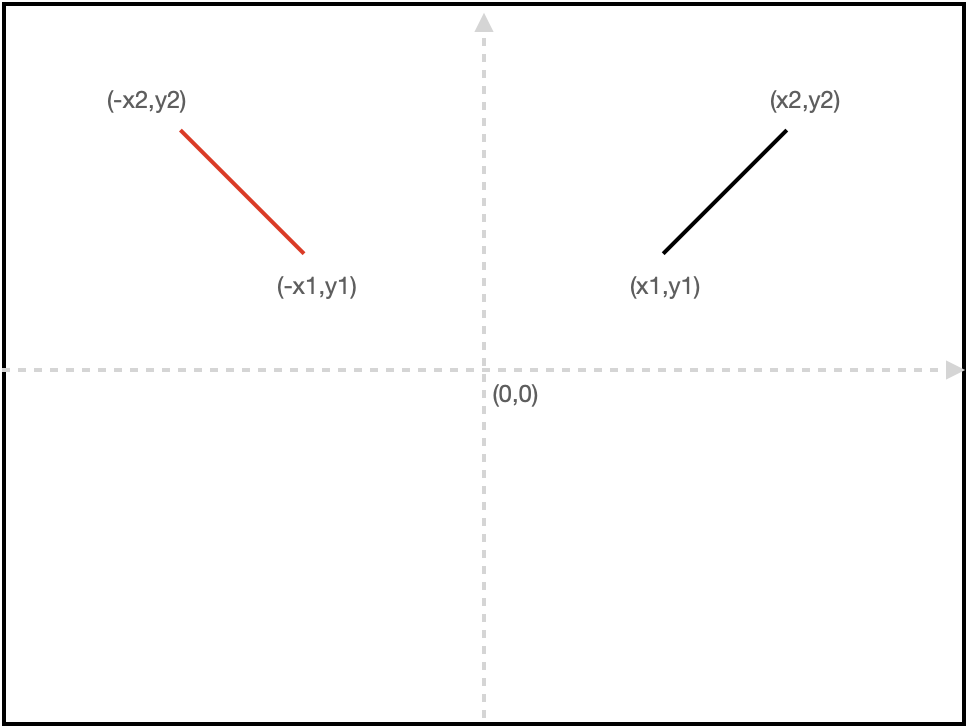
The important thing to notice is that we can do this just by negating the X components of the endpoints.
Remembering what we've done
In order to be able to draw a mirrored line, here is our algorithm:
- start at point (x1, y1)
- draw a line to point (x2, y2)
- move to (-x1, y1)
- draw a line to (-x2, y2)
- move back to point (x2, y2) to be ready for the next line
Notice that in order to do this, we need to remember four values: x1, y1, x2, and y2. While the sprite will be at each of those positions, our algorithm requires us to remember the positions after the sprite has already moved. In essence, this is the same problem I demonstrated in the lecture when we had to keep returning to the center of the spiral
At the start of the script, add a  (put it right after the clear). Rename
 a to x1. Use the black arrow to create three more variables and name them y1, x2, and y2.
Now we want to capture the values for the four variables.
Start with x1 and y1. Use the  to store the
  and
and  . You want ot do this before the to capture where the sprite starts.
Repeat this for x2, and y2. This time, however, you want to record the positions after the to capture where the sprite is at the end of the line.
Make a block to draw a line
Let's revisit our algorithm
- start at point (x1, y1) we don't have to do anything, (x1, y1) is just where the sprite is now
- draw a line to point (x2, y2) this is handled by the move
- move to (-x1, y1)
- draw a line to (-x2, y2)
- move back to point (x2, y2) to be ready for the next line
So, we are down to worrying about the last three steps. We are going to focus for a moment on just the third and fourth steps. We can abstract these to "draw the line (-x1, y1) to (-x2, y2)". Even better, we could abstract this to "draw a line from point A to point B". If we could draw an arbitrary line by entering end points, that could be useful.
When I start talking about abstraction, your first thoughts at this point should be "sounds like we should make a new block". So let's make a new block.
Add a new block to the Pen palette that looks like this: 
This should draw any arbitrary line, and it shouldn't leave extra pen trails all over the place. So the algorithm is
- pick up the pen
- go to (x1, y1)
- put the pen down
- go to (x2, y2)
- pick the pen up
Important The (x1, y1) and (x2, y2) are not the same as the ones we were using in our script. These are just convenient names for the end points of lines, so I am reusing them. Inside of the we are in a different scope -- the names may look the same, but they refer to different boxes.
Draw the mirrored line
Once you have your new block, add it to your script right after you saved (x2, y2) and before you make the random direction change.
You want to draw the line from (-x1, y1) to (-x2, y2). The easiest way to negate a number is to multiply it by -1.
Right after you draw the line, add a  to return the sprite to (x2, y2).
Try it out. While the sprite draws its curves, a second mirror curve is drawn, flipped across the Y axis.
Four way symmetry
Once you have one degree of symmetry working, it is easy enough to add another to also mirror the image across the X axis.
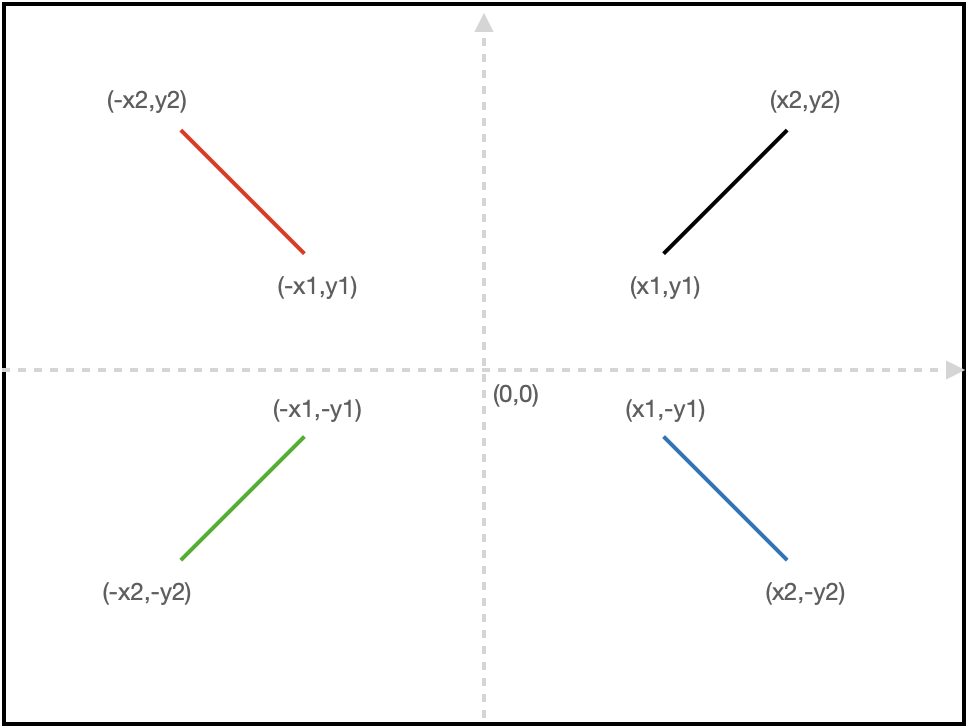
We play the same trick to mirror the line across the X axis. To mirror the original line, we draw the line (x1, -y1) to (x2, -y2) (blue line). However, if, as shown in the picture, we are going to fully mirror across the X axis, we also need to mirror the reflection we already made. This gives us the line (-x1, -y1) to (-x2, -y2) (green line).
While this sounds a bit complicated, it really just means you need to use your two more times. Ain't abstraction grand?
Make sure that both of these additions goes in before the returning the sprite to (x2, y2).
Now we have something pretty interesting going on. If you leave it running too long, it just becomes a mess, but for a little while, I think it is pretty interesting to look at.
Add color
Time to add color. Color will pep up our image, and it will allow it to run longer and still look interesting.
We could do the same thing we did for the last exercise, and just increment hue from time to time. However, we are going to do something more interesting. We are going to tie the color of the pen to the location of the mouse, so as the user moves the mouse across the stage, the color will change.
Mapping mouse location to hue
The first this we need to figure out is how the mouse position could affect the hue.
I decided that we would map the x position of the mouse to the hue. That leaves us with the problem of switching scales. What does that mean?
The x position of the mouse (on the stage at least) goes from the left side of the stage (-240) to the right (240). Hue goes from 0 to 100. So, we want the hue to be at 0 when the x position of the cursor is -240, the hue to be 50 when the cursor is at 0 and for the hue to be 100 when the cursor is at 240.
Converting between two linear scales is pretty easy:
- divide by the size of the current scale this leaves you with a value between 0-1, which we can think of as the percentage of the way across
- multiply by the size of the new scale this converts from the percentage back to a real value
So, to convert our mouse's x position to a hue, we can multiply it by 100/width of the stage.
Of course, 0, is in the middle of the stage, not on the left, so we need to add half of the width to the mouse position first. This gives us (mouse x + width/2)*(100/width).
Add another variable
We could just plug this equation into  and be done with it, but I want you to do a little more with variables. So we are going to write a separate script that manages the mouse and the color.
This time we are going to make a sprite variable.
Go to the Variables palette and click the 'Make a variable' button. Call the variable pen hue.
Write the second script
Start a new script with a second .
Add a to the new script.
Inside of the loop, use the to set pen hue based on the equation we developed above.
Now, back in the first script, add a at the very end of and set the hue to the value stored in pen hue.
Try it out. Get both of your scripts running and play with colors by moving your cursor back and forth.
Chances are, nothing happened. If you haven't previously set the color of the pen, then hue, saturation and brightness all started at 0. Changing just the hue won't change the saturation and brightness, and 0 brightness and 0 saturation is still black, no matter what hue you have.
Add two copies of to the first scripts, right under the . If you click on the box that says "hue", it will give you a menu of other properties you can set. Use this to set the brightness and saturation up to 100. Now you should get nice colors.
Cleaning up
Hue values loop when they go above 100 or under 0. So, when the cursor leaves the stage, it continues to cycle.
For more control, add an  around the block setting
 pen hue. Add a predicate to the conditional that only runs the block if mouse x is on stage (less than the right side and greater than the left).
That's it! Play around with it and see if you can make something that appeals to you. I'll be honest, I think this is really interesting and a big step up from the last exercise. Giving the user the power to change the color transforms this from a screensaver to a collaborative piece. Both the computer and the user have some level of control over what is drawn. I think this is a really powerful concept...
What I will be looking for
- When the user clicks the
 , the stage should clear and the sprite should start wandering randomly
 - As the sprite wanders, it should draw four symmetric lines, mirroring across both the X and Y axes.
- When the user moves the cursor across the stage, the hue should change based on the mouse position
- There should be two scripts, one controlling the sprite, and one controlling the hue
- The color script should only be sensitive to mouse movement on the stage
Submitting
Share the project using the instructions from exercise 1.
Visit the exercise page on Canvas to submit the URL.