CS 105 - Exercise Fourteen
Goals
- Learn how to manipulate images with Snap!
- Get more practice with lists and map
Prerequisite
There is no starter code for this exercise, so go ahead and visit https://snap.berkeley.edu/snap/snap.html and make sure you are logged in.
Objective
Our goal with this exercise is to get a feel for how sound work. Again, there is a set of tasks for you, but I hope that you take the opportunity to play around a little bit as well.
Getting started
Start by loading the 'Audio comp' library. We will use the  to look at what we are doing.
Next, you will want a sound to play with. Open the Sound tab and record yourself saying a short sentence. It can be anything you want, but it will be useful if it is a recognizable sentence and not just jibber jabber.
Get to know your sound
Find the  . Set the first input to 'samples' and the second to your sound. Click on it to see the samples (this is like our pixels when we were looking at images).
As I told you in the lecture, all of the samples have a value between -1 and 1. You should see that you have a lot of samples.
Check the sample rate. Change the first input of to 'sample rate'. This will change based on your system setup. For me, I get recordings at 48 kHz. Remember this sample rate. You will want to use this with the  when you are playing your samples.
Try playing the sound now. Try playing your sound at different sample rates to hear the difference.
Use the to take a look at the shape of your sound.
Once you have tried that, let's start altering the sound.
Throwing away information
One of the crazy things about sound is how resilient it is to change. It will degrade, but still remain recognizable. Let's check this out.
Change the sign of samples
What would happen if we didn't have any negative values? Pull out the  . Set the first input to 'abs' (the absolute value). Put your samples in the second input.
Plot the result

You should see that all of the negative values have been flipped up on top of the line.
Play this new sound.
It should sound different, but it will still be recognizable. (to my ears, it sounds like someone talking with wax paper held stretched in front of their mouth).
Change sample values
Let's try something more radical. What we are going to do is simplify the sound. If the sample value is greater than 0, we will set the sample to .5, otherwise, we will set it to -.5. In other words, we are simplifying our sound to have binary samples. If this was an image, it is like we converted it so that each pixel was only either black or white.
Create a new block:  .
.
It is time to break out  ! (you knew it was coming)
We will be mapping over the sound -- changing each sample. What we want is something that will look at a sample's value and return .5 if it is positive and -.5 otherwise.
This is a job for  . Hopefully you recall that this block takes in a predicate and then reports one of the other two inputs depending on the outcomes of the predicate (true or false). Set this up to check if the value of the sample is greater than 0, if so, report .5, otherwise report -.5. Remember to leave one of the inputs blank in the predicate to represent the sample.
Plot the result of applying this block to your samples.
The result should look quite different. You should now see something that look like a barcode.
Go ahead and play the result. If you are wearing headphones, you might want to make sure your volume is not too loud first
The result is super noisy, but you should still be able to make out your original words. Crazy, no?
Creating effects based on time shifts
Since sound is a temporal phenomenon, a number of the interesting effects we can do with it involve not just knowing what a sample is, but also when it occurs.
To help us out, we are going to learn a little bit more about the map block.
Pull out a new .
Hold down your Shift key and click the black triangle on the ring. The block should now look like this:  .
.
This reveals the three variables that are available for the block we pass into the ring.
value- This one you have seen before. This variable receives the value of the current item of the list that we are mapping over (this is the explicit form -- when we leave an input blank, we are using the implicit form)index- This is the position of the current item in the listlist- This is the list we are currently mapping over. This is useful if the list we are passing in to the map is being computed so we don't have to recompute the list for every element.
Reverse the sound
Let's try reversing the sound.
Create a new block: 
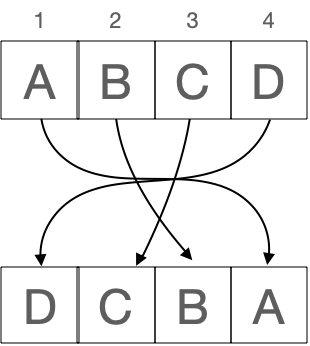
Now, think about the process of reversing a list. Imagine we have a list like this:

When we are looking at the first sample, the value (A) will not help us to figure out the value we want to return (D).
However, the position in the list is helpful. When we are on the first item of the list, we want to return the last item. When we are on the second item, we want to return 1 less than the end, etc...
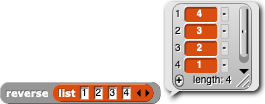
Use  ,
,  , and some basic operators to reverse the list.
I recommend trying this out on a simple list before moving on to your list of samples.
Once you have it working, reverse the samples of your sound.
Plot the result -- it should look reversed.
Now play it.
Reverb
For your next effect, you are going to create a block that will add reverb to a sound.
Reverb is caused by the sound bouncing off the surfaces of the room and coming back to your ears a little bit later.
We can mimic this by adding a weaker version of old samples to the sound currently being produced. The characteristics of the space the sound is produced in determine how much of a delay there is between the sound being produced and the sound being received by your ears.
For example, for our example list, if we use a delay of 3, the new value for the fourth element of our list would be D (the current sample) plus a weaker version of A (the delayed sample):
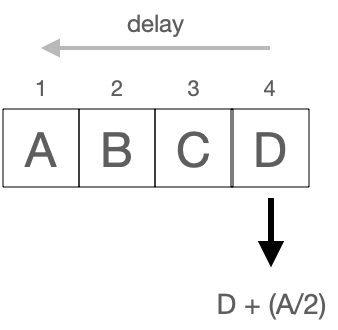
Create a new block: 
Use . Report a new sound where each sample has been added to 1/2 the sample from delay samples earlier (where delay is the second input to the block).
For a fairly realistic reverb, try a delay of about 1000. This should make your voice just sound a little fuller. As you make that number bigger, you will hear more separation and you will start getting more of an echo effect.
An obvious question to have is "what happens when the position of the sample is earlier than the length of the delay?" (for example, what if we are on sample 100, and we have a delay of 1000?). Here, we are benefiting from some behavior of Snap!. If we ask for an item at a location that doesn't exist in a list (like -900), Snap! just reports 0, rather than reporting an error. So, our earlier samples just don't have any reverb added to them.
What I will be looking for
- A block that makes every sample either .5 or -.5
- A block that reverses the sound
- A that adds reverb to the sound
- Evidence that you have been playing with the sounds ( and ) being used
Submitting
Share the project using the instructions from exercise 1.
Visit the exercise page on Canvas to submit the URL (or the XML file if you saved it locally).
Note: Remember that there is a cap on the size of your project, so if you create too many sounds you may not be able to save. You can either save your file locally and submit that, or trim back on some of the sounds you have made.