Due: 2018-04-18 11:59p
Before coming to lab on Thursday/Friday find one
or more color images that you will want to work with. Edit them
so that they have no more than 800 pixels on the longest side (any
simple photo viewer/editor such as "Preview" will be sufficient). Save
your resized color image(s) to the same folder where your Python
program will be. Create your file username_hw7.py and
copy the
justblue() function below into your file.
Write a function called power(L, exponent), which
takes in a list of numbers L and returns a new list where each value of
the original list has been raised to exponent. Use a
list comprehension
instead of a loop.
Write a function called average(L), which returns
the average (arithmetic mean) of a list of numbers L. Use a loop.
Write a function called pigLatin(s) that takes
in a string and returns a new string with every word converted to pig
latin. We will use three rules for converting a word to pig latin:
Do not worry about punctuation and assume you will be given actual words.
Use the string function split(), which will convert a string
into a list. Create a new empty list to collect your answer in.
Convert each item in the list to pig latin, appending each new pig latin word
onto the end of the answer list.
Then convert
the answer list back into a string using the join()
function. The syntax for the join() function is a little
weird. You call it on the string that you want to use as glue and pass
it the list of words to glue together.
>>> ' '.join(["this","is", "a", "string"])
'this is a string'
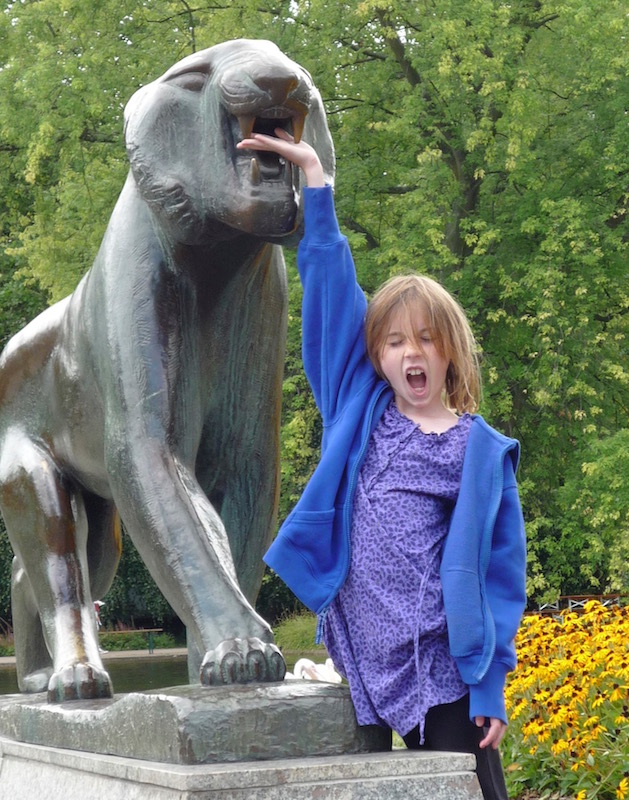
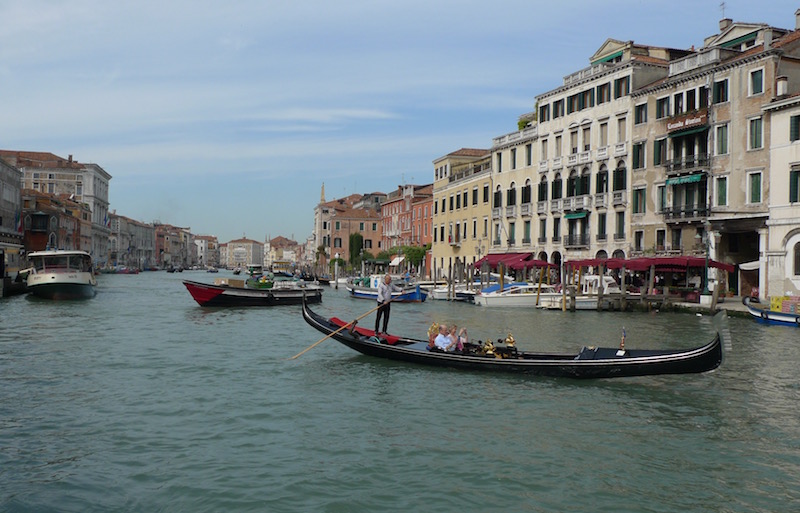
This week, we will implement some image transformation functions. If you don't yet have a resized image of your own to work with, for now you can use either sample image 1 or sample image 2.
Put the image in the same directory as your Python file.
Create your new Python file and then put this line at the top:
from PIL import Image
This imports the library we will be using to manipulate the images. The library is called Pillow (Pillow is an updated version of an older project called PIL, thus the name). Here is the documentation.
This is a different import format than we have used previously. This imports a single item out of a library (in this case Image). The following command opens an image from the same directory (passed in as a string) and returns an image object. The PIL module can open a variety of different image formats. Generally, the images you have available will be .jpg, .png, or .gif files, all of which can be opened.
Run this file, despite the fact that it doesn’t appear to do anything. It will import the Pillow library and set the working directory so we can find your image.
In the Python console, type the following line (updating the string containing the file name as appropriate).
image = Image.open('statue.jpg')
This will open the file
and store a representation of the contents in a variable called
image (you can, of course, use any variable name you
like).
To see the image, you can call its show() function.
image.show()
When you are ready to save the image back out to the file system,
you can call the save() function like this:
image.save('statue_mirror.png')
PIL will figure out what format to save the file based on the suffix you supply the name. The file will turn up in the same working directory as your input images and source files. Save as ‘.png’ rather than ‘.jpg’, because PIL’s default jpg processing looks horrible.
Our style of working with media will be that we open images on the console, pass them into functions that return new images, and then show or save the results.
As we discussed in class, every pixel in a color image is made up of red, green, and blue data. For our first function we are going to isolate the blue channel by setting the values associated with the other channels to 0.
Here is the function (we'll walk through it together in class, but you can copy it to your file to use as a template if you like).
def justBlue(image):
    """Return a new image containing just the blue values from an image.

    The input should be a PIL image object created using something like
    image = Image.open(filename), where filename is a string.
    """
    # create a copy of the original image so we don't lose the original
    newImage = image.copy()

    # create our 2D structure of pixels from the image so we can work with individual pixels
    pixels = newImage.load()

    # get the bounding box -- this is returned as a tuple and we use some python
    # magic to automatically break the tuple up into four variables
    minX,minY,width,height = image.getbbox()

    # iterate over every pixel in the image
    for y in range(height):
        for x in range(width):
            # get the rgb value of the pixel (as a tuple in the order (red, green, blue))
            rgb = pixels[x,y]

            # set the pixel to a new RGB value (in this instance, we keep the original
            # blue value and set the red and green to 0)
            pixels[x,y] = (0,0, rgb[2])

    # return the new image
    return newImage
Run this on your image and use show() to look at the
result (no need to save this one).
>>> blueImage = justBlue(image)
>>> blueImage.show()
You get shades of gray when all three color channels have the same value. So, to convert an image to grayscale, you need to visit each pixel, take the three color channels and combine them to get the a value we call the luminance of the pixel. You can then take this value and use it for all three color channels to get a grayscale image.
We start by calculating the average (i.e., add the three channels
together and then divide by 3). We save this value in a variable and use
it for all three channels of the pixel. We need to use the
int() function to convert the result to an integer, since
we can’t have fractional color values.
Here is code for grayscale(image) that takes in
an image and returns a grayscale version.
def grayscale(image):
    """Return a new image containing grayscale values from an image.

    The input should be a PIL image object created using something like
    image = Image.open(filename), where filename is a string.
    """
    # create a copy of the original image so we don't lose the original
    newImage = image.copy()

    # create our 2D structure of pixels from the image so we can work with individual pixels
    pixels = newImage.load()

    # get the bounding box -- this is returned as a tuple and we use some python
    # magic to automatically break the tuple up into four variables
    minX,minY,width,height = image.getbbox()

    # iterate over every pixel in the image
    for y in range(height):
        for x in range(width):
            # get the rgb value of the pixel (as a tuple in the order (red, green, blue))
            rgb = pixels[x,y]

            # set the pixel to a new RGB value
            # that is the average of the old
            avg = int((rgb[0]+rgb[1]+rgb[2])/3)
            pixels[x,y] = (avg, avg, avg)

    # return the new image
    return newImage
A different black and white image can be created through
thresholding. The idea is to choose a value between 0 and 255 as the
threshold, and then any pixel luminance values less than the
threshold are considered black,
and any pixel luminance values greater than or equal to the
threshold are considered white.
Implement a function blackwhite(image, threshold) that takes
in an image and a threshold value as parameters and returns a black and white version.
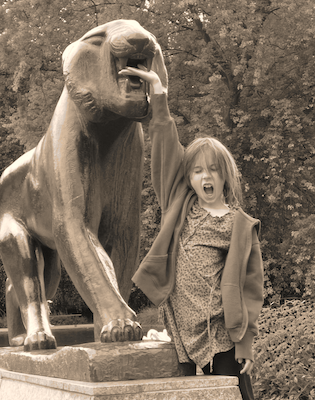
Write a function called sepia(image), that takes in an
image and returns a sepia version of the image.
Sepia is a very common photo filter — just about every photo editor has some variant of it. This mimics the effect of an old chemical process that left black and white images yellowish in appearance. We can do this by creating a grayscale image, and then adjusting the red and blue channels to give it a yellowish tint. If we just add some yellow to everything, however, it doesn’t look very good. So we are going to treat the high values, low values and mid values separately.
The process works like this. First calculate the luminance of the pixel as you did above for the grayscale image.
If we just use this luminance value for all three channels, we will get the grayscale image we already created. Instead, create a new red value by multiplying the luminance by the appropriate factor below. Do the same to create a new blue value. The green channel can take the raw luminance value. So, for example, if we have a luminance of 130, you create a new color with (130*1.15, 130, 130*.85) = (149,130,110). If you had a luminance of 50, your color would be (55, 50, 45).
| type | range of values | red weight | blue weight |
|---|---|---|---|
| shadow | 0-62 | 1.1 | 0.9 |
| mids | 63-192 | 1.15 | 0.85 |
| highlights | 193-255 | 1.08 | 0.93 |
Note that since we are increasing the amount of red, it is possible that the red value will exceed 255. If this happens, very strange things can start happening. So, after you have adjusted red and blue, check if red is over 255, and if it is, set it to 255.
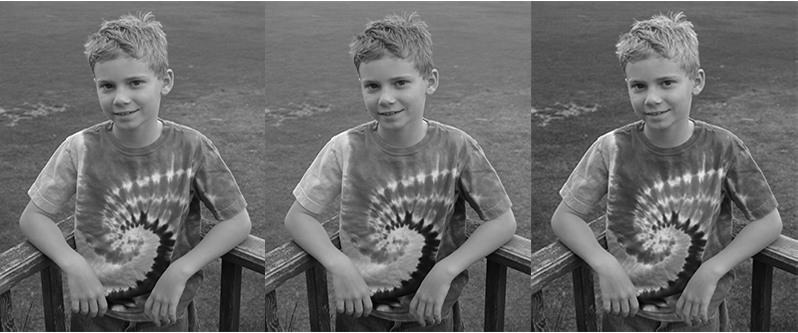
The first grayscale image that we produced above looks fine, but we can make it a little better. An old photographer’s trick is to use colored filters when shooting black and white film. Doing this can dramatically change the appearance of the image. For example, we might use a yellow filter when shooting landscapes. This lets through the red and green light (trees, grass, dirt), but blocks out blue (sky and water). This makes foliage glow while making the sky dark and contrasty. Of course with digital photography, we don’t actually need color filters any more, we can just adjust the color channels directly during post-processing.
We are going to do these by allowing the user to specify a weight
to be applied to each color channel. Write a function called
grayscaleWeighted(image, redWeight, greenWeight,
blueWeight)
Instead of averaging the three channel values together, multiply each channel by its respective weight and then sum the result (and convert it to an int). If the weights sum to one, we call this a weighted average. It is still an averaging operation, but it favors one item over another (this is how your grade is calculated so that individual homework assignments are worth less than exams). Note that what we calculated earlier is just a weighted average where the weights all were the same (for three items, the weight would be 1/3).
One interesting set of weights is (0.299, 0.587, 0.114) for red, green, and blue, respectively. This set of weights has been calculated to match the sensitivity of the human eye and is closer to the perceived luminance of a color image.
It is not a requirement that the weights sum to one, but you should keep it in that ball park. Make sure to try a collection of different weights. Often you will find that different weights will dramatically alter your images and there isn’t a single “correct” setting.
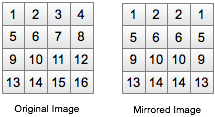
This time, rather
than altering the colors of the image, we are going to move them
around. Write a function called mirror(image) that takes
an image and returns another image that has the left side reflected
across the center line onto the right side.
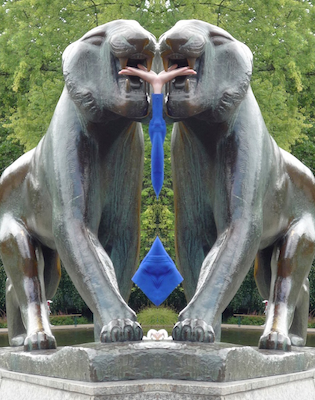
The idea is to visit only the pixels on the left side of the image and to copy the value of the pixel to the appropriate location on the other side of the image (you will need to adjust the end point on the ranges on the for loops so you only visit the pixels on the left side of the image). Here is a diagram showing how the operation should affect the individual pixels:
Write a function called fourUp(image) that takes in an image and returns a image that has four 1/4 sized versions of the original in it.
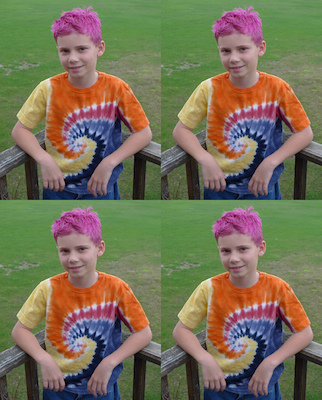
There are a number of ways to tackle this problem. Our suggestion is
that you add a line before the for loops that creates a new variable
(call it something like origPixels) and use the load
function to give you access to the pixels in the original image. In
your for loop, you will read from the original image and write into
the new one.
Start by just writing in the upper left sub image. The image should be one quarter of the size of the original image. This is actually easy to do, just skip every other row and column (i.e., pixel (x,y) in the new image comes from (x2, y2) in the original). When you have it, it should look like this:
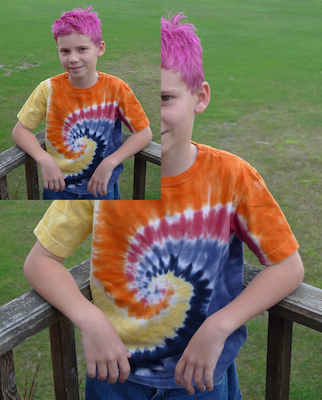
Once you have that working, you should be able to add the three other copies by drawing each pixel you are copying from the original four times. You will need to add offsets to the x and y position to shift the copies to the appropriate quadrant of the new image (think of what location (0,0), the upper left corner, has in each of the sub images). The pattern is very regular, so you should be able to come up with a way of specifying the four locations in terms of x,y, width, and height.
Before submitting, make sure you have followed all instructions correctly and check the HW7 grading rubric.
Please put all of your functions into a single Python file called username_hw7.py, where username is your Middlebury username.
Be sure to comment your code. The top of the file should include a multiline comment that lists your name, the name of the assignment, and the date, at a minimum. Each function should also include a multiline comment (enclosed in triple-quotes) at the beginning of the body of the function describing what the function does.
Save a copy of each generated image and collect them all in a PDF file called username_hw7.pdf (e.g., here are our sample solutions).
Submit your two files username_hw7.py and username_hw7.pdf using the CS 101 submit script.