Due: 2018-03-14 11:59p
randomBefore coming to lab on Thursday / Friday, read this entire homework write-up and complete the prelab.
Once you have the tree drawing correctly, and you have tested a couple of generations, we are going to start making it more tree-like.
We will start by adding a random element to the drawing. We will do
this with the help of the random library. The
random library provides us with a random number
generator, which will allow us to generate seemingly random numbers
the way we would roll a die. In truth, there is an algorithmic process
that governs the sequence of numbers, so it is not truly random, but
it is close enough for us right now. The main feature we are using
from the library is a function that will return random integers within
some range that we can specify.
import random
randint. It takes two arguments that
define the range of the random numbers that we want. The first gives
the start of the range, and the second is the end. If we call the
function randint(3,7), the function will return a
number that is either 3,4,5,6, or 7. Each time you call the
function, you will get any one number from that set. Because the
function is in a library, we need to preface it with the name of the
library. So, if I wanted a number between 5 and 9 inclusive, I would
write something like this:random.randint(5,9)
Type the above two lines in on the Python console in Thonny. Run the function a couple of times until you feel comfortable with what it is doing.
Now that you can generate random numbers, use it to randomize the tree. There are two main things we can randomize: the length of a particular branch, and the angle with respect to the trunk.
Some ideas:
To randomize the trunk length, you could add a random value, say between
-length//10 and length//10 to
length at the start of your function. In essence, this
would add or subtract something within a 10th of the trunk length.
You could play the same trick to randomize the angle. This is harder because you need to be able to undo the angle and it would be good if the left and right angles were not identical. One way to solve this would be to add a variable and break up the turn between the two branches into two separate turns.
For example, you could:
Create a new angle variable and set it equal to your base angle (currently 45) plus some random amount between -45 and +45
Rather than the 90 degree turn to the right, turn right by this angle to undo the left turn
Immediately after this right turn, calculate a new random angle
Use this angle to turn right
After drawing the second smaller tree, use the new angle to turn left (the turtle should now be facing the original direction)
Now you should take some time to play with the tree code. Here are some things you could try (complete at least 3 for full points)
Tinker with the generations to get a nice full tree. One approach is actually to get rid of the generations parameter altogether and use the spiral approach, iterating until the length is smaller than some set limit like 3 or 4 pixels.
Changing the base angle from 45 will give you trees with quite different characters. Try some different angles (or even mix them within the same tree) to get a tree you like.
Adjust the width of the turtle’s lines (using
turtle.width()) based on the current length so the
tree tapers (i.e., make the width a function of the length).
Rather than shrinking the length in half every time, experiment with other size reductions like one third, or three quarters.
Add color, perhaps even based on the current generation.
Make a forest with multiple trees (this should be done in
drawScene()).
Do something else not mentioned above.
Make sure the function includes a docstring enumerating the changes you have made.
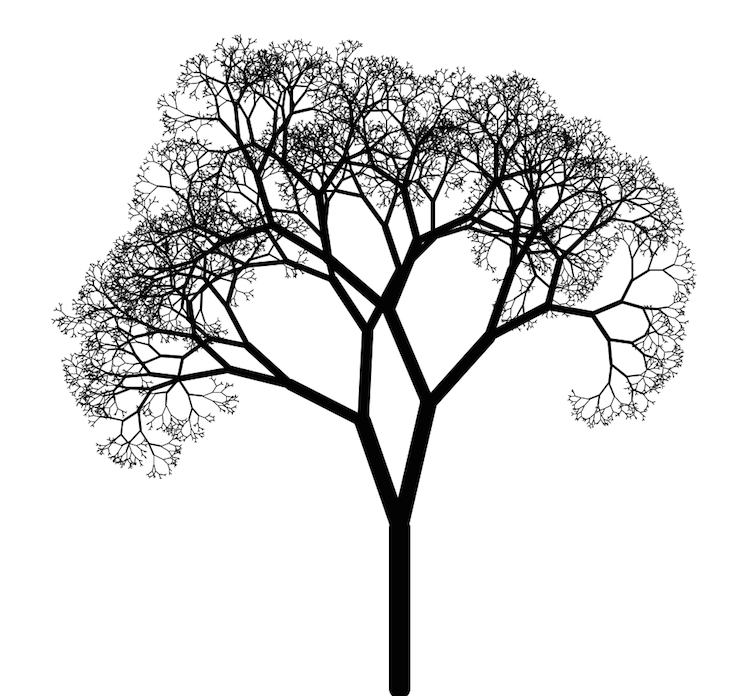
Here is an example tree with some of these features.
Take a screenshot of your tree drawing and upload it as part of your HW4 submission using the submit script.
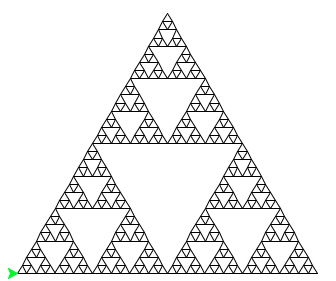
Next we'll draw another fun fractal shape called the Sierpinski triangle. Here is what it looks like taken out to six generations:
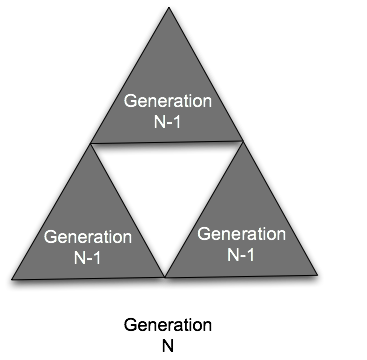
There are many ways to draw this shape, but we are going to use the same technique that we used for the Koch curve. Rather than taking a line and breaking it into thirds, we are going to draw half size triangles. Here is an abstraction of how Generation N of the Sierpinski Triangle is built:
More simply, here are the first generations 1, 2, 3, 4:

Here is one of the easiest ways to draw the Sierpinski Triangle. Start with the assumption that when you draw the triangle, the turtle will be left in the same position and orientation it started from. Given that, drawing a generation N triangle just involves drawing three N-1 triangles that are half the size. Draw the shape, move to the location of the next one, draw again, move to the last triangle and draw that one, then restore the turtle to the original location and orientation. For generation 0, don’t do anything (think of the base case of the spiral rather than the Koch curve).
All of this should go in a function called
drawSierpinski(length,
iterations)
. length will be the length of the base
of the figure and iterations will tell us how many generations to
make. You should also include the following function to call your function
and set everything up:
def drawSierpinskiScene(length, iterations):
    """
    Use this code to call your drawSierpinski() function. This provides
    the functionality of turning off the tracer and running turtle.done().
    """

    # turn off animation (too slow otherwise)
    turtle.tracer(False)

    # pick up the pen and move the turtle so it starts at the left edge of the canvas
    turtle.penup()
    turtle.goto(-turtle.window_width()/3 + 20,0)
    turtle.pendown()

    drawSierpinski(length, iterations)

    # finish
    turtle.update()
    turtle.done()
Take a screenshot of your Sierpinski Triangle for generation 4 and upload it as part of your HW4 submission using the submit script.
Write a new recursive function (and a helper function that sets up the turtle and calls your function) to draw the Sierpinski carpet. You may find it useful to pick up and put down the pen while doing the drawing. Feel free to enhance your carpet with color! Here are generations 0 through 4:

Here are the most important commands from the
Python turtle library
(more can be found in the online
documentation).
forward(distance)distance in the direction it is facing.backward(distance)distance in the opposite direction to where it is facing.right(angle)angle. Note that this can be any angle, not the four cardinal directions we had with LightBot.left(angle)angle.goto(x, y)pendown()penup()width(linewidth)pencolor(colorstring)fillcolor(colorstring)begin_fill()end_fill()tracer(state)True or False to turn the tracing on or off.update()window_width()window_height()Please put all of your functions into a single Python file called username_hw4.py, where username is your Middlebury username.
Be sure to comment your code. The top of the file should include a multiline comment that lists your name, the name of the assignment, and the date, at a minimum. Each function should also include a multiline comment (enclosed in triple-quotes) at the beginning of the body of the function describing what the function does.
As mentioned above, take screenshots of your output for your final tree scene and the Sierpinski generation 4. Save those screenshots and submit them along with your code. (On a Mac use Cmd-Shift-4 to select a region on the screen; on Windows use the Snipping Tool application. The resulting screenshot will be saved to the desktop.)
Before submitting, see the grading rubric and make sure you have followed all instructions correctly. Please submit your file username_hw4.py as well as the two screenshots using the CS 101 submit script. You will need to use the script three times for the three files. Please enter the same amount of time each time you fill out the form.