Git and GitHub
This is intended to be a quick primer for folks who are a little new to using git. It is by no means a comprehensive document and you are encouraged to read some additional sources.
Background
Git is a distributed version control system (VCS). Git, and its "killer app" GitHub, will play a key role in our workflow. At its simplest, a VCS enables us to "checkpoint" our work (a commit in Git terminology), creating a distinct version of our codebase that that we can return to. The opportunity to track and undo changes makes it easier to find new bugs (by reviewing differences to a prior working version), maintain a clean code base (we don't need to keep commented out code around in case we need it again), confidently make large changes knowing we can always recover a working version, and much more. For these reasons and more solo developers will use a VCS (and so should you!), but it is even more useful in a team environment.
How will you know if you and another developer modify the same file (in potentially incompatible ways)? How do you ensure you don't end up with a teammate's half-working modifications? We will use the VCS to prevent these problems.
The "distributed" in "distributed VCS" means that no central repository is required. Each Git repository contains the entire history of the project and thus each developer can work independently, making commits (checkpoints) without interfering with anyone else. Only when you push or pull those changes to another copy of the repository do your changes become visible to anyone else. Further we will use branches to segregate our changes. A branch is just a parallel version of the codebase. This allows you to experiment, while leaving the main branch untouched until your new feature is ready to be merged back into the main.
Git does not require a central repository. However, teams still tend to use a central repository to facilitate their work (we will use GitHub in this role). There isn't anything technically special about the shared repository other than that the team decides to share their changes via that central repository rather than directly with each other, which makes access privileges easier.
Setting up git
-
Make sure you have git installed. You likely already have Git installed (e.g. as part of OSX developer tools).
As an aside, OSX users should install XCode Command Line tools (which includes compilers and other relevant tools like Git) if you don't already have XCode installed. You will likely need those tools in another class. This guide includes step-by-step instructions.
-
If you haven't already, configure git with your name and e-mail (the other two options are just good settings to have)
git config --global user.name "your name"
git config --global user.email "your email address"
git config --global init.defaultBranch main
git config --global color.ui auto
For example:
git config --global user.name "Christopher Andrews" git config --global user.email "candrews@middlebury.edu" -
GitHub offers both SSH and HTTPS-based interfaces to your repository. SSH requires you to set up a public-key. See GitHub's help page for more information on these two options.
If you used git at some point in the past, but not recently, you may have used password authentication for command line interaction, which has now been deprecated. Read through the description for Cloning with HTTPS urls for more information.
Git basics
For this class, where all of your repositories will be created by GitHub Classroom, you only need a couple of basic commands.
tl;dr
Getting the code from GitHub to your computer
git clone repository_url
Saving your work and uploading to GitHub
git add .
git commit -m "A message about what is in the commit"
git push -u origin main
git clone
Cloning a repository makes a copy of the entire repository (including all of the change history). You will start assignments by cloning the repository on GitHub to your local machine. Enter this into the terminal:
git clone repository_url
This will clone the repository at repository_url to your local machine in the current working directory of your terminal.
You can get the repository_url from GitHub by clicking the Code button on the front page of your repository.
git add
Adding changes to your local repository is a two step process. First you stage the changes you want to preserve. This gives you the chance to select a subset of the changes so that you can group related changes together into a single commit.
The command to stage a file called file_name is
git add file_name
The git add command will also accept wild cards and directories. This leads many developers to just use
git add .
That . stands for the current directory. That will add any changes found in the current directory or in child directories. In other words, when you do that at the root of the project you are staging all changes.
git commit
The second step is to commit the staged changes to the repository. This saves the changes that you staged. We will associate each commit with a message that tells us what was in the change.
For example:
git commit -m "completes parts 2 of the assignment"
The message should be short but informative about the contents of the commit so you can find specific commits later if you need to go back.
git push
When you commit the code, it is only saved on your local machine. To tell GitHub's version of the repository about the changes, you are going to push the changes to GitHub.
Our command for that will be
git push -u origin main
In this example, origin refers to the repository on GitHub, and main is the name of the branch. You can frequently just get away with git push.
Checking git status
To see what is going on there, are two primary tools to use.
git status
This will tell you the current status of your directory and little bit about the the status of the repository. The most useful part of this report is that for all changed files it will list if they are new, updated or deleted, as well as if they are staged yet or not.
The second command is
git log
This will show you the history of your commits.
Git and VSCode
VSCode has some pretty good Git integration (I switch back and forth between the command line and the builtin tools in VSCode all of the time).
Cloning
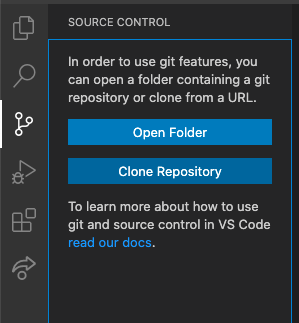
Much of the git functionality can be found in the Source Control tab (the icon on the left that looks like a forked graph).
![]()
If you open a new window, when you open the Source Control tab you will have the option to clone a repository. You can use this to clone your repository from GitHub (it will also bypass the current GitHub password requirements).
Editing
I recommend opening directories in VSCode rather than individual files (this will happen if you clone from the Source Control panel). If you do that, you will get a list of the files in the project in a sidebar. The files will be colored by state. The colors will vary based on your theme, but you will see new files, edited files, files that won't be seen by git, and if you are running a linter code with errors.
Another cool feature is that in a file with updates you will see a little colored bar on the left side for the lines with changes.

If you click on the bar, a change viewer will come up and show you what changed about this line.
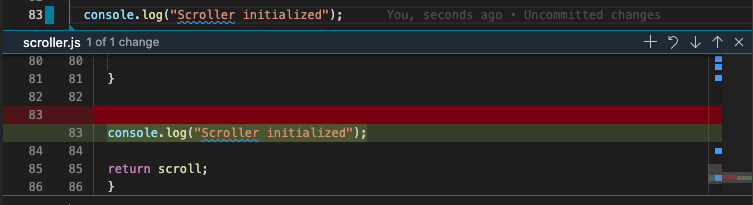
This little view has two cool features. First, you can stage the change with the '+'. This allows you to stage changes very selectively (more selectively than you can on the command line where we can just add an entire file).
The second is the "revert change" button (the looped arrow). This will revert your code back to the original state. This gets me excited because it is basically random access undo! Rather than having to undo all of the changes back to the point where you made a mistake, you can just selectively revert any edit made since the last commit.
Stage, commit, push
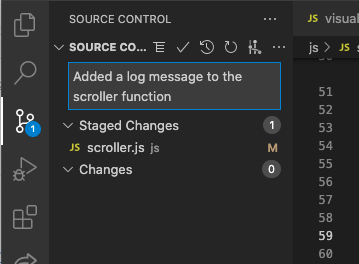
When you visit the Source Control tab with some file changes, the side panel shows you the current status of your changed files, just like git status.
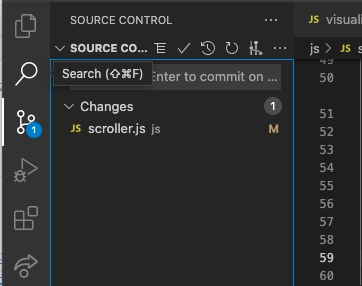
If you hover over any of the changed files, or the "Changes" header, some additional icons appear, allowing you to add or revert the changes.
When you stage a change, you will get a new category of "Staged Changes"
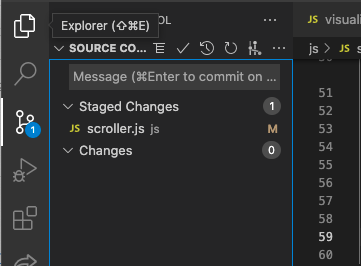
You can then write your message in the box at the top of the panel and then click the checkmark at the top of the panel.
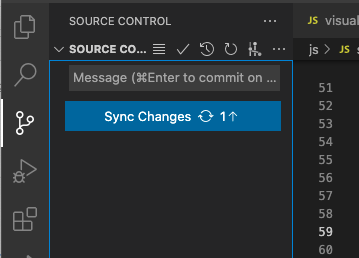
You will then get a button that says "Sync Changes", which will push your changes up to GitHub.
Last updated 02/16/2023