def draw_square_with_loop(side_length):
    for i in range(4):
        forward(side_length)
right(90)Class 4
Loops
Objectives for today
- Explain when loops are used
- Describe the execution of a
forloop - Use a
forloop to iterate through a range - Use loops for more complex Turtle drawings
- Practice implementing loops, especially nested loops
for loops
We previously implemented an improved function for drawing a square with Turtle that used a loop instead of copying the same code over and over again. In that example we knew we wanted to move and turn 4 times. Can we loop over those statements 4 times? Yes. With a for loop. A for loop does exactly what it sounds like. “For” some set of iterations, execute the statements in the body. Note that we also convert that fixed side length into function parameter that we can change (making our function more flexible and useful).
Note that “for” and “in” are reserved words (just like def) and therefore they cannot be used as variable or function names.
A for-loop in Python generally:
- Defines a loop variable that is set each iteration. For indexes, the convention is to use
i,j, andkalthough you can and should use more descriptive variable names when relevant. - The loop variable is set from a sequence. In this case the
rangefunction generates a sequence of integers starting at 0 up to but not including the supplied stop parameter (an exclusive end), e.g. 0, 1, 2, 3. So there will be 4 iterations. As we will see in future classes there are other kinds of sequences. - Each iteration the loop variable is set to the next value from the sequence and the for-loop body is executed in its entirety. The body of the for loop is indicated by indentation.
Let’s look at another example using loops, this time to print numbers:
def print_loop(n):
    """ Print numbers from 0 until (but not including) n """
    print("Begin list of numbers")
    for i in range(n):
        print(i)
    print("End list of numbers")

print_loop(5)
Begin list of numbers
0
1
2
3
4
End list of numbersWe can use the above output to remind us that there are three “regions” in and around our loop:
- Before the loop
- Inside the loop body
- After the loop
The statements inside the loop body will execute on every loop iteration, while the “after” statements will only execute once and only after all of the loop iterations are complete.
Recall in the first class that we said the computers were the right tool for the job when we needed to do something more than once. As you might imagine for-loops are one of our key tools for doing anything more than once. For example, when performing a computation “for each” data point in a file, or simulating a process “for” a set of different inputs.
for loops and scope
We saw that functions create a new scope, that is variables defined in a function are not visible outside that function. Do for loops similarly create a new scope? No. For simplicity, the designers of Python decided that only modules, classes (which we will learn about later) and functions will create a new scope. Thus the loop variable and any variables we define inside the loop body will be visible from that point to the end of the function, module, etc.
Turtle revisted
Warning about turtle errors
You may encounter errors with turtle, including rendering again after a bye() call or closing the drawing window. The graphics system that underlies turtle can only be “fired” once per Python console session. You can restart the Python console by clicking the Stop sign icon in Thonny to restart your session.
Turtle Enhancements
We saw that we can control the direction and angle of the drawing pen. What else can we control to enhance our square? Lets check out the docs. Here we change the color of the line to be red and set the color of the interior of our square to be yellow. The key for the “fill” is invoking begin_fill before you draw the shape and then end_fill after you draw the shape.
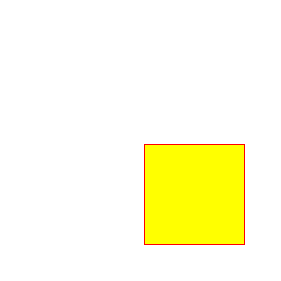
pencolor("red")
fillcolor("yellow")
begin_fill()

draw_square_with_loop(100)

end_fill()
Drawing Fibonacci spiral with a loop
What about more interesting shapes? Specifically a Fibonacci spiral. A Fibonacci spiral is created by inscribing quarter circles inside squares whose edge length increases as the Fibonacci sequence. Let’s implement a function golden_spiral that has two parameters, the starting radius of the spiral and the number segments, and draws a Fibonacci spiral.
We want to work incrementally, that is instead of tackling the whole problem at once. Let’s work in smaller more manageable steps:
- Define the Fibonacci sequence, and calculate Fibonacci numbers with a loop
- Identify a function in
turtlefor drawing portions of a circle - Integrate circle drawing into the Fibonacci loop
Try it before taking a peek at the code
def golden_spiral(radius, segments):
    """
    Draw a Fibonacci spiral using Turtle. turtle package must be imported into namespace.

    Args:
        radius: Starting radius of the spiral
        segments: Number of quarter circle segments to draw after initial quarter circle.
            Must be >= 2.

    Returns:
        None
    """
    a = radius
    circle(a, 90)
    b = radius
    circle(b, 90)
    # range can take two arguments, start and stop. We set the start at two since the first two
    # segments are already drawn
    for i in range(2, segments):
        c = a + b
        circle(c, 90)
        # Prepare for the next iteration of the loop
        a = b
        b = c
Note that if we invoke the golden_spiral function several times, each new spiral starts from where the last one finished. This reminds us that the pen has “state”, specifically an \((x, y)\) position and a heading. Controlling that state is a key part of the upcoming programming assignment. How could we control where the drawing starts? That is how could we modify our function to have the following definition and start drawing the spiral at a specific location on the screen?
def golden_spiral(x, y, radius, segments):We need a way move the pen around the page. If we review the docs, we see that there is a function setpos that sounds like it will do exactly what we want. If we try that out in the shell, e.g.
setpos(100, 100)we notice that every time we move the pen it draws a line. If we think about how we would draw this picture (with pen and paper), we would pick our hand up from the page before moving. Again returning to the docs, we see there is a function penup for picking the pen up and thus not drawing while moving. With those pieces we can now enhance our golden_spiral function to start drawing at an arbitrary location.
def golden_spiral(x, y, radius, segments):
    penup()
    setpos(x, y)
    pendown() # Need to put the pendown to start drawing again
    ...
Recall that pen (turtle) also has a heading that you will need to control in a similar way. I suspect you might find similar code at the beginning of several of your functions. If you we find ourselves with repeated code, we can often DRY it up with a function.
Here are many more turtle examples for you to review in preparation for the programming assignment.
Nested loops: ASCII art
In our programming assignment we will use Turtle to draw images. But that kind of graphical output can be awkward in programs that are designed to be automated and thus have text-based interfaces (like a lot of scientific software). In those contexts, we can use text for visualization (often termed ASCII art). Today we will use loops to generate some text-based visualizations (Adapted from “CS for All”), including of a Sine wave!
Print basic shapes
Try implementing both functions before peeking at the code
def print_rect(width, height, char):
    """Print an ASCII rectangle

    Args:
        width, height: Width in characters, height in rows of rectangle
        char: Character to print
    """
    for i in range(height):
        for j in range(width):
            print(char, end=" ")
        print() # Go to a new line at end of the row

def print_triangle(size, char):
    """Print an ASCII lower triangle

    Args:
        size: Height in rows and with in characters of triangle
        char: Character to print
    """
    for i in range(size):
        for j in range(i+1):
            print(char, end=" ")
        print()
As a starting point, let’s write functions to print a rectangle and a “lower” right triangle. For print_rect, the parameters will be the width, the height and the character and for print_triangle, the parameters will be the size (width and height) and the character.
print_rect(4, 6, "%")% % % %
% % % %
% % % %
% % % %
% % % %
% % % % print_triangle(3, "@")@
@ @
@ @ @ One restriction is that you are not allowed you to use the string multiplication operator (the goal is to practice using loops). As a hint, the print function adds a new line (carriage return) at the end by default. We can override that default by changing the end argument (we will learn more about these default arguments later in the semester). For example, notice the different output from these two code snippets (the semicolon just allows us to have multiple Python statements on one line).
print("%", end = " "); print("%", end = " ");% % print("%"); print("%");%
%Recall our discussion of syntax vs. semantics. Before we write any code let’s figure out the semantic tools we will use. Some questions for us to answer:
- What semantic tools will we use? Hint, since we are talking about loops, probably loops…
- How many loops will we need?
- If we need more than loop, are they nested, and if so, in what order?
- How will the loop sequences differ between the rectangle and the triangle?
Plotting a Sine wave
Imagine you want to plot a sine wave using a similar text rendering, where the rows are the angle and width is the amplitude. That is we want to implement the following, where the parameters are the height, the width, the character and the degrees-per-row.
Try implementing the function before peeking at the code
import math

def print_sin(width, height, char, degrees_per_row):
    """Print a sine wave (with angle on the vertical)

    Args:
        width: Maximum approximate width in characters
        height: Height in rows
        char: Character to print sine value
        degrees_per_row: Increment in angle for each row
    """
    degrees = 0
    for i in range(height):
        amplitude = math.sin(math.radians(degrees))
        # Map [-1,1] to width
        current_width = amplitude * (width / 2) + (width / 2)
        for j in range(int(current_width)):
            print(" ", end=" ")
        print(char)
degrees += degrees_per_row # The same as degrees = degrees + degrees_per_row print_sin(10, 10, "*", 45) *
*
*
*
*
*
*
*
*
*Again before we start, what semantic tools will we need? Loops (like before) and a way to calculate Sine. Not surprisingly Python has a built-in sin function. Is the input for that function degrees or radians (or both)? And would we find that out? If it is radians, how could we convert from degrees to radians?
We always want to work incrementally (testing as a we go).
How could we decompose this large problem into a set of smaller steps?
- Implement a loop that prints the degrees for each row
- Calculate (and print) the sine amplitude for each row
- Convert the sine amplitude to a number of columns (recall that
math.sinwill produce afloatin the range [-1,1], but we need an integer number of columns in the approximate range [0,width]). - Print the character at the specified number of columns