Due: 2017-05-04 2:45p
You are going to build a 24-hour clock with an interactive touch interface for setting the alarm. Because of our limited time, getting the alarm to actually function as an alarm clock will be left as an independent exercise…
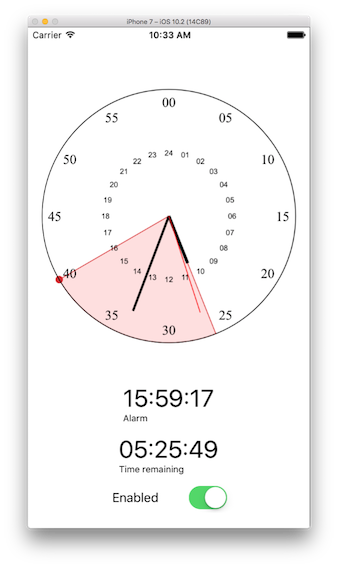
Our desired product is a working, analog-style 24 hour clock. The alarm is set by dragging the end point of the alarm to the desired set time.
Start by creating a new single-view application.
The single most important piece of this application is the large clock face. You will have noted that there is no "24HourClockView" widgets listed in our toolbox, so we will have to build one. We do this by making our own view.
Create a new Cocoa Touch Class file. Call the class ClockView and make it a subclass of UIView (not UIViewController). When you open it, you will see that you have been given a new function: draw(_ rect:CGRect) (go ahead and uncomment it). Overriding this allows us to draw our own content for the view. Our main drawing tool is the UIBezierPath (documentation). This works much like the Turtle in Python, where we assemble a collection of commands into a shape. We are going to construct "path" objects using functions like move(to:), addLine(to:), and addArc(withCenter:,radius:, startAngle:, endAngle:). We can then render the path using fill() or stroke(). We also have the ability to set the stroke size (using lineWidth()), and the color. (Curiously, unlike all of the others, the color is not a function of the path. Think of it like picking up a paint brush and then being able to paint a collection of different shapes).
Here is an example that would draw a red triangle with a black border.
let path = UIBezierPath()
path.move(to:CGPoint(x:100, y:100)) // pick up the pen and set it down at the specified point
path.addLine(to:CGPoint(x:150, y:200)) // draw a straight line to the new point
path.addLine(to:CGPoint(x:50, y:200))
path.addLine(to:CGPoint(x:100, y:100)) // this completes the shape
path.lineWidth = 3 // sets the width of the stroke (the outline of the shape)
UIColor.black.set() // set the current pen color to black
path.stroke() // draw the outline

UIColor.red.set() // set the current pen color to red
path.fill() // fill in the shape
Note: For those not used to doing drawing on computers, iOS follows the common convention that (0,0) is in the upper left hand side with x coordinates increasing to the right and y coordinates increasing down.
To draw a circle, we can use one of the UIBezierPath's custom init() functions: init(arcCenter: CGPoint, radius: CGFloat, startAngle: CGFloat, endAngle: CGFloat, clockwise: Bool). (Note all of the new types that start with "CG". This stands for "computer graphics", and we need to use these for all of our drawing functions.)
To get a full circle, you are going to draw from 0 to 2π (which you will write as 2*M_PI). We want the circle to fill the view, so the center and the radius should be set dynamically by the the current bounds of the view.
Create two new private variables clockRadius:CGFloat and clockCenter:CGPoint. These will be read-only properties that are calculated on demand (i.e., they have a getter but no setter). Since we want the circle to fill the view without distortion, the radius should be half of the smallest side of the view's bounding rectangle (min(bounds.size.width, bounds.size.height) / 2). Multiple this by 0.9 to shrink the circle in a little so it doesn't hit the sides of the view. For the clock center, the bounds object has two useful properties: midX and midY. Use these two to create a new CGPoint.
Now you can make the circle. Create a new path using all of the above values to draw a circle. Set the line width to 5, set the current color to black and then call the path's stroke() function.
Now you need to see what you have done…
Open the storyboard and drag a View component into the app (you'll find it near the very bottom of the component list). Use the Identity Inspector to set the class of the View to your new custom class. Now, if you run the app, you should see your circle.
It would be pretty annoying if we had to run our app every time we wanted to see the results of our custom drawing. Go back to your new view and write @IBDesignable right before the class declaration. Now, when you look in the storyboard, it will compile your view and render the output (warning – on slow machines you might not want to keep this set). It won't be perfect and will only use the initial default values, but it will be enough to support the design process.
Drawing text is pretty easy. Given a String, you can just call its draw(at:CGPoint) function to draw the text in the view. Drawing numbers arrayed in a circle is simply a matter of using a little trig and a for loop. If we have twelve numbers to draw, we divide 2π by 12 to get the angle between two numbers, and then the position of the number, if the center of the circle is at (x,y) and angle is the current angle where we want to put the number, would just be (x + radius*cos(angle), y + radius*sin(angle)). The devil, as they say, is in the details.
Messy details: The position of a piece of text is a point on the baseline at the start of the text. If we just use the formula above, all of the numbers will be offset from our circle. To solve this, we need to figure out where the center of a piece of text is work from that position down to the proper baseline point. Then there is the problem that the "12 o'clock" position in our circle is not where angle=0. To spare you from having to figure this out (that is not where I want you to put your time on this), here is a function:
private func drawNumbers(center: CGPoint, radius: CGFloat, angleOffset: CGFloat, range:StrideTo<Int>, stringAttributes:[String: Any?]){

    for i in range{
        let text = NSAttributedString(string: String(format:"%02d", i), attributes: stringAttributes)
        let bounds = text.boundingRect(with: CGSize(width:18, height:18), options: [], context: nil)
        let angle = CGFloat(i) * angleOffset - CGFloat(M_PI/2)
        let position = CGPoint(x: center.x + radius * CGFloat(cos(angle)) - bounds.width/2, y: center.y + radius * CGFloat(sin(angle)) - bounds.height/2)


        text.draw(at: position)

    }
}
The center and radius of this are pretty straightforward. The angleOffset is the size (in radians) of the angle between two numbers in the circle.
The range argument takes in the result of calling the stride(from:to:by:) function. I found this a convenient way to abstract the problem of our outer circle ranging from 0-60 by fives and our inner circle ranging from 1 to 24 by 1s.
The stringAttributes allows us to specify things like the font of the text. For example, text that is "Times" with a size of 10pt would be specified by [NSFontAttributeName:UIFont(name:"Times", size: 10)]. I personally used "Times" for the outer ring and "Arial" for the inner one.
Use this function to draw the two rings of text.
Drawing the hands is pretty straight forward. For each one, we set up a path. The path should move to the center of the clock face and then draw outward using the same (radius * cos(), radius * sin()) equation to calculate the end point. The only real question is what the angle should be…
To determine the angles for the hands, we need to know what time it is. We will get the time from outside the view, but by default, we will set the date to the current time. Add var dateTime:Date = Date(){didSet{setNeedsDisplay()}} to the top of the class. This creates a new property of type Date, initialized to the current time (at least to the time the view is instantiated). The didSet function on the property allows us to add functionality to be fired off when the value is changed. In this instance, we are telling the view to redraw itself. We never call draw() directly, we always use setNeedsDisplay().
To extract the time from this, you need to involve an NSCalendar object like this:
let calendar = NSCalendar.current
let time = calendar.dateComponents([.hour, .minute, .second], from: dateTime)

print(time.hour, time.minute, time.second)
Go ahead and draw the three hands using the current time. Style them however you want.
To get the clock to update, we are simply going to set dateTime at regular intervals. We will do this using a Timer object. Since we want the clock view to be independent of the actual time (so we could do different things with it, like implement an international clock interface), we will do this in the view controller.
Create an outlet in your view controller for the clock view in the usual way. Then add a function called update() to the view controller. The only thing this function needs to do is set the dateTime of the clock view to Date() – this will update the time and fire off the redraw.
Now we need to hook this all up to a timer. Create a new private property called timer:Timer?. In viewDidLoad, set the timer up like this: timer = Timer.scheduledTimer(timeInterval: 0.25, target: self, selector: #selector(update), userInfo: nil, repeats: true). This says that the timer will fire after a quarter of a second, calling the function update on self, and that it should repeat infinitely. You can set the interval time to whatever you like. I chose a 1/4 second to make sure that the second hand doesn't lag.
To be good citizens, we should turn off timers when we are done with them. So create a viewWillDisappear function and call invalidate on the timer object to turn it off.
When you run the app you should now have a happy, functional 24 hour clock.
Now we will implement the drag-to-set alarm functionality.
While we can deal with touch input directly, it is much easier to use one of the special "recognizers", which respond to specific types of inputs. For our purposes, we will use the UIPanGestureRecognizer. This is used for panning around maps and large images, but it also functions as a basic drag recognizer. In general, we would ask this recognizer for the change in position of the finger and the velocity. However, since we are dealing with a fixed view, we can ask for location.
Write a function like this:
@IBAction func handleDrag(recognizer: UIPanGestureRecognizer){
    let position = recognizer.location(in: self)
}
The position will be the current position of the finger in the view as a CGPoint. Create a new private property private var alarmPoint:CGPoint?{didSet{setNeedsDisplay()}}. Then, in the draw function, draw a circle at this point (making sure that the point exists).
To actually recognize the drags, we need to add a UIPanGestureRecognizer to the view. You will find it in the component library. Just drag it onto the view.
The recognizer will show up in the outline view of the storyboard and as a new icon at the top of the window. Control drag from the recognizer to the view and select your function.
You should now be able to drag the circle around the screen when you run your app.
We want the circle to stick to the perimeter of the clock face. Rather than having you fight with the trig, here is a function for doing that.
@IBAction func handleDrag(recognizer: UIPanGestureRecognizer){
    let position = recognizer.location(in: self)

    // make sure that we are inside of the clock face
    let x = position.x - clockCenter.x
    let y = position.y - clockCenter.y
    let distance = hypot(x, y) // calculates the length of the hypotenuse to the point (x,y)
    if 0 < distance && distance <= clockRadius{
        // figure out the angle so we can place the alarmPoint

        var angle = asin(y/distance)
        angle = (x < 0) ? CGFloat(M_PI) - angle: (y < 0) ? CGFloat(M_PI)*2 +  angle : angle
        alarmPoint = CGPoint(x:clockRadius * CGFloat(cos(angle)) + clockCenter.x, y: clockRadius * CGFloat(sin(angle)) + clockCenter.y)
    }
}
This code first makes sure that the drag is actually inside of the main circle. If it is, it figures out the angle to the current finger position, and projects it out to a point on the perimeter. You should now have a circle that you can drag around the clock face.
The next piece we want to handle is drawing the wedge that extends from the hour hand (current time) to the alarm point. This is, of course, just another path. As you hopefully can guess, this is basically the triangle, but with an arc instead of a line for the base line. You can add and arc to a path with the addArc function, which otherwise works line the init function you use to draw circles.
The start and end angles of the arc will be the angle to the hour hand and the angle to the alarm point. Rather than recalculating these, just add two more private properties to the view and save them at the point where they are calculated in the code.
The path can then go from the center of the clock, add the arc to the hour angle, and then back to the center of the clock. Color this however you like. I made the stroke and fill colors slightly different, with a reduced alpha on the fill so it is partially transparent. If you look in the documentation for UIColor, you will see that in addition to the collection of built in colors like the ones we used earlier, there are some custom initializers that allow you to specify any color you like.
For some extra fun, make this color something that can be set from the interface builder. Make a public property for your color (setting it to some default), and then put @IBInspectable immediately above it. This will now be a property that can be set from the properties editor.
Now we need to add labels that show the time the alarm is set for and the amount of time remaining.
Add the labels to the view in the usual way.
Ideally, when the gesture updates the alarm, we want to communicate this change to the view controller. Sounds like another job for a delegate!
Create a protocol in ClockView.swift called ClockViewDelegate. Add a function alarmPointSet(hour:Int, minute:Int). When the alarm has changed, the clock view will call the delegate function with the updated hour and minute.
Your view controller will, of course, implement this protocol. In the view controller, add ClockViewController to the declaration and add an implementation of the function.
To support the delegate on the clock view side, we need to add some more code to the handleDrag function. Add some code that checks if there is a delegate, and if there is calls the function with the hour and minute of the alarm.
To calculate this, you need to start with the alarm angle. Add π/2 to this to get 0 to line up with the top of our clock. There are 24*60 minutes in a full circle of the clock. Use this to figure out how many minutes there are in the angle represented by the alarm point. Once you have that, it should be simple to break this down in the number of complete hours and remaining minutes to send to the delegate.
Use the hour and minute data to calculate the target time for the alarm to go off. You will need to fetch the current time and see if the input hour and minute are earlier or later in the day.
If the input hour:minute occurs later in the day, then you just need to calculate the difference between the current time and the target time. Calculate this in seconds. You can then use Date().addingTimeInterval(TimeInterval(interval)), where interval is the number of seconds to calculate the target alarm time. This will return a Date object.
If the hour:minute time is earlier in the day, then it is really in the next day (you always march forward to the next time the alarm would go off). So the interval would be whatever is left of the day, plus hour and minute.
Save this target time as another property of the view controller. You can also use this to set the target time label.
Now, you can go back to the update function and add some code to update the time remaining label. I recommend using the timeIntervalSinceNow function on Date objects, which will return the number of second left before your target date.
When the enable button is on, the interface should work as described. When the enable button is off, the time remaining label should revert to 00:00:00, and the wedge on the clock should go away. I recommend adding a second function to the ClockViewDelegate protocol that the view can call to check if things are enabled when it draws.
Put your submission in a folder called username_hw05 and zip it. You can submit the result on Canvas.
| Points | Criteria |
|---|---|
| 4 | Custom view shows clock face with numbers and hands |
| 4 | Clock tells accurate time |
| 4 | Dragging works to position alarm point and wedge drawn |
| 2 | Target time label set |
| 2 | Time remaining label set |
| 1 | Enable button works |
| 1 | Layout is stable (you can turn off landscape) |