Due: 2016-11-14 11:59p
I teased this assignment earlier – it is time to do some terrain generation. This is, with out a doubt, the most "real" thing we have built yet.
For this assignment, you are going to take your simple grid from last assignment and extend it to a skinned surface. There is a class of surfaces which we can describe using something called heightfield. A heightfield is in essence a 2D array of height values (the term frequently refers to raster images that are used to store this data, but we are using it in the more general sense). For our purposes, we can imagine the cells in the array as vertices forming a regular grid on the XZ plane, with each vertex having a height value in Y. Rather than reading this in from a file, we will just generate our own.
There are a number of approaches that can be used for doing terrain generation. We are going to use a technique called the diamond square algorithm. The diamond square algorithm is based on a simple technique called midpoint displacement. Here is a simple example of midpoint displacement of a line:

The basic idea is to take a line segment, split it at its midpoint and displace the new point either up or down by some small amount. In the next pass, you have two line segments so you do it to both of them, and so on… This gives you a randomized curve that is not completely random.
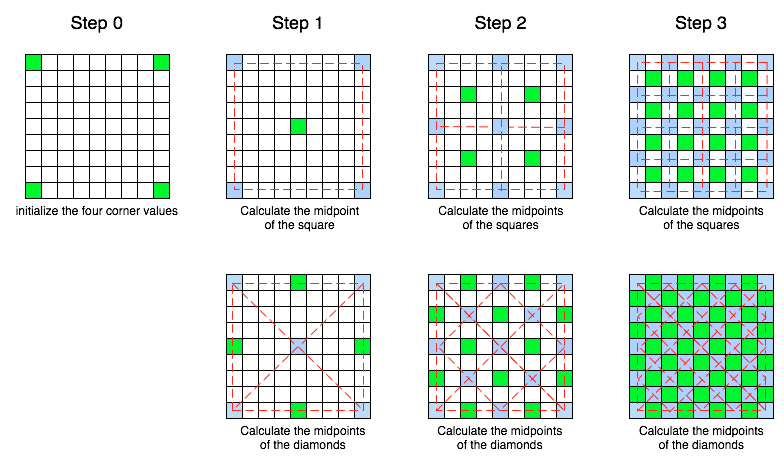
The diamond square algorithm is based on the same principle, but we are going to do it in two dimensions. Given a square, we will average the heights of the four corners, add or subtract some small random amount, and that will be the height of the midpoint of the square. We then break the square into four smaller squares and do the same to those squares, then each of those squares are broken into four, and we do it again, and so on. Of course, when we break the first square into quarters, the four sub squares would only have values in two of their four corners (one corner is a corner from the original square, and the opposing one is the midpoint of the original square). So, to fill these other squares in, we do the diamond step, which does the same thing for diamonds centered on the corners we still need values for. Here is what that looks like:
The algorithm is pretty straightforward (which would be why we are using this rather than one of the other approaches).
create a 2D array of size 2^n + 1 // this size is very important
initialize the values in the four corners of the 2D array
pick a roughness factor // close to 0 is flat, close to 1 is spiky
s = 2^n
while (array is not filled)
	r = roughness * s
	perform the square step
		for all squares of size s,
			average the values in the corners
			add rand()*2r - r to the midpoint
	perform the diamond step
		for all diamonds of size s,
			average the values at the four points of the diamond
			add rand()*2r - r to the midpoint
	s /= 2
There are some things to note. First, we must have a square that is a power of two plus one on the sides for the algorithm to work well. Second, we introduced a roughness factor that is scaled by the current size of the square. This allows us to have big changes made across big distances and small changes made across small distances. A third thing to note is that during the diamond step, we may need points that are not on the mesh. We can either compute the average without the missing point (which leads to somewhat strange pinches on the edges), or we can wrap around to the other side (which can also look a little strange). The choice is up to you.
My recommendation is that you implement the above algorithm separately from your mesh code. Just generate a 2D array filled with values. Then, create a function that iterates over the grid to skin the mesh. To help debugging, here is the sequence I would follow:
Somewhat obviously, the larger n is, the better the result will look. There are a couple of things to bear in mind however. The first of which is that larger squares will not give you larger landscapes. The mesh may take more room, but you will not get more mountains by increasing the size, you will just get more refinement of the same landscape.
The second issue is of more immediate concern. You will notice that we can specify the indices of vertices using either unsigned bytes or unsigned shorts. This puts an upper limit on the number of vertices we can address with indices: 2^16, or 65,536. Sixty five thousand may seem like a lot of vertices, but it is 256*256, so if n = 8, we will have too many vertices to index them. So, if you want to have a bigger grid, you will need to have multiple vertex/index buffers, or tile together some grids of n=7 or lower (which will have the effect of growing the landscape, not refining it further).
I recommend skinning the world as a series of triangle strips, much the way that I did the stripes around the sphere. You can, however, do the whole thing with one giant triangle strip. In order to do that, you will need to add some degenerate triangles. These are basically triangles that aren't really triangles because a vertex is duplicated. See if you can figure out a pattern that allows you to move to the next row or column without leaving artifacts everywhere and without flipping the orientation of your triangles.
Make sure that you have the terrain being generated and displaying properly before moving to the next stage.
Now comes the cool part – adding lighting. I would like you to use Phong shading to light the terrain. You will note that we only implemented Gouraud lighting in class, so you will need to move the lighting functionality down to the fragment shader. The second change is that we are dealing with the sun, so you can switch to directional lighting. Finally, I would like you to move all of the various "control knobs" out of the shader itself. The material properties, light direction and color should all be determined in your code and passed down as uniforms.
The biggest challenge, however, is that every vertex will now need a normal vector calculated for it. As we discussed in class, the normal for a vertex on an arbitrary surface is the average of the normals of all of the surrounding faces. I suggest computing and storing all of the face normals first, and then doing a second pass doing the averages for each point.
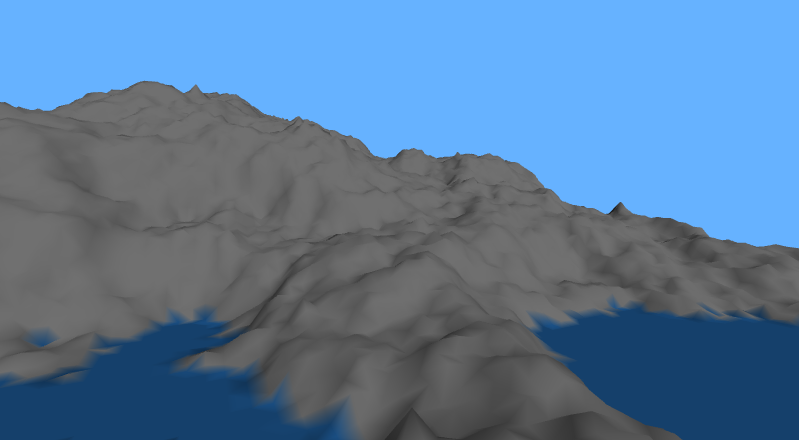
The shading will make it easy to see the three dimensionality, so I will leave coloring up to you. You could be boring and make everything snowy mountain grey/white. You could have different material properties at different levels so we have grey mountain peaks, transitioning to green at the tree line, and brown down on the plains. You can get a nice effect by determining a water level and cutting the heightfield off flat at a certain point, and making everything that reaches that level blue.
This assignment is worth 80. If you look closely below, that means that you need to pick up 15 points of "cool things" to get full credit. Make sure to list what you did at the top of your JavaScript file in order to get credit.
| Points | Metric |
|---|---|
| 5 | Presentation - good commenting, name in the files, followed naming convention |
| 5 | Design - no spaghetti code, sensible allocation of responsibilities, extensibility |
| 5 | Camera - is well positioned (baring awkward mountain placement) and has appropriate view for immersion |
| 20 | Diamond-square - algorithm is implemented correctly and hooked up to the mesh |
| 30 | Lighting - directional Phong lighting with proper normals |
| 5 | Water line - a water line has been chosen and points below a certain level are replaced with a flat plane (appropriately colored) |
| 5 | Waves - add some regular distortion to the water to create waves |
| 5 | Distance haze (fog) - shader-based fog is used to imply distance (do some research) |
| 5 | Animation - make the sun rise and set |
| 10 | UFO - create a shape with an internal light source that moves around the scene |
| 10 | Textures - use textures to make the surface look more like real mountains, dirt, etc |
| 10 | Variable roughness - roughness varies so that mountain tops are jagged and foothills are smooth |
| 10 | Tiling - create multiple tiles for longer distance |
| 10 | Flying camera - implement a flying camera to turn this into a flight simulator |
| 15 | Skybox - create a skybox |
| 20 | Bump map - make the terrain look more detailed by generating a high resolution heightmap, converting it to a normal map, and mapping it to a lower resolution mesh |
| 20 | Skybox w/ fractal clouds - use diamond-square or some noise function to generate clouds |
| ? | Something else |
Create a directory called username_hw06 and put your code inside (making sure your HTML file is called index.html). Please zip the directory and submit it to Assignment six on Canvas.
I would also like to make all of the submission live off of the website. If you would like to opt out from this, please tell me so in the text box on the assignment submission form.