Due: 2016-10-24, 11:59p
We are going to make a big step with this assignment. It is time to take our work to the next dimension… literally.
You are going to build a small 3D environment that we can "drive" around in. You will specify an environment using a custom scenegraph and then you will allow the viewer to move the camera around the scene using classic gaming WASD keys.
I am going to give you fairly wide latitude with respect to what you put into your environment. There are only a few requirements.
You must draw everything using the scenegraph in the final version. This means that everything must be fired off with a single call to root.apply() (more on that shortly). Of course, for development, you may (will) want to test your models individually – just make sure they are all bundled up by the time you hand it in. The only exception is for anything that you want to draw fixed with respect to the camera. You can include that in the scenegraph, but you are allowed to draw it separately.
I would like the base of your world to be a 20x20 grid. You should draw the grid using gl.LINES or any of the variants. All of your world should fit on the grid.
You should make at least three distinct shapes (not counting the grid). The platonic solids are a good starting point, but you can build whatever you like.
In at least one place in your world, there should be a compound structure, which consists of at least two primitive shapes (they could be the same shape), with some associated transformations. (In other words, I don't want a completely flat scenegraph).
The camera should be placed a little above the grid and should move with the WASD keys (if you don't know them, w - forward, s - backward, a - left, d - right).
To get you started, I am again providing you with some starter code. I have given you most of the code for the scenegraph and some code for smoothly using the keys on the keyboard.
My advice is to start with the grid. It should be relatively straightforward to lay out the lines using a loop, and it will be much easier to get your camera set and adjusted once the grid is in place.
You will want to lay your grid out on the XZ plane. In truth, you could do it on the XY plane, but we are used to the convention that Y is "up". To debug your grid initially, however, consider using lookAt to flip the camera ninety degrees so the Z axis is "up", and looking straight at the XZ plane. If you position the camera in the middle of the grid and with a fairly large Y value, you can look down and see the whole grid laid out flat.
Once the grid is place, you should work on the camera. We have looked at two different approaches to managing the camera placement: custom transformations and lookAt(). You are welcome to use either technique for managing your camera.
Custom transformations are not the most intuitive since you have to think about moving the world coordinate system out away from the eye. On the other hand, lookAt assumes a fixed "at", and if we want to be able to drive around, where we are looking should change all of the time. Probably the best mental image if you want to use lookAt is that there is a stick with a ball on the end attached to the front of the camera. If you want to turn the camera, you need to move the ball around the current location. If you want to move forward or backward, you need to move "eye" and "at" by the same amount and along the same vector. In either case, you will need to break out your trig to get movement working.
You should create a camera object that maintains the camera's position and heading (or "eye" and "at"). Design the object to have an apply() method that loads the view matrix into the GPU when you are ready to re-render.
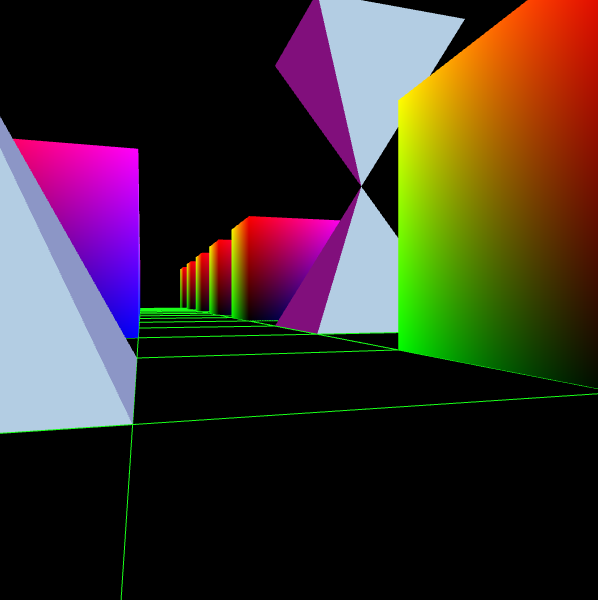
As I said above, you have a lot of choice here. Here is a snapshot of what my world looks like.
Mine illustrates one of the features of loading data down to the array buffer. I specified a cube placed at the origin. I then used loops to load it into my scenegraph a very large number of times with associated transformations to place them regularly around the space.
You should absolutely look at one of my recent examples, like the latest version of the 3D triangles. I was inspired by the design of D3 (for those of you who hung out with me in infovis or this summer). I wrote creation functions that handle loading all of the data into the buffers, which then return functions that do the actual drawing. You don't have to follow this style exactly, but the scenegraph will expect you to hand it render functions that require no arguments to draw.
As I said above, start by specifying your shapes and rendering them at the origin. Make sure they work before you get fancy.
I decided to give you most of the scenegraph code. You just need to fill in a couple of blanks. The scenegraph consists of a current transformation, a stack, and a graph of nodes. When we call createScenegraph() we get access to the root node with which we can build the rest of the graph. Our scenegraph has two kinds of nodes: shape nodes and transformation nodes.
Transformation nodes have two functions add(type, data) and apply(). The add() function creates a new node, adding it as a new node, and returning it so we can add things to the child. The type should be "transformation" or "shape", and the data depends on which kind of node we are creating. If it is a transformation node, we pass in a transformation matrix. If it is a shape node, we pass a function that will draw something when called.
The apply() function should push the current transformation, multiply the current transform by the node's matrix, call apply on all of its children, and then restore the current transform. Note that the implication here is that the matrix we hand transformation nodes should be relative, not an absolute combined transformation from the world origin.
Shape nodes are the leaves of our tree, and only have a single function: apply(). This should draw the associated shape by calling the stored drawing function.
Your task will be to finish the implementation of the transformation node's apply() function. Once you have that sorted out, go crazy and build a world.
This assignment is worth 65 points. You will notice that the table below has more than 65 points worth of metrics. You should do the first six items (starred). Then pick some combination of other things to individualize your world. You aren't restricted to these if you have another good idea – just run it by me first. Make sure to list your "cool features" at the top of your JavaScript file so I don't have to guess what you thought you did.
| Points | Metric |
|---|---|
| 5 | * Presentation - good commenting, name in the files, followed naming convention, no spaghetti code, sensible allocation of responsibilities |
| 10 | * Grid - the grid is the right size and in the right place |
| 15 | * Shapes - three shapes, drawn correctly |
| 5 | * Composed structure - at least one composed structure |
| 10 | * Scenegraph - correct implementation and usage |
| 10 | * Camera - a smoothly operating mobile camera |
| 5 | Camera "nose" - add a front end to the vehicle that stays fixed in front of the camera |
| 5 | Procedural "city" - use loops and possibly some randomness to fully populate your world (mine is a simple example of this) |
| 10 | Structure animation - alter the scenegraph to allow animation. This could mean adding a new node type that takes an update function, or allowing a final transformation in the shape node. Lots of ways to tackle this. |
| 5-15 | Collision detection - don't allow the camera to run through structures. I will award points based on complexity. If you have a regular grid pattern for your buildings and just keep the camera in a certain portion of the grid, that would be on the low end of the points. Actually detecting structures would be at the high end |
Create a directory called username_hw05 and put your code inside (making sure your HTML file is called index.html). Please zip the directory and submit it to Assignment five on Canvas.
I would also like to make all of the submission live off of the website. If you would like to opt out from this, please tell me so in the text box on the assignment submission form.