CS 312 - Assignment Two
Goals
- Implement basic React components with state and callbacks
- Use a linter and code formatter to write more consistent, more maintainable, higher quality, code
The goal of this assignment is to learn the basics of creating a single page web application (SPA) with React. In this and the next few assignments, you will be developing a miniature version of Wikipedia named "Simplepedia". Implementing Simplepedia will provide hands-on experience developing a full single page web application in preparation for completing your large project. Simplepedia was first developed with Davin Chia in Fall 2016 as an independent study.
As with previous assignments, you will need to do additional research (online) to successfully complete the assignment.
Prerequisites
- Visit the Assignment 2 page on Replit (or click the 'Start Project' link for Assignment 2 on our team page).
- Click the GitHub classroom link to accept the assignment.
- Return to the assignment on Repl.it and go to the Version Control panel.
- Click the button to create a new git repository (not the one for connecting to an existing repo).
- Open the shell and follow the instructions on your GitHub repository for connecting an existing repository:
git remote add origin repo-namewhererepo-nameis the name of your repository (e.g.,https://github.com/csci312-s21/assignment02-ChristopherPAndrews.git)git branch -m maingit push -u origin main
- Update the author information in the
package.jsonfile - Install the module dependencies by typing
npm installin the shell
Once you have the dependencies installed you can start the development server by clicking the 'Run' button (I've provided a .replit file to configure the button to use npm run dev).
Background
For the first installment, you will be constructing the basic interface for looking at a collection of articles. Here is the goal you are aiming for:
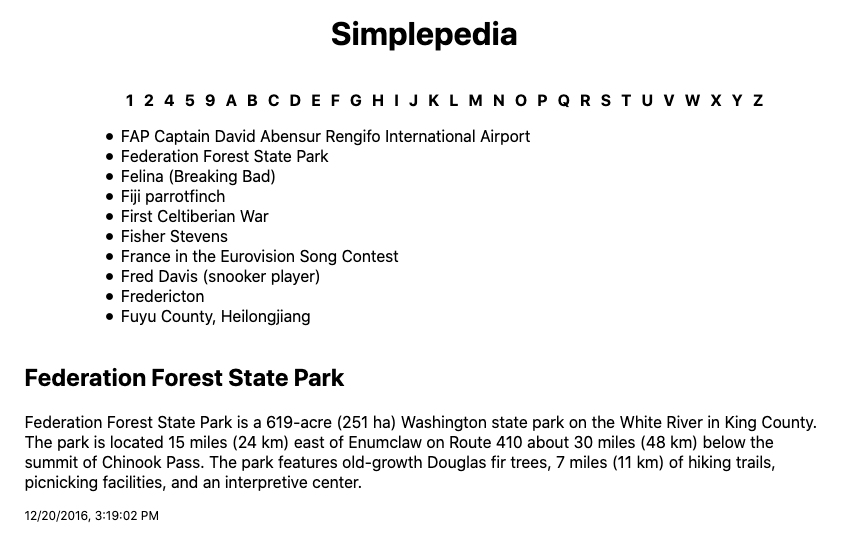
Along the top of the page, there is a list of sections. Clicking on one of the sections displays the appropriate list of articles. Clicking on an article title displays the contents of the article at the bottom of the page. All of the articles have a title, some contents, and a modification date.
As with previous assignments an initial set of (failing) tests are provided as part of the skeleton (run with npm test). These tests are intended to help you as you develop your application and to ensure that the grading scripts can successfully test your assignment. Code that passes all of the provided tests is not guaranteed to be correct. However, code that fails one or more these tests does not meet the specification. Testing React applications is a future topic and so you are not expected to write any additional tests for this assignment.
You will notice that there is already some code present in index.js. In order for this application to be interesting, we need to load in some data. We do this by directly importing seed.json, which contains our data.
In addition, the Simplepedia component has some basic structure already filled in for you.
Assignment
Part 1: The article browser
With React, the first step is to break the interface down into components:
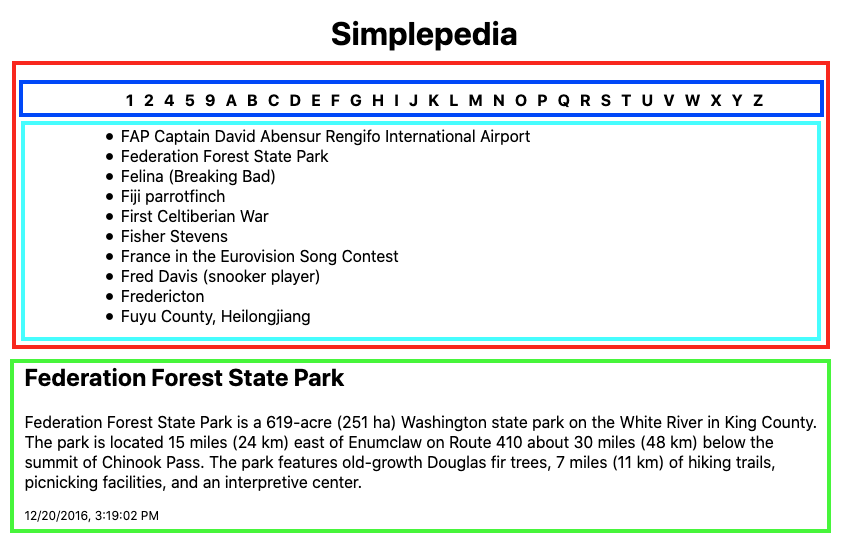
We will break this interface down into two main components: IndexBar (red rectangle) and Article (green rectangle). We will further break down the IndexBar into IndexSections (blue) and IndexTitles (cyan).
I recommend reviewing introduction to JSX before starting your assignment.
IndexBar
The first component you should create is the IndexBar. Implement the IndexBar in the provided file src/components/IndexBar.js. You should pass two props to the IndexBar component. The first, named collection, should be a reference to the data collection, and the second, named select, should be a callback to be called when a title is selected. Make sure to use these names (and any others specified in the assignment) to facilitate automated testing.
Internally, you will have two sub-components: a list of sections (SectionsBar), and a list of titles in the current section (TitleList). Create these in their own files.
The component which provides the list of available sections (the letters across the top of the window) should take two props: a list of the sections and a callback for reporting when a section is selected. The list itself should be implemented as an unordered list (<ul>). Wrap this in a <div>. I've provided you with styling to turn the list into the vertical bar. You can enable this by adding a className to the div with the value {styles.sectionList}. You will need to import styles from the appropriate CSS module in the styles directory.
You should add an onClick callback to each <li> in the list which sets the current section as state for the IndexBar.
TitleList should be the list of titles found within the current section. This component should also have two props: a list of the articles in the current section, and a callback for reporting which article has been selected (you can pass along the select). This should also be implemented as an unordered list. You should sort the titles like shown in the screenshot ("unordered" just means that the list isn't displayed as a numbered list). For these <li>, make sure to invoke the callback that was passed down with the props when the user clicks on a title, returning the article corresponding to the title.
The primary job of the IndexBar component will be to break up the collection for the two sub-components and to maintain state (the currently selected section). When the section list reports a new section selection, IndexBar should set its local state, which will cause a re-render (and thus a new selection of titles for the title list). In addition, when a new section is selected, you should invoke the select callback with a missing (thus undefined) argument to indicate that the current article should be "cleared", i.e. not show.
Finally, if there isn't a currently selected section, a message asking the user to select a section should be displayed instead of the sub-component containing the titles.
Building lists of list items
When you are done, the HTML must have this structure:
<div>
  <div class="section-list">
    <ul>
      <li data-testid="section">A</li>
      <li data-testid="section">B</li>
    </ul>
  </div>
  <div>
    <ul>
      <li data-testid="title">Apple</li>
      <li data-testid="title">Anteater</li>
      <li data-testid="title">Auton</li>
    </ul>
  </div>
</div>
Here is one way to transform an array into an HTML list:
const list = ['daleks', 'cybermen', 'ice warriors', 'autons'];
const races = list.map(race => (<li key={race}>{race}</li>));

return (<ul>{races}</ul>);
which would produce this HTML:
<ul>
  <li>daleks</li>
  <li>cybermen</li>
  <li>ice warriors<?li>
  <li>autons</li>
</ul>
The alert among you will have noticed the key property in the above example. When we make a list of React components, it is important that we add a key property so that React can tell which one is which. I will explain more in class, and you can learn more in the React documentation on lists. Regardless, you need to provide a unique string or value as the key.
Important In addition to adding the key property to each <li>, I would like you to add a data-testid property. For the sections, please set this to "section" (i.e. data-testid="section") and for the titles, please set this to "title" (e.g., data-testid="title"). My tests will only pass if these are present, so please make sure that you supply these.
Article
The next component you should implement is Article (in the provided file src/components/Article.js). The Article component should take one prop named article that is an article record Object. Our articles have three fields: "title", "contents", and "edited" (the time the article was last edited).
In your Article component display the title, text, and date. The entire article should be contained in a <div> with a className property with value {styles.article}. The title should use an h2 tag, and the contents and timestamp can use simple p tags. The date should have the className {styles.timestamp}. To ensure consistent date formatting, render the date in a locale-relevant format with Date.toLocaleString. Note that this will not necessarily match the picture -- it will render the date as appropriate for your computer/browser/environment.
Putting the components together
In src/pages/index.js integrate your newly created components. You need to make sure that you pass the appropriate callbacks as props so that clicking on a section opens the title list, and clicking on a title opens the related article for viewing. If there is no article to show at the current moment, best practice is to not render the Article component (via conditional rendering) as opposed to rendering Article but having it somehow manage an undefined article prop. The latter forces additional complexity into the Article component and in the case of more complex components can trigger unnecessary computation.
Reflection
In the README.md file, I would like you to write a brief reflection about your assignment.
If it meets the requirements (passes all of the automated checks), write how comfortable with your solution. Did you use good development practices, or is it a hacky, last minute solution. Do you understand your own solution? How much effort did you put into it? Do you feel like you could do a similar assignment with more ease?
If it doesn't yet meet the requirements, what are you struggling with? What does it not do correctly? What have you done to try to correct it? How hard have you tried to correct it? How much effort have you put into the entire assignment?
Put a date on the reflection and if you do any revisions, add another dated reflection below it.
Finishing up
To be accepted, your submission should not have ESLint warnings or errors when run with npm run lint (or npx eslint .). Remember than you can fix many errors automatically with npm run lint -- --fix (although since ESLint can sometimes introduce errors during this process, we suggest committing your code before running "fix" so you can rollback any changes). As described in the README, the assignment skeleton includes the Prettier package and associated hooks to automatically reformat your code to a consistent standard when you commit. Thus do not be surprised if your code looks slightly different after a commit.
Submit your assignment by pushing your changes to the GitHub repository. If the repl.it button doesn't seem to be working (check on GitHub), try running git push --all origin in the shell to see the error message. Once the repository is fully pushed, submit your repository to Gradescope as described here. You can submit (push to GitHub and submit to Gradescope) multiple times.
Portions of your assignment will undergo automated grading. Make sure to follow the specifications exactly, otherwise the tests will fail (even if your code generally works as intended). Use the provided test suite (run with npm test) to get immediate feedback on whether your code follows the specification. Because of the increased complexity of a React application, Gradescope can take minutes to run all of the tests. Thus you will be more efficient testing locally and only submitting to Gradescope when you are confident your application meets the specification.
FAQ
Do I need to implement unit testing?
We will learn later in the semester how to unit test React components. For this assignment you are not expected to implement any of your own unit tests. The skeleton includes some unit tests to assist you in your development and to ensure that the grading scripts can automatically test your submission.
What if the tests and assignment specification appear to be in conflict?
Please post to Slack so that we can resolve any conflict or confusion ASAP.
Last updated 03/09/2021